Heute bauen wir ein Newsletter-System mit PHP und MySQL-Hintergrund auf. Das Tutorial behandelt den Aufbau eines Systems, das mehrere Newsletter-Listen und das Senden von Nachrichten an bestimmte Listen ermöglicht.
Hey Leute, wir werden also ein ziemlich komplexes Newsletter-System aufbauen, also fangen wir an! Sie werden zwei Ressourcen für das Projekt benötigen.
- Das Silk-Icon-Set wird verwendet, um der Anwendung etwas visuelles Flair zu verleihen.
- Der Swift PHP Mailer wird verwendet, um unsere E-Mails zu versenden.
Schritt 1:Anwendungsskelett erstellen
Wenn ich ein Projekt beginne, gestalte ich gerne die Ordner, bevor ich mit dem Codieren beginne, also machen wir das jetzt. Erstellen Sie zunächst das Gesamtprojektverzeichnis. Erstellen Sie als Nächstes einen Ordner mit dem Namen admin in Ihrem Projektordner. Fügen Sie dann im Admin-Ordner zwei Ordner mit den Namen media und swift hinzu. Erstellen Sie schließlich einen Ordner mit dem Namen Bilder im Medienverzeichnis. Außerdem können Sie den Swift lib-Ordner in dem von uns erstellten Swift-Ordner ablegen. Sie können auch die sechs Seidensymbole kopieren, die wir verwenden werden:
- bullet_green.png
- bullet_red.png
- delete.png
- email_go.png
- finden.png
- page_edit.png
Ich werde das restliche Tutorial zum Erstellen des CRUD strukturieren:Erstellen, Lesen, Aktualisieren und Löschen für vier unserer sechs Modelle. Eine andere wird durch andere Aktionen bearbeitet, und die sechste wird nicht die CRUD-Aktionen erstellen.
Lassen Sie uns jetzt zuerst unsere Datenbank erstellen, und unsere Tabellen werden später schrittweise erstellt. Wir werden jetzt mit dem Codieren beginnen. Außerdem, als Hinweis, gehe ich davon aus, dass wir mit Dateien in unserem Admin-Ordner arbeiten werden, sofern ich nichts anderes spezifiziere, da sich der meiste Code in diesem Ordner befindet.
Schritt 2:Anwendungskonfiguration
Jede Anwendung wird eine Art Konfigurationsdatei haben, und wir werden jetzt unsere erstellen. Fahren Sie fort und erstellen Sie eine Datei namens config.php und fügen Sie Folgendes hinzu:
# admin/config.php
	<?php
	// DB Settings
	define('DB_SERVER', 'localhost');
	define('DB_USER', 'root');
	define('DB_PASSWORD', '');
	define('DB_NAME', 'nettuts_ns_demo');

	define('FROM_EMAIL', 'no_reply@ohyeahemail.com');
	define('FROM_NAME', 'oh yeah email!');


	session_start();
	require_once 'classes.php';
	$mini = false;
	$nonav = false;
	error_reporting(0);
Der erste Abschnitt richtet also unsere Datenbankvariablen ein, stellen Sie also sicher, dass Sie sie so bearbeiten, dass Ihre lokale Konfiguration zuerst verwendet wird. Unser nächster Klappentext richtet einige E-Mail-Attribute ein, die wir später verwenden werden. Der letzte Abschnitt startet unsere Sitzung, damit wir darauf zugreifen können, erfordert unsere Datei "classes.php" (die erstellen wir in nur einer Sekunde), legt die Standardeinstellungen für einige Layoutoptionen fest und setzt dann die Fehlerberichterstattung auf 0, um lästige Warnungen zu stoppen . Wenn Sie jedoch Probleme zu haben scheinen, kommentieren Sie diese Zeile aus.
Machen Sie jetzt weiter und erstellen Sie unsere Datei "classes.php" und fügen Sie Folgendes hinzu:
# admin/classes.php
	<?php
	// Authentication
	function validate_user($username, $pw) {
	    if (check_username_and_pw($username, $pw)) {
	        header('Location: index.php');
	    } else {
	        $_SESSION['error'] = "Login error.";
	        header('Location: login.php');
	    }
	}

	function logged_in() {
	    if ($_SESSION['authorized'] == true) {
	        return true;
	    } else {
	        return false;
	    }
	}

	function login_required() {
	    if(logged_in()) {
	        return true;
	    } else {
	        header('Location: login.php');
	    }
	}
	// mysql
	function query($sql) {
	  $link = new mysqli(DB_SERVER, DB_USER, DB_PASSWORD, DB_NAME) or die('There was a problem connecting to the database.');

	  $stmt = $link->prepare($sql) or die('error');
	  $stmt->execute();
	  $meta = $stmt->result_metadata();

	  while ($field = $meta->fetch_field()) {
	    $parameters[] = &$row[$field->name];
	  }

	  $results = array();
	  call_user_func_array(array($stmt, 'bind_result'), $parameters);

	  while ($stmt->fetch()) {
	    foreach($row as $key => $val) {
	      $x[$key] = $val;
	    }
	    $results[] = $x;
	  }

	  return $results;
	  $results->close();
	  $link->close();
	}

	function count_query($query) {
	  $link = new mysqli(DB_SERVER, DB_USER, DB_PASSWORD, DB_NAME) or die('There was a problem connecting to the database.');
	  if($stmt = $link->prepare($query)) {
	    $stmt->execute();
	    $stmt->bind_result($result);
	    $stmt->fetch();
	    return $result;
	    $stmt->close();
	  }
	  $link->close();
	}

	function check_username_and_pw($u, $pw) {
	  $link = new mysqli(DB_SERVER, DB_USER, DB_PASSWORD, DB_NAME) or die('There was a problem connecting to the database.');

	  $query = "SELECT * FROM users WHERE username = ? AND password = ? LIMIT 1";
	  if($stmt = $link->prepare($query)) {
	    $p = md5($pw);
	    $stmt->bind_param('ss', $u, $p);
	    $stmt->execute();
	    $stmt->bind_result($id, $username, $pw);
	    if($stmt->fetch()) {
	      $_SESSION['authorized'] = true;
	      $_SESSION['username'] = $username;
	      return true;
	    } else {
	      return false;
	    }
	    $stmt->close();
	  }
	  $link->close();
	}
Das ist ein riesiges Stück Code, und ich werde es durchgehen. Unsere erste Funktion verarbeitet, wenn der Benutzer unser Login postet, und sendet dann die Daten an unsere check_username_and_pw-Funktion. Unsere Funktion „logged_in“ gibt einfach zurück, ob ein Benutzer angemeldet ist. Unsere Funktion „login_required“ prüft, ob wir angemeldet sind, und schickt uns, wenn nicht, zur Anmeldeseite.
Die nächste Funktion mit dem einfachen Namen query() führt eine Abfrage in unserer Datenbank durch und wurde von Jeffrey Way erstellt. Ich habe die Funktionen zum Erstellen von Links und zum Schließen hinzugefügt, um es noch einfacher zu machen. Unsere nächste Funktion habe ich speziell erstellt, damit wir problemlos COUNT SQL-Abfragen ausführen können, und unsere check_username_and_pw-Funktion prüft, ob wir einen Benutzer mit derselben E-Mail-Adresse und demselben MD5-Hash-Passwort finden können, und setzt in diesem Fall unsere Sitzungsvariablen.
Schritt 3:Anwendungslayout
Unsere nächste Datei, an der wir arbeiten werden, ist unsere layout.php-Datei, also machen Sie weiter und erstellen Sie sie. In unserem Head-Bereich deklarieren wir einfach unsere regulären XHTML-Deklarationen. Wie Sie bemerken, fügen wir den Titel der Seite automatisch zu einer anderen Zeichenfolge für unseren Titel hinzu. Dann haben wir ein Stylesheet (erstellen Sie das auch in unserem Medienordner). Danach öffnen wir unser Body-Tag und prüfen, ob wir ein Mini-Layout möchten, und fügen gegebenenfalls eine Klasse hinzu. Dann haben wir unseren Header und prüfen dann, ob wir unsere Navigation wollen, und wenn ja, zeigen wir unsere Tabs. Ich habe auch eine Möglichkeit hinzugefügt, eine aktuelle Klasse für jede Registerkarte hinzuzufügen. Wir haben dann auch einen Logout-Link und dann unseren Container div. Dabei fügen wir einen h3-Tag mit unserem Titel hinzu und wiederholen dann unseren Inhalt.
# admin/layout.php
	<!DOCTYPE html PUBLIC "-//W3C//DTD XHTML 1.1//EN" "https://www.w3.org/TR/xhtml11/DTD/xhtml11.dtd">
	<html xmlns="https://www.w3.org/1999/xhtml" >
	    <head>
	        <meta http-equiv="Content-Type" content="text/html; charset=utf-8" />

	        <title><?php echo $title; ?> » my newsletter app</title>
	        <!-- Stylesheets -->
	        <!-- <link rel="stylesheet" href="media/style.css" type="text/css" media="all" /> -->
	    </head>
	    <body<?php if ($mini == true) { ?> class="mini"<?php } ?>>
	        <div id="header">
	            <h1><a href="index.php">my newsletter app</a></h1>
	        </div>
	        <?php if ($nonav == false) { ?>
	        <div id="nav">
	            <a href="messages.php"<?php if($tab == 'mess') {?>class="current"<?php } ?>>messages</a>
	            <a href="subscribers.php"<?php if($tab == 'sub') {?>class="current"<?php } ?>>subscribers</a>
	            <a href="newsletters.php"<?php if($tab == 'nl') {?>class="current"<?php } ?>>newsletters</a>
	            <a href="templates.php"<?php if($tab == 'temp') {?>class="current"<?php } ?>>templates</a>
	            <span class="right">
	                <a href="logout.php">log out</a>
	            </span>
	        </div>
	        <?php } ?>
	        <div id="container">
	            <h3><?php echo $title;?></h3>
	            <?php echo $content; ?>
	        </div>
	    </body>
	</html>
Jetzt werden wir unsere index.php-Seite erstellen, nur damit wir sie gestalten können. Öffnen Sie index.php und fügen Sie hinzu:
# admin/index.php
		<?php
		require_once 'config.php';
		$title = "Home!";
		$content = <<<EOF
		<h3>current stats</h3>
		Our home page!
		EOF;
		include 'layout.php'; ?>
In diesem Fall benötigen wir also unsere Konfigurationsdatei, richten unseren Titel ein, richten dann unsere Inhaltsvariable ein und benötigen zuletzt unsere Layoutdatei. Wenn Sie es zum ersten Mal öffnen, sollte es so aussehen:


Öffnen Sie nun unser Stylesheet. Ich verwende gerne die 960.gs-Reset- und Typografie-Stile, komprimiert in TextMate. Der Anfang meiner CSS-Datei sieht also so aus:
# admin/media/style.css
	/* reset */
	html,body,div,span,applet,object,iframe,h1,h2,h3,h4,h5,h6,p,blockquote,pre,a,abbr,acronym,address,big,cite,code,del,dfn,em,font,img,ins,kbd,q,s,samp,strike,strong,sub,sup,tt,var,b,u,i,center,dl,dt,dd,ol,ul,li,fieldset,form,label,legend,table,caption,tbody,tfoot,thead,tr,th,td{margin:0;padding:0;border:0;outline:0;font-size:100%;vertical-align:baseline;background:transparent}body{line-height:1}ol,ul{list-style:none}blockquote,q{quotes:none}blockquote:before,blockquote:after,q:before,q:after{content:'';content:none}:focus{outline:0}ins{text-decoration:none}del{text-decoration:line-through}table{border-collapse:collapse;border-spacing:0}
	/* typography */
	body{font:13px/1.5 Helvetica,Arial,'Liberation Sans',FreeSans,sans-serif}a:focus{outline:1px dotted invert}hr{border:0 #ccc solid;border-top-width:1px;clear:both;height:0}h1{font-size:25px}h2{font-size:23px}h3{font-size:21px}h4{font-size:19px}h5{font-size:17px}h6{font-size:15px}ol{list-style:decimal}ul{list-style:square}li{margin-left:30px}p,dl,hr,h1,h2,h3,h4,h5,h6,ol,ul,pre,table,address,fieldset{margin:10px 0;}
Lassen Sie uns zuerst unsere Hauptelemente gestalten, also fügen Sie die folgenden Stile hinzu:
# admin/media/style.css
	#header {width:85%; margin:0 auto;}
	#header h1 a {text-decoration:none; color:#000;}
	#container {width:85%; background: #111; margin:5px auto; color:#fff; padding:10px;}
Jetzt sollte Ihre Seite so aussehen:


Wenn wir nun die Registerkarten mit einem Navigationshintergrund und dann einem Hover-Hintergrund auf jedem der Links gestalten, sollten Sie Folgendes sehen:
# admin/media/style.css
	/* tabs */
	#nav {margin:0 auto 2px;padding:10px;width:85%; background:#444;}
	#nav a { padding:12px 10px; margin:0; color:#fff; text-decoration:none; text-align:center;}
	#nav a.current, #nav a:hover {background:#111;}
#nav span.right {float:right;} 


Während wir jetzt an der Datei arbeiten, fügen Sie die folgenden Stile für unser Mini-Layout, Formulareingaben, Tabellen, große Links und unsere Fehler- und Erfolgsmeldungen hinzu.
# admin/media/style.css
	body.mini #header {width:30%; text-align:center;}
	body.mini #container {width:30%;}

	/* form */
	form input.text {width:95%; font-size:16px;}
	form textarea {width:95%; height:100%;}
	/* table */
	table {width:98%; text-align:right; border:rgb(128,128,128); font-size:12px; margin:5px 10px; color:#000;background:#fff;}
	table th {background-color: rgb(229, 229, 229); border:1px solid rgb(187, 187, 187); padding:3px 6px; font-weight:normal; color:#000;}
	table tr td {border: 1px solid rgb(221, 221, 221); padding:3px 6px;}
	table tr:hover {background-color: rgb(240, 240, 240);color:#000;}
	/* a */
	a.large {padding: 5px; color:#000; background:#eee; text-decoration:none; margin:5px;}
	a.large.right {float:right;}
	a.large:hover, a.large.current {background:#444; color:#fff;}
	/* messages */
	#message {margin: 5px 10px; padding: 4px; display:block;text-align:center;}
	#message.error {background:#FFEBE8;border: 1px solid #CC0000;color:#CC0000;}
	#message.success {border:solid 1px #349534; background:#C9FFCA;color:#008000;}
Das sind einige Stile, die ich gerne in all meinen Projekten verwende. Nachdem wir das Layout fertiggestellt haben, fahren wir mit der Authentifizierung fort.
Schritt 4:Authentifizierung
Wir werden mit einem sehr einfachen Authentifizierungssystem arbeiten. Erstellen Sie eine login.php und platzieren Sie Folgendes darin:
# admin/login.php
	<?php
	require_once 'config.php';
	if(logged_in()) {header('Location: index.php');}
	$title = "login";
	$nonav = true;
	$mini = true;
	if($_POST && (!empty($_POST['username']) ) && (!empty($_POST['password']))) {
	    validate_user($_POST['username'], $_POST['password']);
	}
	$error = $_SESSION['error'];
	$content = <<<EOF
	$error
	<form action="login.php" method="post">
	    <p>
	        <label for="username">username:</label><br />
	        <input type="text" name="username" class="text" />
	    </p>
	    <p>
	        <label for="password">password:</label><br />
	        <input type="password" name="password" class="text" />
	    </p>
	    <p>
	        <input type="submit" value="login" />
	    </p>
	</form>
	EOF;
	include 'layout.php'; ?>
Ich werde jeden Teil des Codes erklären. Zuerst benötigen wir unsere Konfigurationsdatei. Als nächstes prüfen wir, ob wir eingeloggt sind, und wenn ja, leiten wir nach Hause weiter. Als nächstes legen wir den Titel und unsere Layoutoptionen fest. Dann prüfen wir, ob wir einen POST haben und ob der POST einen Benutzernamen und ein Passwort hatte, und wenn ja, rufen wir die Funktion validate_user aus unserer Klassendatei auf. Als nächstes setzen wir die Variable error auf unsere Sitzungsfehler, und dann richten wir unser Formular ein und geben alle Fehler aus. Jetzt erstellen wir unsere Logout-Seite, erstellen Sie also logout.php und fügen Sie Folgendes ein:
# admin/logout.php
	<?php
	require_once 'config.php';
	$_SESSION = array();
	session_destroy();
	header('Location: login.php');
	?>
Wir benötigen erneut unsere Konfigurationsdatei, setzen unsere Sitzung auf ein leeres Array, zerstören dann unsere Sitzung und leiten auf unsere Anmeldeseite um. Nachdem Sie dies alles getan haben, sollte Ihre Anmeldeseite wie folgt aussehen:


Wir werden auch einen Benutzerdatensatz (und unsere Tabelle) erstellen, damit wir die Authentifizierungslogik hinzufügen können und Sie die Seiten mit dem Code oben anzeigen können. Um einen Benutzer mit dem Benutzernamen admin und einem geheimen Passwort zu erstellen. Um dies hinzuzufügen, führen Sie diese SQL aus:
CREATE TABLE `users` (
	   `id` int(10) AUTO_INCREMENT,
	   `username` varchar(50),
	   `password` varchar(32),
	   PRIMARY KEY (`id`)
	) ENGINE=MyISAM DEFAULT CHARSET utf8;

	INSERT INTO `users` (`id`, `username`, `password`) VALUES
	('1', 'admin', '5ebe2294ecd0e0f08eab7690d2a6ee69');
Schritt 5:Newsletter
Ich habe diese Anwendung so konzipiert, dass sie sehr flexibel ist. Ich wollte, dass Sie (der Benutzer) so viele Newsletter erstellen und verwalten können, wie Sie möchten. Also müssen wir zuerst unsere Datenbanktabelle erstellen. Hier ist der SQL-Code aus dem Export meiner Demoanwendung:
	CREATE TABLE `newsletters` (
	   `id` int(10) AUTO_INCREMENT,
	   `name` varchar(50),
	   `description` varchar(255),
	   `visible` varchar(10),
	   PRIMARY KEY (`id`)
	) ENGINE=MyISAM DEFAULT CHARSET utf8;
Da wir nun unsere Newsletter-Tabelle haben, werden wir die Seiten für jede Aktion erstellen. Erstellen Sie vier Dateien mit den Namen:newsletters.php, newsletters_delete.php, newsletters_edit.php und newsletters_new.php. Öffnen Sie zunächst die Datei newsletters.php:
# admin/newsletters.php
	<?php
	require_once 'config.php';
	login_required();
	$title = "newsletters";
	$newsletters = query("SELECT * FROM newsletters ORDER BY id ASC");
	$tab = 'nl';
	$table = "";
	foreach($newsletters as $row) {
	    $dlink = '<a href="newsletters_delete.php?id='.$row['id'].'" onclick="return confirm(\'Are you sure you want to delete this newsletter?\');" title="delete"><img src="media/images/delete.png" alt="delete"/></a>';
	    $elink = '<a href="newsletters_edit.php?id='.$row['id'].'" title="edit" ><img src="media/images/page_edit.png" alt="edit"/></a>';
	    if($row['visible'] == "1") {$visible = '<img src="media/images/bullet_green.png" />';} else {$visible = '<img src="media/images/bullet_red.png" />';}
	    $table .= "<tr><td>".$row['id']."</td><td>".$row['name']."</td><td>".$row['description']."</td><td>$visible</td><td>".$dlink." ".$elink."</td></tr>\n";
	}
	$message = error_messages();
	$content = <<<EOF
	<a href="newsletters_new.php" class="large">new newsletter »</a>
	$message
	<table>
	    <tr>
	        <th></th>
	        <th>name</th>
	        <th>description</th>
	        <th>visible</th>
	        <th></th>
	    </tr>
	    $table
	</table>
	EOF;
	include 'layout.php'; ?>
Diese Datei hat also das gleiche Grundgefühl wie unsere Anmeldeseite. Wir benötigen unsere Konfiguration, stellen sicher, dass wir eingeloggt sind, legen unseren Titel fest. Als nächstes verwenden wir unsere query()-Funktion, um eine SELECT-Abfrage durchzuführen, um alle unsere Newsletter zu finden. Wir setzen dann die aktuelle Registerkarte für unser Layout. Nachdem wir das von unserer Abfrage zurückgegebene Array durchlaufen und das Tabellenlayout erstellt haben. Dann rufen wir eine noch unbekannte Funktion auf und erstellen unsere Seite. Bevor Sie die Seite anzeigen können, müssen Sie Folgendes zu Ihrer Klassen.php-Datei hinzufügen, um unsere Fehlermeldungen einfach zu handhaben:
# admin/classes.php
	// Render error messages
	function error_messages() {
	    $message = '';
	    if($_SESSION['success'] != '') {
	        $message = '<span class="success" id="message">'.$_SESSION['success'].'</span>';
	        $_SESSION['success'] = '';
	    }
	    if($_SESSION['error'] != '') {
	        $message = '<span class="error" id="message">'.$_SESSION['error'].'</span>';
	        $_SESSION['error'] = '';
	    }
	    return $message;
	}
Sie werden zwar wahrscheinlich keine Daten haben, aber wenn Sie ein paar Datensätze haben, sieht es so aus:(wenn auch etwas weniger gequetscht)


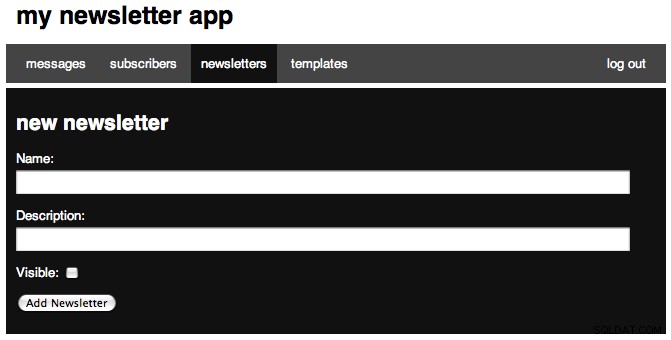
Jetzt werden wir an unserer neuen Aktion arbeiten, also öffnen Sie newsletters_new.php und fügen Sie Folgendes hinzu:
# admin/newsletters_new.php
	<?php
	require_once 'config.php';
	login_required();
	$tab = 'nl';

	if(isset($_POST['submitted'])) {
	    $link = new mysqli(DB_SERVER, DB_USER, DB_PASSWORD, DB_NAME) or die('There was a problem connecting to the database.');
	    $sql = "INSERT INTO NEWSLETTERS (name, description) VALUES ( '".$_POST['name']."' , '".$_POST['description']."' )";
	    $stmt = $link->query($sql) or die($link->error);
	    $stmt->close;
	    $_SESSION['success'] = "Added newsletter.";
	    header('Location: newsletters.php');
	}
	$title = "new newsletter";
	$content = <<<EOF
	<form action="newsletters_new.php" method='POST'>
	    <p>
	        <label for="name">Name:</label><br />
	        <input type='text' name='name' class="text" />
	    </p>
	    <p>
	        <label for="description">Description:</label>
	        <input type="text" name="description" class="text" />
	    </p>
	    <p>
	        <input type='submit' value='Add Newsletter' />
	        <input type='hidden' value='1' name='submitted' />
	    </p>
	</form>
	EOF;
	include 'layout.php'; ?>
Ich hoffe, Sie haben das Muster oben in jeder unserer Dateien bemerkt. Wir benötigen zuerst unsere config.php-Datei, stellen dann sicher, dass wir angemeldet sind, und legen dann unsere aktuelle Registerkarte fest, und wir fügen dann eine zusätzliche Logik für die Handhabung von POSTs hinzu, und dann legen wir unseren Titel, unseren Inhalt fest und rendern dann die Seite. Der POST-Abschnitt ist ziemlich einfach zu verstehen, daher erkläre ich ihn schnell.
Wir prüfen zunächst, ob ein Artikel mit dem Namen Eingereicht versendet wurde. Dies ist das versteckte Feld, das wir nach dem Senden-Button haben. Als nächstes erstellen wir einen Link zu unserer Datenbank, indem wir die Variablen aus unserer Konfigurationsdatei verwenden. Als nächstes erstellen wir unsere SQL-Einfügeabfrage unter Verwendung unserer POSTed-Variablen. Als nächstes fragen wir (nicht unsere Funktion) die Datenbank ab, und wenn ein Fehler ausgelöst wird, zeigen wir den zurückgegebenen Fehler. Als nächstes schließen wir die Abfrage, setzen dann unsere Erfolgsmeldung und leiten dann zur Auflistungsseite weiter. Ihre Seite sollte folgendermaßen aussehen:


Als nächstes werden wir an unserer Bearbeitungsseite arbeiten und Folgendes hinzufügen:
# admin/newsletters_edit.php
	<?php
	require_once 'config.php';
	login_required();
	$tab = 'nl';

	if(isset($_POST['submitted'])) {
	    $link = new mysqli(DB_SERVER, DB_USER, DB_PASSWORD, DB_NAME) or die('There was a problem connecting to the database.');
	    if(isset($_POST['visible'])) {$visible = 1;}else{$visible = 0;}
	    $sql = "UPDATE NEWSLETTERS SET name='".$_POST['name']."', description='".$_POST['description']."', visible=".$visible." WHERE id=".$_POST['id']."";
	    $stmt = $link->query($sql) or die($link->error);
	    $stmt->close;
	    $_SESSION['success'] = "Edited newsletter.";
	    header('Location: newsletters.php');
	}
	$title = "edit newsletter";
	$id = (int) $_GET['id'];
	$results = query("SELECT * FROM newsletters WHERE id='".$id."' LIMIT 1");
	$name = $results[0]['name'];
	$description = $results[0]['description'];
	$visible = ($results[0]['visible'] == "1") ? 'checked="checked"' : '';
	$content = <<<EOF
	<form action="newsletters_edit.php" method='POST'>
	    <p>
	        <label for="name">Name:</label><br />
	        <input type='text' name='name' class="text" value="$name" />
	    </p>
	    <p>
	        <label for="description">Description:</label>
	        <input type="text" name="description" class="text" value="$description" />
	    </p>
	    <p>
	        <label for="visible">Visible:</label>
	        <input type="checkbox" name="visible" value="true" $visible/>
	    </p>
	    <p>
	        <input type='submit' value='Edit Newsletter' />
	        <input type='hidden' value='1' name='submitted' />
	        <input type='hidden' value='$id' name='id' />
	    </p>
	</form>
	EOF;
	include 'layout.php'; ?>
Wie alle unsere Dateien beginnen wir mit demselben Block. Nach unserem POST-Block (über den ich gleich sprechen werde) setzen wir id auf unsere angeforderte ID und stellen sicher, dass es sich um eine ganze Zahl handelt. Wir verwenden dann unsere Abfragefunktion, um den Newsletter zu finden, mit dem wir arbeiten, und setzen einige Variablen auf die zurückgegebenen Ergebnisse. Sie fragen sich vielleicht, warum wir vor jedem Wert eine [0] gesetzt haben und der Grund dafür ist, dass die Abfragefunktion ein Array aller Datensätze zurückgibt und jeder Datensatz ein Array ist, sodass wir auf das erste Array in unserer Ergebnisvariablen zugreifen müssen . Die Zeile, in der wir die Variable sichtbar setzen, ist eigentlich eine komprimierte if/else-Anweisung. der if-Teil ist ==1, wenn das wahr ist, wird die Variable auf „checked“ gesetzt, sonst auf nichts. Dann haben wir unser Formular.
Unser POST-Block ist unserer neuen Seite sehr ähnlich und beginnt auf den restlichen Seiten immer gleich. Wir prüfen dann, ob das Kontrollkästchen aktiviert war, und setzen hier erneut eine Variable. Dann haben wir unsere UPDATE-Abfrage, führen die Abfrage erneut aus, setzen unsere Erfolgsmeldung und leiten dann nach Hause weiter. So sieht das Formular aus und die Nachricht nach der Bearbeitung:


Die letzte Seite für diesen Abschnitt ist die einfachste, da es sich um die Löschseite handelt. Öffnen Sie die Datei und fügen Sie Folgendes ein:
# admin/newsletters_delete.php
	<?php
	require_once 'config.php';
	login_required();
	$id = (int) $_GET['id'];
	$link = new mysqli(DB_SERVER, DB_USER, DB_PASSWORD, DB_NAME) or die('There was a problem connecting to the database.');
	$sql = "DELETE FROM newsletters WHERE id=$id LIMIT 1";
	$stmt = $link->query($sql) or die($link->error);
	if($link->affected_rows) {
	    $_SESSION['success'] = "Newsletter deleted.";
	} else {
	    $_SESSION['error'] = 'Nothing deleted.';
	}
	header('Location: newsletters.php');
In diesem Block benötigen wir unsere Konfiguration, stellen sicher, dass wir angemeldet sind, speichern dann die angeforderte ID in einer Variablen, erstellen eine MySQL-Verbindung, richten unsere SQL-Abfrage ein und führen dann die Abfrage aus. Als nächstes prüfen wir, ob eine Zeile betroffen war, und setzen eine entsprechende Nachricht. Wir leiten dann auf die Newsletter-Seite weiter. Herzlichen Glückwunsch, Sie haben den ersten von vier CRUD-Abschnitten abgeschlossen. Als nächstes werden wir am CRUD für unsere Vorlagen arbeiten.
Schritt 6:Vorlagen
Unsere Anwendung ermöglicht auch mehrere Vorlagen, die alle in der Datenbank gespeichert sind. Zuerst erstellen wir unsere Datenbanktabelle:
	CREATE TABLE `templates` (
	   `id` int(10) AUTO_INCREMENT,
	   `name` varchar(50),
	   `columns` tinyint(5),
	   `body` text,
	   PRIMARY KEY (`id`)
	) ENGINE=MyISAM DEFAULT CHARSET utf8;
Wir haben eine automatisch inkrementierende ID-Spalte, eine Namensspalte, eine Spaltenspalte, um die Anzahl der Spalten zu speichern (die Anwendung skaliert nur auf 2 Spalten, was ausreichen sollte, aber leicht erweitert werden kann. Dies könnte auch für verschiedene Abschnitte verwendet werden .), und unser Körper. Genau wie beim letzten Mal müssen wir jede unserer Seiten erstellen, und wir werden eine templates.php-Seite sowie templates_new.php, templates_edit.php, templates_delete.php und templates_preview.php haben. Wir werden zuerst an unserer templates.php-Datei arbeiten, also öffne sie und füge ein:
# admin/templates.php
	<?php
	require_once 'config.php';
	login_required();
	$title = "templates";
	$tab = 'temp';
	$templates = query("SELECT id,name,columns FROM templates ORDER BY id ASC");
	$table = "";
	foreach($templates as $row) {
	    $plink = '<a href="" onClick="window.open(\'templates_preview.php?id='.$row['id'].'\',width=800,height=600)" title="preview"><img src="media/images/find.png" alt="preview"/></a>';
	    $dlink = '<a href="templates_delete.php?id='.$row['id'].'" onclick="return confirm(\'Are you sure you want to delete this template?\');" title="delete"><img src="media/images/delete.png" alt="delete"/></a>';
	    $elink = '<a href="templates_edit.php?id='.$row['id'].'" title="edit"><img src="media/images/page_edit.png" alt="edit"/></a>';
	    $table .= "<tr><td>".$row['id']."</td><td>".$row['name']."</td><td>".$row['columns']."</td><td>".$plink." ".$dlink." ".$elink."</td></tr>\n";
	}
	$message = error_messages();
	$content = <<<EOF
	<a href="templates_new.php" class="large">new template »</a>
	$message
	<table>
	    <tr>
	        <th></th>
	        <th>name</th>
	        <th>columns</th>
	        <th></th>
	    </tr>
	    $table
	</table>
	EOF;
	include 'layout.php'; ?>
Auch hier fangen wir wieder mit den Basics an. Wir führen dann eine Abfrage durch, um alle unsere Vorlagen zu finden. Wir durchlaufen dann jedes Array in Vorlagen und erstellen eine Tabelle. Wir erhalten dann unsere Fehler- (und Erfolgs-) Nachrichten und dann unseren Inhalt. Ihre Seite sollte in etwa so aussehen:


Gehen Sie nun zu unserer neuen Seite und fügen Sie Folgendes ein:
# admin/templates_new.php
	<?php
	require_once 'config.php';
	login_required();
	$tab = 'temp';
	if(isset($_POST['submitted'])) {
	    $link = new mysqli(DB_SERVER, DB_USER, DB_PASSWORD, DB_NAME) or die('There was a problem connecting to the database.');
	    $sql = "INSERT INTO templates (name, columns, body) VALUES ( '".$_POST['name']."' , ".$_POST['columns'].", '".mysql_real_escape_string($_POST['body'])."' )";
	    $stmt = $link->query($sql) or die($link->error);
	    $stmt->close;
	    $_SESSION['success'] = "Added template.";
	    header('Location: templates.php');
	}
	$title = "new template";
	$content = <<<EOF
	<form action="templates_new.php" method='POST'>
	    <p>
	        <label for="name">Name:</label><br />
	        <input type='text' name='name' class="text" />
	    </p>
	    <p>
	        <label for="columns">Columns</label>
	        <select name="columns">
	            <option value="1">Single Column Layout</option>
	            <option value="2">Two Column Layout</option>
	        </select>
	    </p>
	    <p>
	        <label for="description">Body: (raw html)</label><br />
	        Use %content% for a single column layout, %leftcol% and %rightcol% for a two column layout.<br />
	        <textarea name="body" rows="35"></textarea>
	    </p>
	    <p>
	        <input type='submit' value='Add Template' />
	        <input type='hidden' value='1' name='submitted' />
	    </p>
	</form>
	EOF;
	include 'layout.php'; ?>
Also haben wir wieder unseren gleichen Header. Unser POST erstellt erneut eine MySQL-Verbindung, dann erstellen wir unsere Abfrage und verwenden mysql_real_escape_string, um alle Zeichen in den Datensatz zuzulassen, und dann führen wir unsere Abfrage aus, legen unsere Erfolgsmeldung fest und leiten zu unserer Vorlagenliste weiter. Wenn Sie sich unser Formular ansehen, bitte ich Sie auch darum, Variablen für unseren Inhalt einzufügen, und ich werde Ihnen später zeigen, wie dies ins Spiel kommt, wenn wir eine Nachricht mit einer Vorlage abgleichen. Ihre Seite sollte folgendermaßen aussehen:


Als nächstes werden wir an unserer Bearbeitungsseite arbeiten. Wie Sie bemerkt haben, besteht ein Großteil dieses Codes aus Kopieren und Einfügen bei allen Aktionen, also machen Sie es sich leicht.
# admin/templates/edit.php
	<?php
	require_once 'config.php';
	login_required();
	$tab = 'temp';
	if(isset($_POST['submitted'])) {
	    $link = new mysqli(DB_SERVER, DB_USER, DB_PASSWORD, DB_NAME) or die('There was a problem connecting to the database.');
	    $sql = "UPDATE templates SET name='".$_POST['name']."', body='".mysql_real_escape_string($_POST['body'])."', columns=".$_POST['columns']." WHERE id=".$_POST['id']."";
	    $stmt = $link->query($sql) or die($link->error);
	    $stmt->close;
	    $_SESSION['success'] = "Edited template.";
	    header('Location: templates.php');
	}
	$title = "edit template";
	$id = (int) $_GET['id'];
	$results = query("SELECT * FROM templates WHERE id='".$id."' LIMIT 1");
	$name = $results[0]['name'];
	$templatedata = stripslashes(htmlspecialchars($results[0]['body']));
	$content = <<<EOF
	<form action="templates_edit.php" method='POST'>
	    <p>
	        <label for="name">Name:</label><br />
	        <input type='text' name='name' class="text" value="$name"/>
	    </p>
	    <p>
	        <label for="columns">Columns</label>
	        <select name="columns">
	            <option value="1">Single Column Layout</option>
	            <option value="2">Two Column Layout</option>
	        </select>
	    </p>
	    <p>
	        <label for="body">Body: (raw html)</label><br />
	        Use %content% for a single column layout, %leftcol% and %rightcol% for a two column layout.<br />
	        <textarea name="body" rows="35">$templatedata</textarea>
	    </p>
	    <p>
	        <input type='submit' value='Edit Template' />
	        <input type='hidden' value='1' name='submitted' />
	        <input type='hidden' value='$id' name='id' />
	    </p>
	</form>
	EOF;
	include 'layout.php'; ?>
We start with the same intro, then our POST block, our title, then our requested id. After, we try and find the template we are working with, then sets three variables so that we can inset them into our content block. We also convert all of the tags we stored to HTML characters so everything will display. When looking at our POST block, you will notice we create our link, then our query and again use mysql_real_escape_string to save everything, execute our query, and then set our message, and redirect to our templates list. Your edit page (with a sample record) should look like:


Now we will create another delete page, so open up our delete page and paste in:
# admin/templates_delete.php
	<?php
	require_once 'config.php';
	login_required();
	$id = (int) $_GET['id'];
	$link = new mysqli(DB_SERVER, DB_USER, DB_PASSWORD, DB_NAME) or die('There was a problem connecting to the database.');
	$sql = "DELETE FROM templates WHERE id=$id LIMIT 1";
	$stmt = $link->query($sql) or die($link->error);
	if($link->affected_rows) {
	    $_SESSION['success'] = "Template deleted.";
	} else {
	    $_SESSION['error'] = 'Nothing deleted.';
	}
	header('Location: templates.php');
I hope you have picked up the pattern here, this is a very simple page. Now we are going to work on an extra page that is not part of the CRUD spectrum; we are going to create a preview page. The binoculars in the action part on the table is the link for each one (in a new window). So open up our preview page. The page is very simple, we find our template and echo the data, and then append a javascript close button. The code looks like:
# admin/templates_preview.php
	<?php
	require_once 'config.php';
	login_required();
	$id = (int) $_GET['id'];
	$data = query("SELECT body FROM templates WHERE id=$id LIMIT 1");
	$template = $data[0]['body'];
	?>
	<?php echo $template; ?>
	<center><button type="button" onclick="self.close();">close window</button></center>
And an example preview looks like:


Now we have finished with our Templates, we are ready to move onto the next step!
Step 7:Subscribers
So now we are going to work with our subscribers! We are going to create two tables. The first:
CREATE TABLE `subscribers` (
	   `id` tinyint(10) AUTO_INCREMENT,
	   `name` varchar(50),
	   `email` varchar(50),
	   PRIMARY KEY (`id`)
	) ENGINE=MyISAM DEFAULT CHARSET utf8;
Refers to each subscriber, and the second:
CREATE TABLE `subscriptions` (
	   `id` tinyint(10) AUTO_INCREMENT,
	   `subscriber_id` tinyint(10),
	   `newsletter_id` tinyint(10),
	   PRIMARY KEY (`id`)
	) ENGINE=MyISAM DEFAULT CHARSET utf8;
Creates a table for our many-to-many relationship with our newsletters. A subscriber can have multiple subscription to newsletters, so they can subscribe to multiple ones, and each newsletter can have many subscribers. To create the most dynamic solution, we have a linking table.
Let's first create our files. The files we are going are going to have are subscribers.php, subscribers_delete.php, and subscribers_edit.php. Our create action will be created later for the front-end. First open up subscribers.php and paste in:
# admin/subscribers.php
	<?php
	require_once 'config.php';
	login_required();
	$title = "subscribers";
	$tab = 'sub';
	$table = "";
	$messages = query("SELECT * FROM subscribers ORDER BY id ASC");
	foreach($messages as $row) {
		$dlink = '<a href="subscribers_delete.php?id='.$row['id'].'" onclick="return confirm(\'Are you sure you want to delete this subscriber?\');" title="delete"><img src="media/images/delete.png" alt="delete"/></a>';
		$elink = '<a href="subscribers_edit.php?id='.$row['id'].'" title="edit"><img src="media/images/page_edit.png" alt="edit"/></a>';
		$table .= '<tr><td>'.$row['id'].'</td><td>'.$row['name'].'</td><td>'.$row['email'].'</td><td>'.$dlink.' '.$elink.'</td></tr>';
	}
	$message = error_messages();
	$content = <<<EOF
	$message
	<table>
		<tr>
			<th></th>
			<th>name</th>
			<th>email</th>
			<th></th>
		</tr>
		$table
	</table>
	EOF;
	include 'layout.php'; ?>
We have basically the same listing pages as before, except this time we will be finding our subscribers. Your page (with some sample data) should look like:


Now we will move on to our edit page:
# admin/subscribers_edit.php
	<?php
	require_once 'config.php';
	login_required();
	$tab = 'sub';

	if(isset($_POST['submitted'])) {
	    $id = (int) $_POST['id'];
	    $link = new mysqli(DB_SERVER, DB_USER, DB_PASSWORD, DB_NAME) or die('There was a problem connecting to the database.');
	    $sql = "UPDATE subscribers SET name='".$_POST['name']."', email='".$_POST['email']."' WHERE id=$id";
	    $stmt = $link->query($sql) or die($link->error);
	    $stmt->close;

	    foreach($_POST['newsletter'] as $n) {
	        if($n['exists'] != '1' && $n['subscribe'] == "true") { // If we want to subscribe but the record doesnt exist
	            $nlid = $n['nlid'];
	            $sql = "INSERT INTO subscriptions (subscriber_id, newsletter_id) VALUES ('$id', '$nlid')";
	            $stmt = $link->query($sql) or die($link->error);
	            $stmt->close;
	        } elseif ($n['exists'] == '1' && $n['subscribe'] != "true") {// Else if we had an exits but we want to unsubscribe
	            $subid = $n['subid'];
	            $sql = "DELETE FROM subscriptions WHERE id=$subid LIMIT 1";
	            $stmt = $link->query($sql) or die($link->error);
	            $stmt->close;
	        }
	    }
	    $_SESSION['success'] = "Edited subscriber.";
	    header('Location: subscribers.php');
	}
	$title = "edit newsletter";
	$id = (int) $_GET['id'];

	$subscriber = query("SELECT * FROM subscribers WHERE id='$id'");
	$name = $subscriber[0]['name'];
	$email = $subscriber[0]['email'];

	$newsletters = query("SELECT * FROM newsletters");
	$subs = query("SELECT * FROM subscriptions WHERE subscriber_id='".$id."'");
	$subscriptions = '';
	foreach($newsletters as $nl) {
	    $s = false;
	    $subid = '';
	    foreach($subs as $sub) {
	        if($sub['newsletter_id'] == $nl['id']) {$s = true; $subid = $sub['id'];}
	    }
	    $checked = ($s == true) ? 'checked="checked"' : '';
	    $subscriptions .= '
	    <input type="checkbox" name="newsletter['.$nl["id"].'][subscribe]" value="true" '.$checked.'/>
	    <label for="newsletter['.$nl["id"].']">'.$nl['name'].'</label>
	    <input type="hidden" name="newsletter['.$nl["id"].'][exists]" value="'.$s.'" />
	    <input type="hidden" name="newsletter['.$nl["id"].'][nlid]" value="'.$nl['id'].'" />
	    <input type="hidden" name="newsletter['.$nl["id"].'][subid]" value="'.$subid.'" /><br />
	    ';


	}
	$content = <<<EOF
	<form action="subscribers_edit.php" method='POST'>
	    <p>
	        <label for="name">Name:</label><br />
	        <input type='text' name='name' class="text" value="$name" />
	    </p>
	    <p>
	        <label for="email">Email</label><br />
	        <input type="text" name="email" class="text" value="$email" />
	    </p>
	    <p>
	        <strong>Newsletters:</strong><br />
	        $subscriptions
	    </p>
	    <p>
	        <input type='submit' value='Edit Subscriber' />
	        <input type='hidden' value='1' name='submitted' />
	        <input type='hidden' value='$id' name='id' />
	    </p>
	</form>
	EOF;
	include 'layout.php'; ?>
This page is fairly different so I will explain each part. The header is the same we have been using. I'll skip the POST block and come back to it. We then continue the same code. We next find our current subscriber. Next we find all newsletters (this includes ones that are not visible - visible mean visible to the public) and then all of the subscriber's subscriptions. We next loop through every newsletter record returned, we next reset some values. Next, we loop through every subscription the user has, and if the subscription's newsletter_id is equal to the current newsletter we are looping we set $s true, and $subid equal to the subscription id. We then set the variable $checked equal to either checked or nothing depending on whether a subscription was found for this subscriber and the current newsletter in the loop. Next we create the checkbox form area, with a lot of hidden fields. First, we have the actual checkbox with a name that will create an array for each checkbox. We then have our label, and next we output whether or not the subscription exists, the newsletter_id and then the subscription_id for when the subscription exists. After which we have our normal content.
Now, if we move on to our POST block. We first get the id posted from our hidden field at the bottom. We next create our MySQL link. Next we have our first SQL query where we update the subscriber record. Next we loop through every newsletter checkbox. The first conditional statement checks to see if the POSTed data says we do not have an existing subscription, and the user wants to subscribe to the newsletter. To handle this, we are going to perform a SQL INSERT into our subscriptions table where our subscriber_id is the same as the user_id we are editing, and newsletter_id equal to the 'nlid' value POSTed by one of our hidden fields. We then execute that SQL INSERT query. The elseif conditional statement says that if our subscription exists, but the checkbox was unchecked so we unsubscribe, we need to delete the subscription. We handle this with a SQL DELETE query. To form our query we set $subid equal to the posted value for our 'subid'. We then create our query by deleting the record where the subscription id equals our variable of $subid. Next we execute the query, set our session success message, and then redirect back to our subscribers page. Your final edit page should look like:(filled with sample data)


We have one last page to work on for the subscribers part of the backend:the delete page. Just like before, this page is very simple:
# admin/subscribers_delete.php
	<?php
	require_once 'config.php';
	login_required();
	$id = (int) $_GET['id'];
	$link = new mysqli(DB_SERVER, DB_USER, DB_PASSWORD, DB_NAME) or die('There was a problem connecting to the database.');
	$sql = "DELETE FROM subscribers WHERE id=$id LIMIT 1";
	$stmt = $link->query($sql) or die($link->error);
	if($link->affected_rows) {
	    $_SESSION['success'] = "Subscriber deleted.";
	} else {
	    $_SESSION['error'] = 'Nothing deleted.';
	}
	header('Location: subscribers.php');
Step 8:Messages
I will tell you upfront, this section has the most pages. We will be working with seven now, and creating one more in Step 10. First, we are going to create our messages table with this SQL:
CREATE TABLE `messages` (
	   `id` tinyint(10) AUTO_INCREMENT,
	   `subject` varchar(255),
	   `leftcol` text,
	   `rightcol` text,
	   `template_id` tinyint(10),
	   PRIMARY KEY (`id`)
	) ENGINE=MyISAM DEFAULT CHARSET utf8;
Next, we'll create the files for this step. Creates seven files, each named messages.php, messages_delete.php, messages_edit.php, messages_new.php, messages_new_step2.php, messages_new_step3.php, and messages_preview.php. Let's first open up messages.php and make it look like:
# admin/messages.php
	<?php
	require_once 'config.php';
	login_required();
	$title = "messages";
	$tab = 'mess';
	$table = "";
	$messages = query("SELECT * FROM messages ORDER BY id ASC");
	foreach($messages as $row) {
	    $slink = '<a href="messages_send.php?id='.$row['id'].'" title="send message"><img src="media/images/email_go.png" alt="send message"/></a>';
	    $plink = '<a href="messages_preview.php?id='.$row['id'].'" target="_new" title="preview"><img src="media/images/find.png" alt="preview"/></a>';
	    $dlink = '<a href="messages_delete.php?id='.$row['id'].'" onclick="return confirm(\'Are you sure you want to delete this message?\');" title="delete"><img src="media/images/delete.png" alt="delete"/></a>';
	    $elink = '<a href="messages_edit.php?id='.$row['id'].'" title="edit"><img src="media/images/page_edit.png" alt="edit"/></a>';
	    $table .= '<tr><td>'.$row['id'].'</td><td>'.$row['subject'].'</td><td><a href="" onClick="window.open(\'templates_preview.php?id='.$row['template_id'].'\',width=800,height=600)" title="preview"><img src="media/images/find.png" alt="preview"/></a></td><td>'.$slink.' '.$plink.' '.$dlink.' '.$elink.'</td></tr>';
	}
	$message = error_messages();
	$content = <<<EOF
	<a href="messages_new.php" class="large">new message »</a>
	$message
	<table>
	    <tr>
	        <th></th>
	        <th>subject</th>
	        <th>template</th>
	        <th></th>
	    </tr>
	    $table
	</table>
	EOF;
	include 'layout.php'; ?>
This is our routine table, except we now have 4 'extra' links now, one to send the message, one to preview, one to edit, and one to delete. Your page should look like:


Now we are going to start work on our new pages. The first page is where all messages start out, and then you can progress on and enter the actual message on the next page. The reason for this is because we first need to create the initial message in the DB and so we can find information about the template. The step2 page is basically the edit page (there are six line differences according to FileMerge). Open up our new file and paste the following:
# admin/messages_new.php
	<?php
	require_once 'config.php';
	login_required();
	$tab = 'mess';
	if(isset($_POST['subject'])) {
	    $link = new mysqli(DB_SERVER, DB_USER, DB_PASSWORD, DB_NAME) or die('There was a problem connecting to the database.');
	    $sql = "INSERT INTO messages (subject, template_id) VALUES ( '".$_POST['subject']."' , ".$_POST['template'].")";
	    $stmt = $link->query($sql) or die($link->error);
	    $i = query("SELECT id FROM messages WHERE subject='".$_POST['subject']."' AND template_id=".$_POST['template']." ");
	    $id = $i[0]['id'];
	    $stmt->close;
	    $_SESSION['success'] = "Added template.";
	    header('Location: messages_new_step2.php?id=' + $id);
	}
	$title = "new message";
	$templates = query("SELECT id,name,columns FROM templates");
	$tselect = '<select name="template">';
	foreach($templates as $row) {
	    $tselect .= '<option value="'.$row['id'].'">'.$row['name'].'</option>';
	}
	$tselect .= "</select>";
	$content = <<<EOF
	<form action="messages_new.php" method='POST'>
	    <p>
	        <label for="subject">Subject:</label><br />
	        <input type='text' name='subject' class="text" />
	    </p>
	    <p>
	        <label for="template">Template:</label>
	        $tselect
	    </p>
	    <p>
	        <button onclick="">Continue »</button>
	    </p>
	</form>
	EOF;
	include 'layout.php'; ?>
This page is very similar to what our other new pages look like, but this one was one change in the POST block. Right after we perform the SQL INSERT, we find the most recent insert id. Now this is not the perfect solution, but I prefer it to performing another SQL query to find a row using unindexed columns. This step should look like:


We then redirect to step2, so let's open up the file:
# admin/messages_new_step2.php
	<?php
	require_once 'config.php';
	login_required();
	$title = "new message - step 2";
	$tab = 'mess';
	$id = (int) $_GET['id'];

	$mess = query("SELECT * FROM messages WHERE id=$id");
	$message = $mess[0];
	$subject = $message['subject'];

	$templates = query("SELECT id,name,columns FROM templates");
	$tselect = '<select name="template">';
	foreach($templates as $row) {
	    if($message['template_id'] == $row['id']) {
	        $selected = ' selected="selected"';
	        if($row['columns'] == "1") {
	            $textareas = '<p><label for="body">Body: (raw html)</label><br /><textarea name="body" rows="35"></textarea></p>';
	        } else {
	            $textareas = '<p><label for="leftcol">Left column: (raw html)</label><br /><textarea name="leftcol" rows="35"></textarea></p>
	            <p><label for="rightcol">Right column: (raw html)</label><br /><textarea name="rightcol" rows="35"></textarea></p>';
	        }

	    } else {$selected = '';}
	    $tselect .= '<option value="'.$row['id'].'"'.$selected.'>'.$row['name'].'</option>';
	}
	$tselect .= '</select>';

	// Check for a POST
	if(isset($_POST['submitted'])) {
	    $link = new mysqli(DB_SERVER, DB_USER, DB_PASSWORD, DB_NAME) or die('There was a problem connecting to the database.');
		$template = query("SELECT columns FROM templates WHERE id=".$message['template_id']);
	    if($template[0]['columns'] == "1") {
	        $body = mysql_real_escape_string($_POST['body']);
	        $sql = "UPDATE messages SET subject='".$_POST['subject']."', leftcol='$body' WHERE id=$id";
	    } else {
	        $leftcol = mysql_real_escape_string($_POST['leftcol']);
	        $rightcol = htmlentities($_POST['rightcol']);
	        $sql = "UPDATE messages SET subject='".$_POST['subject']."', leftcol='$leftcol', rightcol='$rightcol' WHERE id=$id";
	    }
	    $stmt = $link->query($sql) or die($link->error);
	    $stmt->close;
	    header('Location: messages_new_step3.php?id='.$id);
	}

	$content = <<<EOF
	<form action="messages_new_step2.php?id=$id" method='POST'>
	    <p>
	        <label for="subject">Subject:</label><br />
	        <input type='text' name='subject' class="text" value="$subject"/>
	    </p>
	    <p>
	        <label for="template">Template:</label>
	        $tselect
	    </p>
	    $textareas
	    <p>
	        <input type='submit' value='Continue »' />
	        <input type='hidden' value='1' name='submitted' />
	    </p>
	</form>
	EOF;
	include 'layout.php'; ?>
Hopefully you have gotten the gist of all the pages and understand the page above. We have our normal heading. we then set our id from our GET request. Next we find the message we are working with, then we find all the templates and construct a drop down. We also use this look to define whether we will have one or two textareas. Next we have our POST block, which creates the link, then checks to see if we are working with one or two columns and creates the appropriate SQL query. After that we have our form. Your form should look like:


Now we will continue onto step 3, so open up the file and paste:
# admin/messages_new_step3.php
	<?php
	require_once 'config.php';
	login_required();
	$title = "new message - step 3";
	$id = (int) $_GET['id'];
	$tab = 'mess';

	$mess = query("SELECT * FROM messages WHERE id=$id");
	$message = $mess[0];
	$subject = $message['subject'];

	$content = <<<EOF
	<a href="messages_preview.php?id=$id" class="large" target="_new">preview »</a><br />
	<p>Do you want to <a href="messages.php" class="large">return to messages</a> or <a href="messages_send.php?id=$id" class="large">send the message</a>?</p>
	EOF;
	include 'layout.php';
	?>
The page is very simple and is the end of creating a message. It offers us a few links. The first is a link to preview the message. The next offers to take us back home. The third offers to take us to send the message (Step 10). The page looks like:


Now we are going to continue on to our edit page. I will not explain it as it is the same file as messages_new_step2.php, so you can refer there.
# admin/messages_edit.php
	<?php
	require_once 'config.php';
	login_required();
	$title = "edit message";
	$id = (int) $_GET['id'];
	$tab = 'mess';

	$mess = query("SELECT * FROM messages WHERE id=$id");
	$message = $mess[0];
	$subject = $message['subject'];

	$templates = query("SELECT id,name,columns FROM templates");
	$tselect = '<select name="template">';
	foreach($templates as $row) {
	    if($message['template_id'] == $row['id']) {
	        $selected = ' selected="selected"';
	    } else {$selected = '';}
	    $tselect .= '<option value="'.$row['id'].'"'.$selected.'>'.$row['name'].'</option>';
	}
	$tselect .= '</select>';

	$mid = $message['template_id'];
	$template = query("SELECT id,name,columns FROM templates WHERE id=$mid");
	if($template[0]['columns'] == "1") {
	    $textareas = '<p><label for="body">Body: (raw html)</label><br /><textarea name="body" rows="35">'.$message['leftcol'].'</textarea></p>';
	} else {
	    $textareas = '<p><label for="leftcol">Left column: (raw html)</label><br /><textarea name="leftcol" rows="35">'.$message['leftcol'].'</textarea></p>
	    <p><label for="rightcol">Right column: (raw html)</label><br /><textarea name="rightcol" rows="35">'.$message['rightcol'].'</textarea></p>';
	}

	// Check for a POST
	if(isset($_POST['submitted'])) {
	    $link = new mysqli(DB_SERVER, DB_USER, DB_PASSWORD, DB_NAME) or die('There was a problem connecting to the database.');
	    if($template[0]['columns'] == "1") {
	        $body = mysql_real_escape_string($_POST['body']);
	        $sql = "UPDATE messages SET subject='".$_POST['subject']."', leftcol='$body' WHERE id=$id";
	    } else {
	        $leftcol = mysql_real_escape_string($_POST['leftcol']);
	        $rightcol = htmlentities($_POST['rightcol']);
	        $sql = "UPDATE messages SET subject='".$_POST['subject']."', leftcol='$leftcol', rightcol='$rightcol' WHERE id=$id";
	    }
	    $stmt = $link->query($sql) or die($link->error);
	    $stmt->close;
	    $_SESSION['success'] = "Edited message.";
	    header('Location: messages.php');
	}

	$content = <<<EOF
	<form action="messages_edit.php?id=$id" method='POST'>
	    <p>
	        <label for="subject">Subject:</label><br />
	        <input type='text' name='subject' class="text" value="$subject"/>
	    </p>
	    <p>
	        <label for="template">Template:</label>
	        $tselect
	    </p>
	    $textareas
	    <p>
	        <input type='submit' value='Save »' />
	        <input type='hidden' value='1' name='submitted' />
	    </p>
	</form>
	EOF;
	include 'layout.php'; ?>
The page will look almost identical to our step 2, but the textarea will have content. Now we will create the delete page with:
# admin/messages_delete.php
	<?php
	require_once 'config.php';
	login_required();
	$id = (int) $_GET['id'];
	$link = new mysqli(DB_SERVER, DB_USER, DB_PASSWORD, DB_NAME) or die('There was a problem connecting to the database.');
	$sql = "DELETE FROM messages WHERE id=$id LIMIT 1";
	$stmt = $link->query($sql) or die($link->error);
	if($link->affected_rows) {
	    $_SESSION['success'] = "Message deleted.";
	} else {
	    $_SESSION['error'] = 'Nothing deleted.';
	}
	header('Location: messages.php'); ?>
That page should also look familiar. The final page we are going to work on in this step is our preview page, so open it up and place:
# admin/messages_preview.php
	<?php
	require_once 'config.php';
	login_required();
	$id = (int) $_GET['id'];

	$mess = query("SELECT * FROM messages WHERE id=$id");
	$message = $mess[0];
	$subject = $message['subject'];
	$tid = $message['template_id'];

	$data = query("SELECT body,columns FROM templates WHERE id=$tid LIMIT 1");
	$template = $data[0]['body'];

	if($data[0]['columns'] == "1") {
	    $leftcol = $message['leftcol'];
	    $body = str_replace('%content%', $leftcol, $template);
	} else {
	    $leftcol = $message['leftcol'];
	    $rightcol = $message['rightcol'];
	    $b = str_replace('%leftcol%', $leftcol, $template);
	    $body = str_replace('%rightcol%', $rightcol, $b);
	}
	?>
	<?php echo $body; ?>
	<button type="button" onclick="self.close();">close window</button>
This file is somewhat different than you have seen, so I'll walk you through it. First have have our normal heading. Next we find the current message we are working with, and set a few variables to the results. Next we find the template we are working with and set a variable equal to the body. Next, we have a conditional statement that checks to see the number of columns the template has. If it has we use the PHP function str_replace to replace the %content% tag we have with our actual content. Otherwise, we first perform a str_replace for the left column, and then on the result of that we perform str_replace again for the right column. Now we are ready to continue onto the front-end.
Step 9:The Front-End
We have finally reached the front-end! For this step and this step only, I will assume the files we are working with are in the root of the project (so not the admin folder, the one containing it). We are going to be working with four files here, so go ahead and create index.php, preferences.php, subscribe.php and a style.css file. First open up our index.php file and paste:
# index.php
	<?php
	require_once 'admin/config.php';
	$newsletters = query("SELECT * FROM newsletters WHERE visible=1");
	$subscriptions = '';
	foreach($newsletters as $nl) {
	    $subscriptions .= '
	    <input type="checkbox" name="newsletter['.$nl["id"].'][subscribe]" value="true" '.$checked.'/>
	    <label for="newsletter['.$nl["id"].']">'.$nl['name'].'</label>
	    <input type="hidden" name="newsletter['.$nl["id"].'][nlid]" value="'.$nl['id'].'" /><br />
	    '.$nl["description"].'<br />
	    ';
	}
	?>
	<!DOCTYPE html PUBLIC "-//W3C//DTD XHTML 1.1//EN" "https://www.w3.org/TR/xhtml11/DTD/xhtml11.dtd">
	<html xmlns="https://www.w3.org/1999/xhtml" >
	    <head>
	        <meta http-equiv="Content-Type" content="text/html; charset=utf-8" />

	        <title>my newsletters</title>
	        <!-- Stylesheets -->
	        <link rel="stylesheet" href="style.css" type="text/css" media="all" />
	    </head>
	    <body>
	        <div id="header">
	            <h1>my newsletters</h1>
	        </div>
	        <div id="container">
	            <h3>Subscribe to our newsletters!</h3>
	            <form action="subscribe.php" method="POST">
	                <p>
	                    <label for="name">Name:</label><br />
	                    <input type='text' name='name' class="text" />
	                </p>
	                <p>
	                    <label for="email">Email</label><br />
	                    <input type="text" name="email" class="text" />
	                </p>
	                <p>
	                    <strong>Newsletters:</strong><br />
	                    <?php echo $subscriptions; ?>
	                </p>
	                <p>
	                    <input type='submit' value='Subscribe »' />
	                    <input type='hidden' value='1' name='submitted' />
	                </p>
	            </form>
	        </div>
	    </body>
	</html>
I'll explain the page first and then we will get to the picture so-far and the page styling. In the PHP section at the top we require our config.php file (now in the admin directory), then find all of our publicly visible newsletters and create a check box array. You will notice that we are not handling the POSTed data here, and I chose to do that in our subscribe.php, and we will get to that, but first let's style the page. The page should currently look like:

First I added the 960.gs reset file like I did in our other stylesheet. Then I added the three following styles to make the design look like:
# style.css
	#header, #container {width:65%;margin:0 auto; padding:0.7%;}
	#container {background:#ccc;}
	form input.text {width:95%; font-size:16px;}
#message.success {border:solid 1px #349534; background:#C9FFCA;color:#008000;} 

So now that we have a clean and simple page, we are going to continue on and work on our subscribe.php file. Go ahead and open the file and paste:
# subscribe.php
	<?php
	require_once 'admin/config.php';

	if(isset($_POST['submitted'])) {
	    $link = new mysqli(DB_SERVER, DB_USER, DB_PASSWORD, DB_NAME) or die('There was a problem connecting to the database.');
	    $name = $_POST['name'];
	    $email = $_POST['email'];

	    $sql = "INSERT INTO subscribers (name, email) VALUES ('$name', '$email')";
	    $stmt = $link->query($sql) or die($link->error);
	    $stmt->close;

	    $sql = "SELECT id FROM subscribers WHERE name='$name' AND email='$email' LIMIT 1";
	    $subscriber = query($sql);
	    $id = $subscriber[0]['id'];

	    foreach($_POST['newsletter'] as $n) {
	        if($n['subscribe'] == "true") { // If we want to subscribe but the record doesnt exist
	            $nlid = $n['nlid'];
	            $sql = "INSERT INTO subscriptions (subscriber_id, newsletter_id) VALUES ('$id', '$nlid')";
	            $stmt = $link->query($sql) or die($link->error);
	            $stmt->close;
	        }
	    }
	} else {header('Location: index.php');}
	?>
	<!DOCTYPE html PUBLIC "-//W3C//DTD XHTML 1.1//EN" "https://www.w3.org/TR/xhtml11/DTD/xhtml11.dtd">
	<html xmlns="https://www.w3.org/1999/xhtml" >
	    <head>
	        <meta http-equiv="Content-Type" content="text/html; charset=utf-8" />

	        <title>my newsletters</title>
	        <!-- Stylesheets -->
	        <link rel="stylesheet" href="style.css" type="text/css" media="all" />
	    </head>
	    <body>
	        <div id="header">
	            <h1>my newsletters</h1>
	        </div>
	        <div id="container">
	            <h3>Thank you for subscribing!</h3>
	        </div>
	    </body>
	</html>
This page is very much like our edit subscribers page, but no DELETE SQL queries happen here. We simply check to make sure we have all POSTed data. We then set a few variables to our POSTed data, and then create and perform a SQL INSERT query to add the person to our subscribers table. After which we perform a SQL query to find that just created subscriber (insert_id was not working this time for me). We then loop through all of the POSTed newsletters and check to see if we want to subscribe to them, and perform SQL INSERTs when needed. If all goes to plan, you see a nice screen like the one below:


We have on last page here to work on, and that is the preferences.php file. This is where a user can edit their email subscription. I am going to split the page in two. First we have our PHP block:
# preferences.php
	<?php
	require_once 'admin/config.php';

	if(isset($_POST['submitted'])) {
	    $id = (int) $_POST['id'];
	    $link = new mysqli(DB_SERVER, DB_USER, DB_PASSWORD, DB_NAME) or die('There was a problem connecting to the database.');
	    $sql = "UPDATE subscribers SET name='".$_POST['name']."', email='".$_POST['email']."' WHERE id=$id";
	    $stmt = $link->query($sql) or die($link->error);
	    $stmt->close;

	    foreach($_POST['newsletter'] as $n) {
	        if($n['exists'] != '1' && $n['subscribe'] == "true") { // If we want to subscribe but the record doesnt exist
	            $nlid = $n['nlid'];
	            $sql = "INSERT INTO subscriptions (subscriber_id, newsletter_id) VALUES ('$id', '$nlid')";
	            $stmt = $link->query($sql) or die($link->error);
	            $stmt->close;
	        } elseif ($n['exists'] == '1' && $n['subscribe'] != "true") {// Else if we had an exits but we want to unsubscribe
	            $subid = $n['subid'];
	            $sql = "DELETE FROM subscriptions WHERE id=$subid LIMIT 1";
	            $stmt = $link->query($sql) or die($link->error);
	            $stmt->close;
	        }
	    }
	    $_SESSION['success'] = "Preferences saved.";
	}

	if(isset($_GET['email'])) {$email = $_GET['email']; $display = 'form';} else {$display = 'find';}

	$subscriber = query("SELECT * FROM subscribers WHERE email='$email'");
	if($subscriber || $display == 'find') {
	    $id = $subscriber[0]['id'];
	    $name = $subscriber[0]['name'];
	    $email = $subscriber[0]['email'];
	} else {header('Location: index.php');}

	$newsletters = query("SELECT * FROM newsletters WHERE visible=1");
	$subs = query("SELECT * FROM subscriptions WHERE subscriber_id='".$id."'");
	$subscriptions = '';
	foreach($newsletters as $nl) {
	    $s = false;
	    $subid = '';
	    foreach($subs as $sub) {
	        if($sub['newsletter_id'] == $nl['id']) {$s = true; $subid = $sub['id'];}
	    }
	    $checked = ($s == true) ? 'checked="checked"' : '';
	    $subscriptions .= '
	    <input type="checkbox" name="newsletter['.$nl["id"].'][subscribe]" value="true" '.$checked.'/>
	    <label for="newsletter['.$nl["id"].']">'.$nl['name'].'</label>
	    <input type="hidden" name="newsletter['.$nl["id"].'][exists]" value="'.$s.'" />
	    <input type="hidden" name="newsletter['.$nl["id"].'][nlid]" value="'.$nl['id'].'" />
	    <input type="hidden" name="newsletter['.$nl["id"].'][subid]" value="'.$subid.'" /><br />
	    ';
	}
	$message = error_messages();
	?>
In this block, a lot is going on. First, we include our config file. Next, we check for a POST, and if we have one, we update our database. This portion is copied exactly from our subscribers_edit.php file so you can look there for a bit more explanation. Next depending on if we have a get request, we set our variable (this variable is used in the HTML section of the page). We then look for a subscriber with that email, and if one exists or we are showing the find portion, we continue, otherwise we are redirected home. Next we find all of our newsletters, and all of the subscriber's subscriptions, and then create our checkbox form. The HTML portion looks like:
# preferences.php
<!DOCTYPE html PUBLIC "-//W3C//DTD XHTML 1.1//EN" "https://www.w3.org/TR/xhtml11/DTD/xhtml11.dtd">
<html xmlns="https://www.w3.org/1999/xhtml" >
<head>
<meta http-equiv="Content-Type" content="text/html; charset=utf-8" />
<title>my newsletters - my preferences</title>
<!-- Stylesheets -->
<link rel="stylesheet" href="style.css" type="text/css" media="all" />
</head>
<body>
<div id="header">
<h1>my newsletters</h1>
</div>
<div id="container">
<h3>my preferences</h3>
<?php if($display == 'form') {?>
<form action="preferences.php" method="POST">
<p>
<label for="name">Name:</label><br />
<input type='text' name='name' class="text" value="<?php echo $name; ?>"/>
</p>
<p>
<label for="email">Email</label><br />
<input type="text" name="email" class="text" value="<?php echo $email; ?>"/>
</p>
<p>
<strong>Newsletters:</strong><br />
<?php echo $subscriptions; ?>
</p>
<p>
<input type='submit' value='Save my preferences »' />
<input type='hidden' value='1' name='submitted' />
<input type='hidden' value='<?php echo $id; ?>' name='id' />
</p>
</form>
<?php } else { ?>
<?php echo $message; ?>
<form action='preferences.php' method="get">
<p>
<label for="email">Email</label><br />
<input type="text" name="email" class="text" />
</p>
<p>
<input type='submit' value='Find »' />
</p>
</form>
<?php } ?>
</div>
</body>
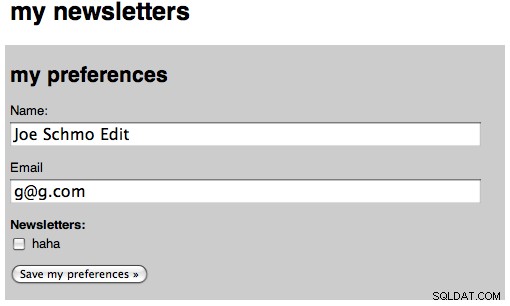
</html> In our HTML block we have two forms and some PHP to choose which one to display. The top form is the form the user sees if a record in the database has been found. The second form is for entering your email and having the system find it. The second form looks like:


And the first looks like:

And the second form after we saved our preferences:


Now that we have finished the front-end, we have one last step:sending the emails!
Step 10:Sending Messages
Our last step is to work on the page to send our message. We will be working in the admin directory, and only one file will be created. Go ahead and create our messages_send.php file and place the following in it:
# admin/messages_send.php
	<?php
	require_once 'config.php';
	login_required();
	$title = "send message";
	$id = (int) $_GET['id'];
	$tab = 'mess';

	if(isset($_POST['submitted'])) {
	    $query = "SELECT * FROM subscribers WHERE id=0 ";
	    $emails = array();
	    foreach($_POST['newsletter'] as $n) {
	        if($n['send'] == "true") {
	            $nlid = $n['nlid'];
	            $e = query("SELECT subscriber_id FROM subscriptions WHERE newsletter_id=$nlid");
	            foreach($e as $s) {
	                $sqlids .= " OR id=".$s['subscriber_id'];
	            }
	            $query .= $sqlids;
	        }
	    }
	    $subscribers = query($query);
	    foreach($subscribers as $sub) {
	        $emails[$sub['email']] = $sub['name'];
	    }
	    $from = array(FROM_EMAIL => FROM_NAME);
	    // BODY RENDERING
	    $mess = query("SELECT * FROM messages WHERE id=$id");
	    $message = $mess[0];
	    $subject = $message['subject'];
	    $tid = $message['template_id'];

	    $data = query("SELECT body FROM templates WHERE id=$tid LIMIT 1");
	    $template = $data[0]['body'];

	    if($message['rightcol'] == '') {
	        $leftcol = $message['leftcol'];
	        $body = str_replace('%content%', $leftcol, $template);
	    } else {
	        $leftcol = $message['leftcol'];
	        $rightcol = $message['rightcol'];
	        $b = str_replace('%leftcol%', $leftcol, $template);
	        $body = str_replace('%rightcol%', $rightcol, $b);
	    }

	    send_email_to_mass($from, $emails, $body, $subject) or die('lol');
	    header('Location: index.php');
	}

	$newsletters = query("SELECT * FROM newsletters");
	foreach($newsletters as $nl) {
	    $nls .= '
	    <input type="hidden" name="newsletter['.$nl["id"].'][nlid]" value="'.$nl['id'].'" />
	    <input type="checkbox" name="newsletter['.$nl["id"].'][send]" value="true" '.$checked.'/>
	    <label for="newsletter['.$nl["id"].']">'.$nl['name'].'</label> - '.$nl['description'].'<br />
	    ';
	}
	$mess = query("SELECT * FROM messages WHERE id=$id");
	$message = $mess[0];
	$subject = $message['subject'];

	$content = <<<EOF
	<a href="messages_preview.php?id=$id" class="large" target="_new">preview »</a><br />
	<form action='messages_send.php?id=$id' method="POST">
	    <p>
	        Subject: $subject<br />
	    </p>
	    <p>Send to:<br />
	        $nls
	    </p>
	    <p>
	        <input type='submit' value='Send »' />
	        <input type='hidden' value='1' name='submitted' />
	    </p>
	</form>
	EOF;
	include 'layout.php'; ?>
The first part we again require our config, then make sure the user is logged in, then our title, make sure our id is an integer, and then set our tab. Next we have our complicated post block. First we set up our base query, and running just that would return 0 records, which is good because that means no users will be send the newsletter. Next we loop through every newsletter that we want to send to, and find all of the subscriptions for that newsletter. We then create a string that will be appended to our original SQL query so that we can find every subscriber. Now, we run that query and create an array where the keys are the emails and the name is the value, and this helps us use names when the user looks at the email in their mail application, showing the TO:as their name. We next find the message we are working with, and set the subject, message, and template id to variables. We then find our template and set the body to a variable. Then we use the same code from the message preview to replace the strings inside the template the the parts of the message. Then we call our yet-to-be-created-function send_email_to_mass and then redirect home.
Leaving our POST block, we create the same checkbox list of newsletters so the admin can pick which one(s) he wants to send the message to. Then we have a simple form that looks like:


Now, open up our classes.php file and add the following function:
# admin/classes.php
	// EMAIL
	function send_email_to_mass($from, $recipients, $body, $subject) {
	    require_once 'swift/lib/swift_required.php'; //require lib

	    $transport = Swift_MailTransport::newInstance();
	    $mailer = Swift_Mailer::newInstance($transport) or die('Error creating mailer.');
	    $message = Swift_Message::newInstance($subject)
	        ->setFrom($from)
	        ->setTo($recipients)
	        ->setBody($body, 'text/html') or die('error here.');
	    $result = $mailer->batchSend($message);

	    return true;
	}
So first, we have our function declaration, and it expects four variables to be passed to it, from, recipients, body, and subject. Next we require the sqift_required.php file of our Swift Mailer Library. Next we create a new Mail Transport (this uses the PHP mail function, so it would be sending from your local machine, for the documentation on the three transport types, see the documentation). Next we create a mailer using that transport. Then we create a new message from our subject, then set our from, to, and body. Then we use the batch_send function so that each recipient only sees themselves on the email, and no one else.
There is one possibly downside of doing it the way I have, and that is if you are sending many messages, the page may take forever to load. A solution to tthis would be running a Javascript AJAX request to send each and every message, but I won't cover that here. Now that we have finished working on sending messages, we are going to spice up the home page and then we will be done!
Step 11:The Homepage
When you load the admin index, the page does not really do much. I want to have some 'stats' on our homepage, and we will finally use the count_query function. Open up the admin index file and change it to look like:
# admin/index.php
	<?php
	require_once 'config.php';
	login_required();
	$users = count_query("SELECT COUNT(*) AS num FROM users");
	$emails = count_query("SELECT COUNT(*) AS num FROM subscribers");
	$subs = count_query("SELECT COUNT(*) AS num FROM subscriptions");
	$nls = count_query("SELECT COUNT(*) AS num FROM newsletters");
	$mess = count_query("SELECT COUNT(*) AS num FROM messages");
	$temps = count_query("SELECT COUNT(*) AS num FROM templates");
	$title = "Home!";
	$content = <<<EOF
	<h3>current stats</h3>
	<p>$users user registered</p>
	<p>$emails subscribers</p>
	<p>$subs newsletter subscriptions</p>
	<p>$nls newsletters</p>
	<p>$mess messages</p>
	<p>$temps templates</p>
	EOF;
	include 'layout.php'; ?>
The page is very simple. We require our config, make sure we are logged in, then we perform six count queries, one for each of our tables and then output that. This is what the final page look like: