Bitte folgen Sie diesen Schritten:
-
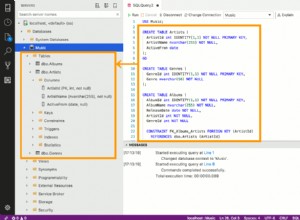
Legen Sie diese schema.sql in Ihrem Ressourcenordner ab, damit sie von SpringBoot erkannt wird, sobald Sie Ihren Server starten. Wenn Sie Spring Boot nicht verwenden, keine Sorge, importieren Sie einfach dieses Skript von einem beliebigen Mysql-App-Client (phpmyadmin,HeidiSQL,Navicat..)
drop table if exists oauth_client_details; create table oauth_client_details ( client_id VARCHAR(255) PRIMARY KEY, resource_ids VARCHAR(255), client_secret VARCHAR(255), scope VARCHAR(255), authorized_grant_types VARCHAR(255), web_server_redirect_uri VARCHAR(255), authorities VARCHAR(255), access_token_validity INTEGER, refresh_token_validity INTEGER, additional_information VARCHAR(4096), autoapprove VARCHAR(255) ); drop table if exists oauth_client_token; create table oauth_client_token ( token_id VARCHAR(255), token LONG VARBINARY, authentication_id VARCHAR(255) PRIMARY KEY, user_name VARCHAR(255), client_id VARCHAR(255) ); drop table if exists oauth_access_token; create table oauth_access_token ( token_id VARCHAR(255), token LONG VARBINARY, authentication_id VARCHAR(255) PRIMARY KEY, user_name VARCHAR(255), client_id VARCHAR(255), authentication LONG VARBINARY, refresh_token VARCHAR(255) ); drop table if exists oauth_refresh_token; create table oauth_refresh_token ( token_id VARCHAR(255), token LONG VARBINARY, authentication LONG VARBINARY ); drop table if exists oauth_code; create table oauth_code ( code VARCHAR(255), authentication LONG VARBINARY ); drop table if exists oauth_approvals; create table oauth_approvals ( userId VARCHAR(255), clientId VARCHAR(255), scope VARCHAR(255), status VARCHAR(10), expiresAt TIMESTAMP, lastModifiedAt TIMESTAMP ); drop table if exists ClientDetails; create table ClientDetails ( appId VARCHAR(255) PRIMARY KEY, resourceIds VARCHAR(255), appSecret VARCHAR(255), scope VARCHAR(255), grantTypes VARCHAR(255), redirectUrl VARCHAR(255), authorities VARCHAR(255), access_token_validity INTEGER, refresh_token_validity INTEGER, additionalInformation VARCHAR(4096), autoApproveScopes VARCHAR(255) ); -
Fügen Sie Ihre Datenquelle, den AuthenticationManager und den UserDetailsService in Ihren OthorizationServer ein
@Autowired private MyUserDetailsService userDetailsService; @Inject private AuthenticationManager authenticationManager; @Autowired private DataSource dataSource; -
Sie müssen diese beiden Beans erstellen
@Bean
public JdbcTokenStore tokenStore() {
return new JdbcTokenStore(dataSource);
}
@Bean
protected AuthorizationCodeServices authorizationCodeServices() {
return new JdbcAuthorizationCodeServices(dataSource);
}
und bitte vergessen Sie nicht die @Configuration oben auf Ihrer AuthorizationServer-Klasse
- Konfigurieren Sie Ihre Client-Apps, die in Ihrer MySQL-Datenbank erstellt werden sollen:
clients.jdbc(dataSource).withClient("clientapp")
.authorizedGrantTypes("password", "refresh_token")
.authorities("USER")
.scopes("read", "write")
.resourceIds(RESOURCE_ID)
.secret("123456");
Sie haben dies bereits getan.
-
Das Wichtigste (und ich glaube, Sie haben es vergessen ..) ist:Ihre Endpoints mit dem AuthorizationServerEndpointsConfigurer zu konfigurieren:
endpoints.userDetailsService(userDetailsService) .authorizationCodeServices(authorizationCodeServices()).authenticationManager(this.authenticationManager).tokenStore(tokenStore()).approvalStoreDisabled();
und das war's mann , jetzt sollte es klappen;)
Und zögern Sie nicht, nach mehr zu fragen ... Ich helfe Ihnen gerne
Ich habe dir eine Nachricht von Tweeter geschickt!