Wenn Sie den richtigen Oracle-Leuten folgen, wissen Sie wahrscheinlich bereits, dass Oracle gerade Oracle Linux Automation Manager veröffentlicht hat:
Ihre #Ansible-Automatisierungs-Engine ist möglicherweise bereits vorhanden und in Ihrem Oracle Linux-Abonnement enthalten ... https://t.co/RPZw37yOvs pic.twitter.com/aQZInFcUsv
– Ludovico Caldara (@ludodba) 6. September 2021Mein Verständnis war, dass der Zugriff darauf ULN-Zugriff erforderte, also gab es keine Möglichkeit, einfach eine schnelle VM zu Hause hochzufahren und es auszuprobieren ... aber ich habe mich geirrt.
Wie von Ludovico bestätigt, gibt es öffentlichen Zugriff:
Ich habe vielleicht zu früh gesprochen, es sieht so aus, als ob auch ein öffentliches Repo verfügbar ist:https://t.co/XxZhs9oFDi
– Ludovico Caldara (@ludodba) 7. September 2021
Ich dachte, ich halte es vorerst einfach, also habe ich gerade eine VM mit Vagrant erstellt und bestätigt, dass Sie sie von zu Hause aus von diesem öffentlichen Repository aus testen können.
Fügen Sie zunächst das öffentliche Automation-Repository zu Ihrem System hinzu und aktivieren Sie es:
[root@OracleAuto ~]# dnf config-manager --add-repo https://yum.oracle.com/repo/OracleLinux/OL8/automation/x86_64
Adding repo from: https://yum.oracle.com/repo/OracleLinux/OL8/automation/x86_64


[root@OracleAuto ~]#  dnf repolist
repo id                                                       repo name
ol8_UEKR6                                                     Latest Unbreakable Enterprise Kernel Release 6 for Oracle Linux 8 (x86_64)
ol8_appstream                                                 Oracle Linux 8 Application Stream (x86_64)
ol8_baseos_latest                                             Oracle Linux 8 BaseOS Latest (x86_64)
yum.oracle.com_repo_OracleLinux_OL8_automation_x86_64         created by dnf config-manager from https://yum.oracle.com/repo/OracleLinux/OL8/automation/x86_64
[root@OracleAuto ~]# dnf config-manager --set-enabled yum.oracle.com_repo_OracleLinux_OL8_automation_x86_64


[root@OracleAuto ~]# dnf update
created by dnf config-manager from https://yum.oracle.com/repo/OracleLinux/OL8/automation/x86_64                                      108 kB/s | 437 kB     00:04
Last metadata expiration check: 0:00:01 ago on Tue 07 Sep 2021 07:35:18 PM UTC.
Dependencies resolved.
=====================================================================================================================================================================
 Package                                     Architecture            Version                                                Repository                          Size
=====================================================================================================================================================================
Installing:
 kernel-uek                                  x86_64                  5.4.17-2102.204.4.4.el8uek                             ol8_UEKR6                           66 M
Upgrading:
 NetworkManager                              x86_64                  1:1.30.0-10.0.1.el8_4                                  ol8_baseos_latest                  2.6 M
 NetworkManager-libnm                        x86_64                  1:1.30.0-10.0.1.el8_4                                  ol8_baseos_latest                  1.8 M
 btrfs-progs                                 x86_64                  5.12.1-1.el8                                           ol8_UEKR6                          858 k
 dhcp-client                                 x86_64                  12:4.3.6-44.el8_4.1                                    ol8_baseos_latest                  318 k
 dhcp-common                                 noarch                  12:4.3.6-44.el8_4.1                                    ol8_baseos_latest                  207 k
 dhcp-libs                                   x86_64                  12:4.3.6-44.el8_4.1                                    ol8_baseos_latest                  148 k
 dmidecode                                   x86_64                  1:3.2-8.0.2.el8                                        ol8_baseos_latest                   92 k
[....]
  nvme-cli-1.12-4.el8_4.x86_64                               openldap-2.4.46-17.el8_4.x86_64                        oraclelinux-release-el8-1.0-19.el8.x86_64
  procps-ng-3.3.15-6.0.1.el8.x86_64                          python3-firewall-0.8.2-7.0.1.el8_4.noarch              python3-rpm-4.14.3-14.el8_4.x86_64
  rpm-4.14.3-14.el8_4.x86_64                                 rpm-build-libs-4.14.3-14.el8_4.x86_64                  rpm-libs-4.14.3-14.el8_4.x86_64
  rpm-plugin-selinux-4.14.3-14.el8_4.x86_64                  rpm-plugin-systemd-inhibit-4.14.3-14.el8_4.x86_64      rsyslog-8.1911.0-7.0.1.el8_4.2.x86_64
  selinux-policy-3.14.3-67.0.6.el8_4.1.noarch                selinux-policy-targeted-3.14.3-67.0.6.el8_4.1.noarch   systemd-239-45.0.2.el8_4.3.x86_64
  systemd-libs-239-45.0.2.el8_4.3.x86_64                     systemd-pam-239-45.0.2.el8_4.3.x86_64                  systemd-udev-239-45.0.2.el8_4.3.x86_64
  virt-what-1.18-9.el8_4.x86_64
Installed:
  kernel-uek-5.4.17-2102.204.4.4.el8uek.x86_64

Complete!
[root@OracleAuto ~]#
Nachdem wir das System aktualisiert haben, können wir nach dem Automation Manager-Paket suchen
[root@OracleAuto ~]# dnf search automation-manager
Last metadata expiration check: 0:07:57 ago on Tue 07 Sep 2021 07:35:18 PM UTC.
================================================================= Name Matched: automation-manager ==================================================================
ol-automation-manager.src : Oracle Linux Automation Manager, based on AWX, provides a web-based user interface, REST API, and task engine built on top of Ansible.
ol-automation-manager.x86_64 : Oracle Linux Automation Manager, based on AWX, provides a web-based user interface, REST API, and task engine built on top of Ansible.
oraclelinux-automation-manager-release-el8.src : Oracle Linux Automation Manager yum repository configuration
oraclelinux-automation-manager-release-el8.x86_64 : Oracle Linux Automation Manager yum repository configuration
[root@OracleAuto ~]#
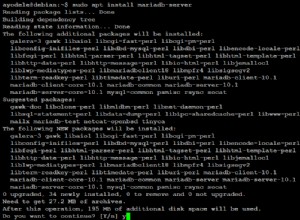
Die Installation des Automatisierungspakets ist ziemlich einfach (natürlich für eine Standard-/Testkonfiguration) und Sie können unten ein Beispiel sehen, das aus der Oracle-Dokumentation kopiert wurde:
Installation von Oracle Linux Automation Manager
[root@OracleAuto ~]# dnf install ol-automation-manager
Last metadata expiration check: 0:09:39 ago on Tue 07 Sep 2021 07:35:18 PM UTC.
Dependencies resolved.
=====================================================================================================================================================================
 Package                            Architecture Version                                           Repository                                                   Size
=====================================================================================================================================================================
Installing:
 ol-automation-manager              x86_64       1.0.0-1.el8                                       yum.oracle.com_repo_OracleLinux_OL8_automation_x86_64        67 M
Installing dependencies:
 aajohan-comfortaa-fonts            noarch       3.001-2.el8                                       ol8_baseos_latest                                           148 k
 ansible                            noarch       2.9.23-1.el8                                      yum.oracle.com_repo_OracleLinux_OL8_automation_x86_64        17 M
 bzip2                              x86_64       1.0.6-26.el8                                      ol8_baseos_latest                                            60 k
 checkpolicy                        x86_64       2.9-1.el8                                         ol8_baseos_latest                                           346 k
 emacs-filesystem                   noarch       1:26.1-5.el8                                      ol8_baseos_latest                                            69 k
 fontconfig                         x86_64       2.13.1-3.el8                                      ol8_baseos_latest                                           274 k
 fontpackages-filesystem            noarch       1.44-22.el8                                       ol8_baseos_latest                                            16 k
 gd                                 x86_64       2.2.5-7.el8                                       ol8_appstream                                               144 k
[...]

  redis-5.0.3-2.module+el8.0.0.z+5250+19ca22c8.x86_64                                   sos-4.0-11.0.1.el8.noarch
  sshpass-1.06-9.el8.x86_64                                                             supervisor-4.2.2-1.el8.noarch
  uwsgi-2.0.18-4.0.1.el8.x86_64                                                         xmlsec1-1.2.25-4.el8.x86_64
  xmlsec1-openssl-1.2.25-4.el8.x86_64

Complete!
[root@OracleAuto ~]#
Als nächstes müssen wir die Konfiguration mit dem AWX-Benutzer einrichten.
Auch hier nur nach dem Dokumentationsbeispiel:
[root@OracleAuto ~]# cat /etc/redis.conf
[...]
unixsocket /var/run/redis/redis.sock
unixsocketperm 775

[root@OracleAuto ~]# /var/lib/ol-automation-manager/ol-automation-manager-DB-init.sh
 * Initializing database in '/var/lib/pgsql/data'
 * Initialized, logs are in /var/lib/pgsql/initdb_postgresql.log
Database pre-setup is completed
[root@OracleAuto ~]#

[root@OracleAuto ~]# su -l awx -s /bin/bash


[awx@OracleAuto ~]$ awx-manage migrate
Operations to perform:
  Apply all migrations: auth, conf, contenttypes, main, oauth2_provider, sessions, sites, social_django, sso, taggit
Running migrations:
  Applying contenttypes.0001_initial... OK
  Applying contenttypes.0002_remove_content_type_name... OK
  Applying taggit.0001_initial... OK
  Applying taggit.0002_auto_20150616_2121... OK
  Applying auth.0001_initial... OK
  Applying main.0001_initial... OK
  Applying main.0002_squashed_v300_release... OK
  Applying main.0003_squashed_v300_v303_updates... OK
  Applying main.0004_squashed_v310_release... OK
  Applying conf.0001_initial... OK
  Applying conf.0002_v310_copy_tower_settings... OK
  Applying main.0005_squashed_v310_v313_updates... OK
  Applying main.0006_v320_release... OK
  Applying main.0007_v320_data_migrations... OK
  Applying main.0008_v320_drop_v1_credential_fields... OK
  Applying main.0009_v322_add_setting_field_for_activity_stream... OK
[....]

  Applying social_django.0002_add_related_name... OK
  Applying social_django.0003_alter_email_max_length... OK
  Applying social_django.0004_auto_20160423_0400... OK
  Applying social_django.0005_auto_20160727_2333... OK
  Applying social_django.0006_partial... OK
  Applying social_django.0007_code_timestamp... OK
  Applying social_django.0008_partial_timestamp... OK
  Applying sso.0001_initial... OK
  Applying sso.0002_expand_provider_options... OK
  Applying taggit.0003_taggeditem_add_unique_index... OK
Lassen Sie uns jetzt den Verwaltungsbenutzer erstellen und sicherstellen, dass Sie den richtigen Hostnamen/die richtige IP-Adresse für die „AWX-Instanzbereitstellung“ festlegen.
[awx@OracleAuto ~]$ awx-manage createsuperuser --username admin
Email address: admin@test.com
Password:
Password (again):
Superuser created successfully.
[awx@OracleAuto ~]$


[awx@OracleAuto ~]$ awx-manage create_preload_data
Default organization added.
Demo Credential, Inventory, and Job Template added.
(changed: True)
[awx@OracleAuto ~]$ awx-manage provision_instance --hostname=OracleAuto
Successfully registered instance OracleAuto
(changed: True)
[awx@OracleAuto ~]$ awx-manage register_queue --queuename=tower --hostnames=OracleAuto
Creating instance group tower
Added instance OracleAuto to tower
(changed: True)
[awx@OracleAuto ~]$
[awx@OracleAuto ~]$ exit
logout
Sobald dies abgeschlossen ist, müssen wir den HTTP-Server einrichten.
Da dies nur ein Test ist, können Sie einfach ein SSL-Zertifikat erstellen, um Probleme beim Einloggen in Ihre Verwaltungsoberfläche zu vermeiden (bitte tun Sie dies nicht auf Ihrem Produktionssystem :))
[root@OracleAuto ~]# openssl req -x509 -nodes -days 365 -newkey rsa:2048 -keyout /etc/tower/tower.key -out /etc/tower/tower.crt
Generating a RSA private key
......+++++
.+++++
writing new private key to '/etc/tower/tower.key'
-----
You are about to be asked to enter information that will be incorporated
into your certificate request.
What you are about to enter is what is called a Distinguished Name or a DN.
There are quite a few fields but you can leave some blank
For some fields there will be a default value,
If you enter '.', the field will be left blank.
-----
Country Name (2 letter code) [XX]:
State or Province Name (full name) []:
Locality Name (eg, city) [Default City]:
Organization Name (eg, company) [Default Company Ltd]:
Organizational Unit Name (eg, section) []:
Common Name (eg, your name or your server's hostname) []:
Email Address []:
[root@OracleAuto ~]#
Ich bin sicher, Sie können den Webserver zu Ihrem bevorzugten ändern, aber jetzt richten wir den Nginx-Server ein, der der Standardserver ist.
Hier haben wir einfach ein Backup der Standardkonfiguration erstellt und die Standardkonfiguration aus der Dokumentation kopiert:
[root@OracleAuto ~]# mv /etc/nginx/nginx.conf /etc/nginx/nginx.conf.bk
[root@OracleAuto ~]# nano /etc/nginx/nginx.conf

[root@OracleAuto ~]# cat /etc/nginx/nginx.conf
user nginx;
worker_processes auto;
error_log /var/log/nginx/error.log;
pid /run/nginx.pid;

# Load dynamic modules. See /usr/share/doc/nginx/README.dynamic.
include /usr/share/nginx/modules/*.conf;

events {
    worker_connections 1024;
}

http {
    log_format  main  '$remote_addr - $remote_user [$time_local] "$request" '
                      '$status $body_bytes_sent "$http_referer" '
                      '"$http_user_agent" "$http_x_forwarded_for"';

    access_log  /var/log/nginx/access.log  main;

    sendfile            on;
    tcp_nopush          on;
    tcp_nodelay         on;
    keepalive_timeout   65;
    types_hash_max_size 2048;

    include             /etc/nginx/mime.types;
    default_type        application/octet-stream;

    # Load modular configuration files from the /etc/nginx/conf.d directory.
    # See https://nginx.org/en/docs/ngx_core_module.html#include
    # for more information.
    include /etc/nginx/conf.d/*.conf;
}
[root@OracleAuto ~]#
Letzte Schritte, ändern Sie einfach einige Informationen in der Tower-Einstellungsdatei (fügen Sie einfach Ihren Hostnamen/IP in CLUSTER_HOST_ID hinzu) und aktivieren/starten Sie den Oracle Automation Manager Service mit Systemd
[root@OracleAuto ~]# grep -i CLUSTER_HOST_ID /etc/tower/settings.py
CLUSTER_HOST_ID = "OracleAuto"
[root@OracleAuto ~]#

[root@OracleAuto ~]# systemctl enable --now ol-automation-manager.service
Created symlink /etc/systemd/system/multi-user.target.wants/ol-automation-manager.service → /usr/lib/systemd/system/ol-automation-manager.service.
[root@OracleAuto ~]#
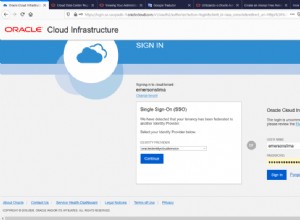
Und voilà! Sie können jetzt direkt über die Oracle Automation Manager-Oberfläche mit der Verwaltung Ihrer ansiblen Playbooks beginnen


Ich muss wirklich mehr in Ansible und Automatisierung einsteigen, also könnte dies eine gute Möglichkeit sein, mit der Verwendung des Oracle-eigenen Automatisierungsmanagers zu beginnen :)