MySql ist eine der beliebtesten Datenbanken.
Wir haben gerade einen MySQL-Datenbankkurs auf dem YouTube-Kanal von freeCodeCamp.org veröffentlicht.
Bharath Ram Manoharan von Execute on Command hat diesen Kurs erstellt. Er ist ein leitender Datenbankingenieur und ein großartiger Lehrer.
Dieser Kurs beginnt mit SQL-Grundlagen. Dann geht es auch auf wichtige Datenbankkonzepte wie Datenmodellierung, Sperren, Indizes, SQL Explain und mehr ein.
Hier sind die Themen, die in diesem Kurs behandelt werden:
- So erstellen Sie eine AWS EC2-Instanz
- So installieren Sie die MySQL-Datenbank
- Datenmodellierung
- SQL-Grundlagen - Erstellen einer Tabelle
- SQL-Grundlagen - Einfügen von Daten
- SQL-Grundlagen - Aktualisieren und Löschen von Daten
- SQL-Grundlagen - Daten lesen (Select-Anweisungen)
- SQL-Joins
- Transaktionsisolationsstufen
- Sperren auf Tabellenebene
- Sperren auf Zeilenebene
- Datenbank-Deadlocks
- Clusterte Indizes
- SQL-Erklärung
Sehen Sie sich den vollständigen Kurs unten oder auf dem YouTube-Kanal von freeCodeCamp.org an (2 Stunden ansehen).
Transkript
(automatisch generiert)
MySQL ist eine der beliebtesten Datenbanken. Lernen Sie in diesem Kurs von einem erfahrenen Datenbankingenieur, wie man sie verwendet.
Willkommen zu diesem grundlegenden MySQL-Kurs. Ich möchte damit beginnen, dass Sie sich dafür bedanken, dass Sie versuchen, eine neue Fähigkeit zu erlernen.
Darf ich mich vorstellen.
Mein Name ist Barbara und ich arbeite für Salesforce als Senior Database Engineer. Ich habe über 12 Jahre Erfahrung mit einer Vielzahl von Datenbanken, wobei Oracle die wichtigste ist. Ich habe Erfahrung in der Zusammenarbeit mit Unternehmen wie Chase, PayPal, Wells, Fargo, StubHub, usw.
Lassen Sie mich zuerst ein paar grundlegende Fragen für Sie beantworten, und zwar wer, was und warum.
Wer sollte also an diesem Kurs teilnehmen? Dieser Kurs ist für Datenbankprofis gedacht, die ihre Fähigkeiten erweitern möchten.
Wenn Sie ein Softwareentwickler oder ein Full-Stack-Entwickler sind und ein tiefes Verständnis der MySQL-Datenbank erlangen möchten, ist dieser Kurs genau das Richtige für Sie.
Und wenn Sie ein College-Student, ein Informatikstudent oder ein frischer Absolvent sind, vermittelt Ihnen dieser Kurs einige Kenntnisse über die Interna von Datenbanken.
Warum sollten Sie also MySQL lernen, MySQL ist die beliebteste Open-Source-Datenbank und natürlich Postgres.
SQL ist definitiv da oben.
Wenn Unternehmen ihre Daten von lokal in die Cloud verschieben, migrieren sie normalerweise gerne zu einer Cloud-nativen Datenbank oder einer Open-Source-Datenbank wie MySQL oder Postgres Sequel, um Kosten zu sparen.
Nehmen wir also an, Sie sind ein Experte für Oracle-Datenbanken.
Wenn Sie sich Kenntnisse über eine Datenbank wie MySQL aneignen, können Sie Unternehmen dabei helfen, ihre Daten von Oracle auf MySQL zu migrieren, und das kann wirklich wertvoll sein.
Sehen wir uns nun an, was in diesem Kurs behandelt wird.
Zunächst einmal meine ich mit MySQL die MySQL InnoDB-Speicher-Engine in diesem Kurs, die hinter jeder kommerziellen Website, einer Bank oder einem Finanzinstitut usw. verwendet wird.
Und MySQL bietet eine Vielzahl von Speicher-Engines an, mein I Sam, in der Speicher-Speicher-Engine oder einige beliebte Speicher-Engines, die verfügbar sind. Wir werden etwas über MySQL InnoDB lernen, ich werde keine anderen Arten von Speicher-Engines behandeln.
Das sind nun die Themen, die ich in diesem Kurs behandeln werde.
Bitte beachten Sie, dass dies ein Kurs zur Datenbankverwaltung ist.
Es handelt sich also zu 80 % um Datenbankverwaltung.
Und für Leute, die mit Datenbanken völlig neu sind, habe ich SQL-Grundlagen hinzugefügt.
Sie lernen also etwas über die Datenbankinstallation, MySQL Workbench, Datenbankindizes, Datenbankprotokolle und ein wenig Leistungsoptimierung, dh SQL Explain.
Das sind also einige interessante Themen, die ich behandeln werde.
Was brauchen Sie also genau, um mit diesem Kurs zu beginnen? Sie brauchen einen PC oder einen Mac.
Wenn Sie also einen PC verwenden, empfehle ich Ihnen, sich die Arbeitsblätter oder das ergänzende Material anzusehen, das in der Beschreibung beigefügt ist.
Wenn Sie einen Mac-Laptop haben, sind Sie in der besten Position, um diesen Kurs zu lernen.
Denn dann können Sie einfach sehen, was ich tippe.
Und Sie können einfach die gleichen Befehle eingeben und einfach von Ende zu Ende folgen.
Und vor allem ist dies die Hauptanforderung. Ich möchte, dass Sie ein AWS-Konto erstellen, das auf Web Services-Konto richtig und erstaunlich ist.
Wenn Sie also nicht wissen, wovon ich spreche, sehen Sie sich bitte mein Arbeitsblatt an, das in der Beschreibung zu finden ist. Ich habe einige Ressourcen angehängt, die Ihnen zeigen, wie Sie ein AWS-Konto erstellen, das ich verwenden werde eine AWS EC Two-Instanz während des gesamten Kurses.
Und ich zeige Ihnen, wie Sie eine erstellen.
Aber eine wichtige Sache, an die Sie sich erinnern sollten, ist, dass Sie nach jeder Ihrer Lernsitzungen Ihre EC-Zwei-Instanz herunterfahren können.
So entstehen Ihnen keine unnötigen Kosten.
Und bitte denken Sie daran, dass Sie Ihre EC Two-Instance nicht rund um die Uhr laufen lassen müssen.
Sobald Sie also ein AWS-Konto erstellt und sich angemeldet haben, landen Sie auf diesem Dashboard oder dieser Seite.
Und Sie können direkt hier zum Servicemenü gehen.
Und dann können Sie unter Compute einfach auswählen, also hier auf der linken Seite können Sie Instanzen auswählen.
Und dann werden wir hier eine Instanz erstellen, die unsere Laborumgebung sein wird.
Klicken Sie also auf Instanz starten.
Und dann wählen wir ein Bild für unsere Instanz aus.
Also wähle ich Red Hat Enterprise Linux, Version 864 Bit, und mein Instance-Typ ist T Two Micro, was für die kostenlose Stufe geeignet ist.
Und Sie müssen ein geeignetes Subnetz auswählen.
Wenn Sie gerade ein AWS-Konto erstellt haben, können Sie es einfach verlassen.
Belassen Sie es bei dem Standard-Subnetz, das für Sie angezeigt wird.
Für mich werde ich wählen, ob ich ein bestimmter bin.
Stellen Sie dann sicher, dass Sie diese Option zur automatischen Zuweisung öffentlicher IP-Adressen aktivieren.
Denn dadurch wird Ihrer Instanz eine öffentliche IP-Adresse zugewiesen, mit der Sie von Ihrem Laptop aus per SSH auf Ihre Instanz zugreifen und alle anderen Einstellungen unverändert lassen können.
Und lassen Sie uns etwa 25 Gigs für die Datenbank oder für die gesamte Instanz zuweisen.
Und Sie können den Rest ISIS einfach verlassen, zur nächsten Seite lesen, Sie können ein Tag für Ihre Instanz erstellen.
Also werde ich es meine SQL-Instanz nennen.
Erstens, gehen Sie zur Sicherheitsgruppenseite.
Und hier ist es wichtig, dass Sie in der Lage sein müssen, SSH in die Instanz einzubinden.
Und Sie müssen, Sie müssen geeignete Firewall-Regeln erstellen, damit sich jeder, im Grunde jeder auf der Welt, über Port 22 in diese Instanz einloggen kann.
Und das ist überhaupt nicht sicher.
Und ich werde mich um diese Instanz kümmern.
Denn wenn ich mit der Aufnahme fertig bin, entferne ich sie normalerweise.
Ich weiß also, wie ich damit umgehen muss.
Aber wenn Sie Regeln erstellen, stellen Sie sicher, dass Sie die IP Ihres Laptops dort eingeben, nur damit es sicherer ist, dann können Sie jetzt Ihre Konfiguration überprüfen und dann auf "Starten" klicken.
Aber wenn Sie möchten, können Sie ein neues Schlüsselpaar erstellen und ihm dann einfach einen Namen geben.
Laden Sie es dann herunter, bevor Sie die Instanz erstellen.
Für mich wähle ich einfach ein vorhandenes Schlüsselpaar aus.
Vielleicht dieses, und ich sage Wissen, vielleicht ein anderes.
In Ordnung, das hier.
Und starten Sie die Instanz.
Jetzt wird Ihre Instanz erstellt, es dauert wahrscheinlich ein paar Minuten, um diese Instanz zu erstellen.
Okay, so erstellen Sie eine EC-Zwei-Instanz.
Und jetzt, da meine Instanz betriebsbereit ist und ich die öffentliche IP-Adresse sehen kann.
Später werde ich MySQL auf dieser Instanz installieren.
Das wollte ich Ihnen in dieser Lektion zeigen.
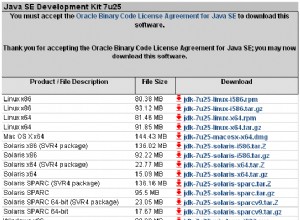
Was Sie also sehen, ist im Grunde meine Folgedokumentation, die all diese verschiedenen Installationsanleitungen zeigt, wie Windows und Mac und so weiter.
Wir interessieren uns also für Linux-Installationen, im Grunde genommen für MySQL-Installationen unter Linux.
Und es gibt tatsächlich ein paar Anleitungen.
Das hier installiert also im Grunde die Jannettek-Binärdatei, wir überspringen das und gehen hier weiter.
Und selbst bei der Installation von MySQL unter Linux gibt es eine Reihe von Anleitungen.
Daher ist die empfohlene Installationsmethode die Verwendung von RPM-Paketen von Oracle.
Aber wir werden diese auf dem MySQL-Yum-Repository basierende Installation verwenden.
Und es ist eigentlich ganz einfach.
Für diese Installation müssen wir also zu MySQL comm and downloads gehen.
Und wir laden die Community Edition herunter und gehen zum yum-Repository.
Wie Sie wissen, laufen auf der von uns erstellten Instanz Archie Light, Red Hat und Enterprise Linux 8.
Und deshalb müssen wir diese RPM herunterladen.
Aber dann müssen wir das RPM auf die Instanz selbst herunterladen, die wir erstellt haben.
Melden wir uns also tatsächlich bei der Instanz an.
Also werde ich SSH verwenden und wir werden meinen privaten Schlüssel verwenden.
Und die Protokollierung ist einfach, Benutzer wählen den Standardbenutzer und erhalten im Grunde die öffentliche IP meiner Instanzanmeldung und wir wechseln zu einem Root-Okay.
Eine Sache, die wir also brauchen, um dieses RPM auf diese Linux-Instanz herunterzuladen, ist W get package.
Also lass uns weitermachen und das zuerst installieren.
In Ordnung, jetzt, wo w gate installiert ist, müssen wir das RPM herunterladen, das wir gerade gesehen haben.
Um also den Link zu diesem RPM zu erhalten, müssen wir in diesen Download gehen.
Und wir müssen hier mit der rechten Maustaste klicken und den Link kopieren.
Und wenn Sie auf einem anderen OSS installieren, müssen Sie auf die entsprechende Schaltfläche klicken.
Okay, wir haben also den Link, und lass uns einfach weitermachen und diesen Link hier einfügen, wie w get und der Link.
Und dieser Befehl lädt dieses Paket herunter, jetzt werden wir einen RPM-Befehl verwenden, um dieses Paket zu installieren.
Wie ich bereits erwähnt habe, fügt dieses Paket also dieses MySQL-Yum-Repo zu Ihrer lokalen System-Repo-Liste hinzu.
Bei der Installation von Red Hat Enterprise Linux erhalten Sie standardmäßig ein MySQL-Modul.
Lassen Sie uns das also deaktivieren.
Wenn Sie es nicht deaktivieren, wird dies unsere MySQL-Installation stören.
Lassen Sie uns also fortfahren und es mit diesem Befehl deaktivieren.
Und machen Sie sich keine Sorgen über das Schreiben dieser Befehle, ich werde einen Link zu meinem Git-Repo mit all diesen Kommentaren in die Beschreibung einfügen.
Also wurden alle diese deaktiviert.
Lassen Sie uns nun fortfahren und MySQL Community Server Edition mit yum install MySQL Community Server installieren.
Und lassen Sie uns dort minus y einfügen, um fortzufahren und alle Eingabeaufforderungen zu akzeptieren.
Und das ist die Installation all dieser Pakete.
In Ordnung, also wurde mein SQL installiert.
Lassen Sie uns fortfahren und die MySQL-Datenbank mit System-CTL starten.
Befehl.
Und lassen Sie uns den Status überprüfen.
Also, jetzt läuft meine SQL-Datenbank.
Okay, die Protokolldatei dieser MySQL-Datenbanksoftware befindet sich also unter var log.
Und wenn Sie dann temp aus dieser Protokolldatei greifen, erhalten Sie das temporäre Passwort für den Root-Benutzer.
Und Sie können sich damit in die MySQL-Datenbank einloggen.
Und wie melden Sie sich an, Sie verwenden diesen Befehl, meine Fortsetzung minus u, das wird root sein, und minus P ist für die passwortbasierte Anmeldung.
Und dann melden wir uns bei der MySQL-Datenbank an.
Lassen Sie uns also dieses Passwort verwenden und sehen, ob es sich anmeldet.
Und wir sind dabei.
Und wenn Sie an dieser Stelle irgendeinen Befehl ausführen, wird meine Fortsetzung Sie auffordern, das Passwort mit der alter user-Anweisung zurückzusetzen.
Wir können dies auf andere Weise tun.
Es gibt also eine ausführbare Datei namens MySQL admin.
Und das ist der Befehl dafür.
MySQL-Admin, abzüglich des Benutzernamens und abzüglich des Passworts.
Wir werden das Passwort des Root-Benutzers zurücksetzen.
Und lassen Sie uns zuerst das aktuelle Passwort angeben, das dieses temporäre Passwort ist.
Und lassen Sie uns das neue Passwort Nr. angeben.
In Ordnung, das Passwort wurde akzeptiert.
Lassen Sie mich nun versuchen, mich mit diesem neuen Passwort anzumelden, indem ich den vorherigen Befehl my SQL minus u proofed und minus p MySQL verwende.
Lassen Sie mich das Passwort eingeben, das ich gerade gesagt habe, jetzt sind wir drin.
Lassen Sie uns also fortfahren und einen einfachen show databases-Befehl ausführen, der alle Standarddatenbanken anzeigt, die Teil der Installation sind.
Eine weitere Sache, die wir tun müssen, um die Installation abzuschließen, ist das Laden einer Zeitzonendatei oder Zeitzonentabelle, wie hier gezeigt.
Wenn ich also einen Auswahlstern mache, was im Grunde eine SQL-Abfrage ist, die aus dieser Tabelle gelesen werden soll, können Sie sehen, dass die Tabelle gerade leer ist.
Lassen Sie uns also beenden und einen anderen Befehl ausführen.
Um zeitzonenbezogene Daten zu laden.
Das ist also der Befehl.
Und lassen Sie uns fortfahren und es ausführen.
Und ich werde weitermachen und mein Passwort eingeben, und das lädt eine Menge Daten, Sie können alle diese Warnungen ignorieren.
Kehren wir zu unserer MySQL-Datenbank zurück.
Wenn Sie also wieder einen Stern aus der MySQL-Punkt-Zeitzone auswählen, werden eine Reihe von Daten angezeigt.
Also, jetzt bist du gut.
Und damit ist die Installation der MySQL-Datenbank abgeschlossen.
In Ordnung, Leute, in diesem Abschnitt werden wir über Datenmodellierung sprechen.
Okay, also Datenbankdesign, Datenmodellierung, Schemadesign, das sind alles austauschbare Wörter, Begriffe für Datenbankdesign sind ein fortlaufender Prozess.
Sie entwickeln also ein grundlegendes Design, wenn Sie Ihre Anwendung erstellen möchten.
Und wenn der Anwendung dann neue Funktionen, Erweiterungen und Verbesserungen hinzugefügt werden, iterieren Sie im Grunde genommen über dieses Design, richtig, Sie fügen Ihrem Design ständig neue Dinge hinzu und so weiter.
Das erste, was Sie also tun, wenn Sie Datenbankdesign oder Datenmodellierung betreiben, ist, Geschäftsdaten zu verstehen.
Und sobald Sie die Geschäftsdaten verstanden haben, müssen Sie sich ein logisches Design Ihrer Datenbank einfallen lassen.
Was meine ich damit? Nun, im Grunde müssen Sie Ihre Tabellen entwerfen, die Spalten, die in diese Tabellen einfließen, Indizes, Einschränkungen, wie Primärschlüssel-Einschränkung, Eindeutigkeitsschlüssel-Einschränkung, Nicht-Null-Einschränkungen, Standardwerte, Fremdschlüssel, das sind alles verschiedene Dinge, die Sie tun müssen erstellen müssen.
Wenn Sie sich ein logisches Design Ihres Schemas ausdenken, sobald Sie dieses grundlegende Tabellendesign oder Schemadesign haben, können Sie nach Datenredundanz suchen, das heißt, Sie sehen im Grunde, wo sich Ihre Daten wiederholen.
Und dann fangen Sie an, es zu eliminieren, indem Sie Ihre Tabellen tatsächlich normalisieren.
Und das liegt daran, dass Datenredundanz zu Datenanomalien führt.
Was ich damit meine ist, wenn Sie dieselben Daten mehrfach vorfinden, wenn Sie beispielsweise bestimmte Daten aktualisieren, müssen Sie an vielen Stellen aktualisieren.
Und wenn Sie vergessen, auch nur einen Ort zu aktualisieren, haben Sie jetzt zwei Versionen derselben Daten in Ihrer Datenbank.
Und das erzeugt eine Datenanomalie, Dateninkonsistenz geht eigentlich in die gleiche Richtung.
Und das alles aufgrund von Datenredundanz.
Was wir also sehen, ist im Grunde eine Tabelle, und die Tabelle ist im Grunde eine riesige Tabelle, eine große Tabelle, richtig? Und was wir tun werden, ist im Grunde eine Tabelle für eine E-Commerce-Website zu entwerfen, eine E-Commerce-Website ist im Grunde wie eine erstaunliche Zone oder E Bay oder was auch immer, wie ein Online-Geschäft, wie eine Online-E-Commerce-Website wie Alibaba , oder was auch immer, richtig? Nehmen wir an, Sie haben nur eine Tabelle in dieser Datenbank, richtig? Und wenn die Bestellungen über diese Website eingehen, fangen Sie an, Daten in diese Tabelle einzugeben, richtig? Sie haben, wissen Sie, schauen wir uns einige der Dinge an, die Sie in dieser Tabelle aufzeichnen werden, richtig, Sie brauchen offensichtlich wie eine Zählung Ihrer Bestellungen.
Vielleicht möchten Sie Ihre Bestellungen nummerieren, und wie es dann aussieht, wissen Sie, ist es Desktop oder Mobil? Oder um welches Produkt handelt es sich? Weißt du, hier habe ich etwa ein paar Bücher, die Buchtitel und dann den Preis der Produkte.
Und wer sind dann die Kundendaten, Zahlungsdetails, Lieferdetails und so weiter.
Das sind also im Grunde genommen alle Teile des Wortes E-Commerce.
Recht? Und Sie haben einen riesigen Tisch.
Und wenn Sie sich die Daten hier ansehen, richtig? Also, wissen Sie, hier habe ich ein paar Kunden, die Sie wissen, so etwas wie zwei verschiedene Produkte kaufen, richtig.
Sie können also sehen, dass sich die Daten wiederholt haben.
Was ich damit meine, ist, dass ich jedes Mal, wenn ich dasselbe Produkt kaufe, diese Daten wiederholen muss, wie die erste Bestellung, die über die Webdesktop-Website einging, die von Geburt an mitgebracht wurde, und dann können Sie alle Details dazu sehen Kunde und alle Details über das Produkt und die Zahlung, Zahlungsdetails sowie.
Dann kam die zweite Bestellung von einer anderen Person, aber dann war es die Bestellung für dasselbe Produkt und Sie mussten die Produktinformationen wiederholen.
Richtig.
Der dritte war vom vorherigen Kunden.
Aber dann hat er dieses Mal ein anderes Produkt gekauft, seine Information, die Kundeninformation hat sich eigentlich wiederholt.
Es gibt also viele Datenredundanzdaten, die sich wiederholen.
Dies ist also im Grunde eine denormalisierte Datenbank, in der Sie nur eine Tabelle oder eine Handvoll Tabellen haben, wir sichern alle Informationen von Ihrer Website oder Ihrem Unternehmen in diesen wenigen Tabellen.
Eigentlich ist dies eine denormalisierte Version Ihrer Datenbank. Sehen wir uns an, was Sie sonst noch tun könnten.
Was Sie also tun können, ist im Grunde, Sie können mit dieser einfachen Denormalisierungstabelle beginnen und dann alle redundanten Informationen aus Ihrer Datenbank oder Ihrer Tabellenaktion entfernen. Als erstes habe ich die Kundeninformationen entfernt , sie haben es in einer separaten Tabelle abgelegt, richtig.
Und ich habe hier nur Kundendaten.
Und ich fing an, eine ID-Nummer für jede Kunden-ID oder Kundennummer, wie auch immer Sie es nennen, anzugeben.
Sobald ich die Kundeninformationen herausgenommen habe, habe ich die Orders-Tabelle, die Anfangstabelle, ich nenne die Orders-Tabelle, die jetzt so aussieht, richtig? Und Sie können sehen, dass ich hier eine ähnliche Kunden-ID-Spalte habe.
Und was ist diese Kunden-ID-Spalte? Ihre Vermutungen? Recht? Diese Kunden-ID-Spalte ist also dieselbe wie die, die Sie hier sehen.
Recht? Also und warum habe ich das, weil ich eine Möglichkeit brauche, diese Zeilen in Beziehung zu setzen.
Wie Sie sehen, das sind Spalten, das sind Zeilen, diese Zeilen, ich muss in der Lage sein, eine Beziehung zu einem Kunden aufzubauen, richtig? Wenn ich Kundeninformationen herausnehme, wie kann ich dann eine Beziehung herstellen? Weißt du, dieser Tisch und jener Tisch? Es geht über eine gemeinsame Spalte oder mehrere Spalten.
Tatsächlich ist es in diesem Fall nur eine Spalte.
Also Kunden-ID, richtig? Ich möchte nur die ID-Nummer hier einfügen.
Und was wir dieser Tabelle eigentlich noch entnehmen können.
Das ist also eine Stufe der Normalisierung.
Recht? Lassen Sie uns also weiter normalisieren, was wie das Herausnehmen der Produktdetails ist.
Recht? Daher wiederholen sich auch Produktdetails.
Hier spüren Sie also nicht so viel Schmerz, weil es in dieser Tabelle nur drei Datensätze gibt.
Was ist, wenn die Tabelle Millionen Datensätze enthält, richtig? Deshalb müssen wir die Tabelle normalisieren.
Jetzt nehmen Sie die Produktinformationen tatsächlich heraus und verschieben sie in eine andere Tabelle.
Und dann habe ich eine Produkt-ID-Spalte, nur um die Produkte tatsächlich zu nummerieren, wie ID, und Ihre Orders-Tabelle wird so aussehen, dann nehmen Sie die Zahlungsinformationen in eine andere Tabelle.
Und Ihre Bestelltabelle sieht dann so aus.
Dies ist im Grunde der Prozess, von einem denormalisierten Schema oder einer Datenbank zu einer normalisierten Datenbank zu wechseln.
Wenn Sie Ihre Daten in einer einzigen Tabelle haben, müssen Sie keine Verbindungen herstellen.
Sie könnten sich also fragen, was eigentlich Joints sind, wenn Sie Abfragen ausführen, z. B. mit SQL, ist SQL eine Sprache, oder? Eine strukturierte Abfragesprache, wenn Sie Befehle in Ihrer Datenbank ausführen, können Sie alle Ihre Daten aus dieser einen Tabelle abrufen, wenn Ihre Tabellendatenbank vollständig denormalisiert ist.
Wenn Sie dagegen viele Tische haben, müssen Sie die Ställe irgendwie kombinieren oder sich ihnen anschließen und dann die Daten herausholen.
Das nennt man sich den Tischen anschließen.
Wenn Sie also eine denormalisierte Datenbank haben, müssen Sie nicht viele Verbindungen herstellen.
Und das ist irgendwie gut, weil Ihre Datenbank nicht so viel nachdenken muss, um die Daten zu bekommen.
Sie sagen, ich möchte diese Daten und diese Daten sind in dieser Tabelle verfügbar.
Es ist also ganz einfach.
Während wie in einer normalisierten Datenbank, wenn Sie viele Tabellen verbinden, dann Ihre Datenbank-Engine, mit der sie den Optimierer aufrufen, in Oracle oder in den meisten Bands die meisten Datenbanken.
Diese Datenbank-Engine muss also mehr denken als:Okay, welche Tabelle soll ich zuerst scannen? Und wie soll ich die Daten in dieser Tabelle filtern.
Und dann Okay, ich nehme die Ergebnismenge aus dieser Tabelle und muss sie mit diesen anderen Tabellen verknüpfen.
Es wird also viel mehr darüber nachgedacht, dass so viel mehr Verarbeitung auf dem Server stattfinden muss, auf dem diese Datenbank läuft.
Richtig.
Und deshalb wird die Leistung ziemlich flexibel sein.
Unten rechts und es wird eine Menge Ressourcen verbrauchen und Sie haben all das in großem Maßstab, da so viele Vorgänge gleichzeitig stattfinden, dann haben Sie im Grunde genommen eine langsame Leistung oder zumindest eine niedrigere als in a Datenbank denormalisieren, aber gleichzeitig entfernen wir so viel Datenwiederholung oder Datenredundanz ist sehr gering, deshalb ist der Speicherplatz, der in einer normalisierten Datenbank benötigt wird, viel geringer.
Sie können also nicht verallgemeinern und sagen, dass eine normalisierte Datenbank immer langsam oder eine denormalisierte Datenbank schnell sein wird. Es hängt alles davon ab, ob Sie sich die Daten ansehen und sehen müssen, wie viele Wiederholungen auftreten, usw. usw.
Also, aber im Allgemeinen läuft es so ab, wenn Sie diesen Designprozess durchlaufen, sehen Sie, was wir tatsächlich gemacht haben, richtig.
Also, wir haben uns entschieden, die Tische, die wir brauchen, wie Sie wissen, wir haben Bestellungen, Tischprodukte haben die Kunden und Zahlungen erhalten, und wir haben die Spaltennamen festgelegt.
Und dann müssen Sie nicht nur für jede Tabelle entscheiden, was der Primärschlüssel sein soll.
Was ich damit meine, dass ein Primärschlüssel ein eindeutiger Schlüssel ist und eigentlich nicht null sein kann, was sehr wichtig ist.
Mit diesem Primärschlüssel sollten Sie also in der Lage sein, jeden Datensatz in dieser Tabelle, jede Zeile in dieser Tabelle zu identifizieren.
Wenn ich hier zum Beispiel sage, der Primärschlüssel ist die Bestellnummer, dann kann ich jederzeit, wenn ich eine Bestellnummer habe, diese Tabelle nachschlagen, sagen wir, die Bestellnummer ist gleich zwei, ich kann diesen Datensatz einfach herausholen meine Datenbank.
Und dann müssen Sie auch noch so einige eindeutige Schlüssel haben, richtig.
Eindeutige Schlüssel sind also so ziemlich wie Primärschlüssel.
Und ein eindeutiger Schlüssel kann jetzt ein Primärschlüssel sein, der nicht null sein kann, wie ich bereits erwähnt habe.
Und dann können Sie auch Indizes auf Ihrer Tabelle haben.
Indizes sind also Möglichkeiten, Ihre Tagesdaten im Grunde schneller auszuwählen.
Angenommen, ich durchsuche diese Tabelle häufig anhand der E-Mail-Adresse eines Kunden, dann brauche ich einen Index für die E-Mail-Spalte des Kunden. Richtig, das müssen Sie entscheiden.
Und Sie müssen entscheiden, welche Spalten null sein können.
Recht? Hier darf keine der Spalten null sein.
Nehmen wir an, Sie haben eine weitere Spalte mit dem Namen "Präferenz", die Kundenpräferenz, z. B. welche Versandart oder welche Art von Telefonnummer bevorzugt wird, oder so ähnlich.
Das kann also eine Nullspalte sein, richtig? Sie können also keine Spalten haben.
Andernfalls definieren Sie Ihre Spalten als nicht null.
Nehmen wir an, in Ihrer Tabelle "Bestellungen" haben Sie diese gelieferte Spalte, wenn eine Bestellung im Grunde erstellt wird, wenn ein Kunde ein Produkt auf Ihrer Website kauft.
Natürlich wird es nicht sofort geliefert, zum Zeitpunkt der Auftragserstellung hat die gelieferte Spalte immer keinen oder n, einen n-Wert, richtig? All diese Dinge, all diese Entscheidungen, die wir treffen, sind Teil des Schema-Designs.
Und sobald Sie all dies herausgefunden haben, können Sie die Informationen in Ihr Designtool Entity Relationship Designtool einfügen.
Und im nächsten Abschnitt werde ich Ihnen zeigen, wie ich das auf Sequel Workbench mache, meiner Sequel World Workbench, im Grunde können Sie dann tatsächlich eine bildliche Darstellung Ihres logischen Designs Ihrer Datenbank haben, richtig.
Und das nennt man im Grunde ein ER-Diagramm.
Und natürlich können Sie über die Beziehung zwischen den beiden Tabellen sprechen, sagen wir mal, oh, diese Tabelle in dieser Tabelle, sie haben eine Eins-zu-viele-Beziehung, zum Beispiel kann jeder Kunde viele Bestellungen aufgeben.
Das ist also eigentlich eine Eins-zu-Viele-Beziehung, richtig.
Aber eine, wissen Sie, eine Bestellung kann nur von einem Kunden ausgeführt werden.
Recht? So, so in der Art.
Sie haben also eine Eins-zu-Eins-Beziehung, eine Eins-zu-Viele-Beziehung oder eine Viele-zu-Viele-Beziehung zwischen Tabellen.
Eigentlich sind diese alle Teil der Datenmodellierung.
Aber darüber müssen Sie sich nicht so viele Gedanken machen, solange Sie eine klare Vorstellung davon haben, welche Daten in Ihre Datenbank kommen.
Und nebenbei müssen Sie noch den Datentyp Ihrer Spalten definieren.
Eigentlich ist das sehr wichtig.
Ihre Namen werden ein wildes Zeichen sein.
Wissen Sie, Telefonnummern können Nummern sein, und dann ist E-Mail wieder wie eine Uhr.
Und Ihre ID-Spalte oder Zahlenspalten werden int oder Zahl sein.
Dies sind alles einige Entscheidungen, die Sie in einer Datenmodellierungsaufgabe treffen würden, das ist eigentlich so ziemlich das, was ich über die Datenmodellierung sagen möchte, dann gibt es noch viel mehr, über das wir sprechen können.
Und wie Atomarität, wie Sie, haben Sie alle Adressen, so etwas wie Attribute, die in eine Spalte gepackt sind, wir müssen das auch aufteilen.
Das nennt man Atomarität.
Sie können die Adresse separat haben, die Stadt separat, die Staaten separat und, wissen Sie, die Postleitzahl separat, richtig.
Also diese Art von Dingen, es gibt Nuancen, die Ihre Datenbank immer effizienter machen.
Und natürlich gehen wir hier nicht auf viele Details ein.
Dies ist jedoch die grundlegende Datenmodellierung, die Sie verstehen müssen.
Und wie ich bereits sagte, werde ich Ihnen im nächsten Abschnitt zeigen, wie Sie dies nehmen und dann in meine Sequel-Workbench eingeben.
kurze Zusammenfassung dessen, was ich im letzten Abschnitt getan habe, ich habe im Grunde ein logisches Design einer E-Commerce-Website erstellt.
Sie sehen also eine Tabelle, mit der ich begonnen habe.
Es ist eine denormalisierte Tabelle, und wir haben im Grunde diese denormalisierte Tabelle genommen und sie normalisiert.
Wie Sie sehen können, gibt es vier Versionen dieser Tabelle, ich nenne diese Tabelle Orders-Tabelle.
Es gibt also vier verschiedene Versionen.
Und ich habe bei jeder Iteration sich wiederholende Daten herausgenommen.
So landeten wir schließlich mit vier Tabellen, abgesehen von der ursprünglichen Orders-Tabelle.
Jetzt haben wir also auch Produkte und Zahlungen für Kunden.
In diesem Video nehme ich jetzt alle Ställe und dann die Struktur und erstelle ein logisches Design.
Okay, gehen wir also tatsächlich zu MySQL Workbench und ich bin bereits mit einer Datenbank verbunden, was ich tun werde, ist, zu Datei zu gehen und zu neuen Modellen zu gehen.
hier können wir also ein neues ER-Diagramm hinzufügen, ein Entity-Relationship-Diagramm.
Und nennen wir diese Datenbank eecom.
Store, so ähnlich.
Also fangen wir an und erstellen unsere Tabellen.
Jetzt werde ich nicht alle vier Tabellen erstellen, was wahrscheinlich mehr Zeit oder Zeit in Anspruch nehmen würde, sondern ich werde ein paar Tabellen erstellen.
Und das sollte ausreichen, um zu verstehen, wie wir das machen.
Beginnen wir also einfach mit der Customers-Tabelle.
Die Kundentabelle hat also fünf Spalten, dies ist das Symbol zum Erstellen einer neuen Tabelle, Sie können ziehen und ablegen, oder Sie können versuchen, jetzt zu zeichnen, doppelklicken Sie darauf und erstellen Sie dann eine Tabelle namens Kunde, und hier können wir beginnen, die Tabelle in die Spalte einzufügen benennt die Kunden-ID, und diese wird dann mit Ihrer Sequenz ausgefüllt.
Sequenz ist also ein Datenbankobjekt.
Und es wird eine ganze Zahl sein.
Also können wir es so lassen wie es ist.
Und wir können es als Primärschlüssel haben, das ist in Ordnung, und ein Primärschlüssel muss ausgefüllt werden, das kann es jetzt nicht sein.
Das wird also automatisch ausgewählt.
Der nächste ist der Kundenname, wir könnten das in den Vornamen aufteilen, und dann können wir unseren auswählen und vielleicht ein bisschen mehr Raum geben, wie in der Länge des Namens und dann des Nachnamens, ich kann 100 sehen und dann all das kann jetzt nicht sein, also können wir die Bedingung not null wählen.
Dies sind also verschiedene Beschränkungen, die verfügbar sind.
Lassen Sie uns mit der nächsten Adresse weitermachen.
Und wenn Sie sich erinnern, sprach ich über Atomarität.
Sie möchten also, dass Ihre Spalten atomar in dem Sinne sind, dass hier im Grunde die gesamte Adresse in eine Spalte gepackt wird.
gute Praxis, dies tatsächlich in atomare Spalten als Adresse separat aufzuteilen, Stadt separat anzugeben und dann Postleitzahl separat.
Also haben wir das alles natürlich, nichts davon kann jetzt sein und was gibt es sonst noch? Also Kundentelefonnummer, Telefonnummer werden alle Nummern sein.
Aber dann möchte ich 10 Nummern bekommen, natürlich nicht null und Kunden-E-Mail.
Also kann ich einfach sagen, E-Mail-ID 100 Okay, nicht null.
Da also I ID hier der Primärschlüssel oder die Kunden-ID ist, möchte ich sicherstellen, dass wir eine Beschränkung haben, um die Wiederholung von Kundeninformationen zu vermeiden.
Wenn Sie beispielsweise Kundendaten für ID eins haben, möchte ich nicht, dass dieselben Kunden- und Kundendaten für eine andere ID wiederholt werden, z. B. ID zwei.
Also werde ich die E-Mail-ID tatsächlich für jeden Datensatz hier eindeutig machen.
Und dann kann oder kann auch die Telefonnummer sein.
Das sind also alles Unique Key Constraints oder Unique Constraints.
Das ist es.
Also haben wir die Customers-Tabelle erstellt.
Gehen wir also zurück und sehen, was wir sonst noch haben.
Lassen Sie uns jetzt ein Produkt erstellen, ich würde sagen.
Und dann machst du im Grunde dasselbe, wähle das zum Erstellen einer neuen Tabelle aus.
Und jetzt kannst du hier einfach dieses einzeichnen, ich nenne es Produkt.
Und wir wollen den gleichen Prozess durchlaufen und dann die Produktspaltennamen dort einfügen.
Falls Sie sich fragen, dies ist dieselbe Kunden-ID-Spalte, die wir hier hinzugefügt haben.
Und wir werden das in einer Minute zu einem Fremdschlüssel machen.
Also lass uns weitermachen und das in mehrere Spalten aufteilen.
Denn wiederum wird alles in eine Spalte gepackt, was keine gute Praxis ist.
Sagen wir also, wir nennen es Kreditkartennummer.
Wenn der Kunde PayPal verwendet, benötigen wir diese E-Mail.
Kann also die E-Mail-ID hier verwenden.
Dies kann also null oder nicht null sein, je nachdem, welche Zahlungsart verwendet wird.
Das ist also in Ordnung, also wird das Ablaufdatum eine Datumsspalte sein.
Also lasst uns das tatsächlich ändern.
Wenn Sie sich also nicht sicher sind, können Sie auf das Dropdown-Menü klicken und dann jeweils den richtigen Datentyp auswählen.
Die andere Sache, die ich erwähnt habe, bei der es im Grunde um Fremdschlüssel geht, diese Kunden-ID ist die gleiche wie die, die wir hier hinzugefügt haben.
Machen wir diese Kunden-ID also tatsächlich zu einem Fremdschlüssel.
Wir können es also einfach Kunden-ID-Fremdschlüssel 1 nennen.
Und dann ist die Tabelle, auf die verwiesen wird, die Kunden.
Und die Spalte wird die Kunden-ID sein.
Und das war's.
Sie können also sehen, dass wir jetzt eine Verbindung oder eine Beziehung zwischen diesen beiden Tabellen haben, ich werde eigentlich auch nur die Orders-Tabelle hinzufügen.
Ich habe auch die Orders-Tabelle erstellt, die die Haupttabelle ist, und ich werde jetzt einige Fremdschlüssel für die Orders erstellen.
Alles ist erledigt.
Wenn Sie an dieser Stelle Indizes erstellen möchten, können Sie das tun.
Also sind wir wohl fertig.
Wir haben also im Grunde vier Tabellen zu unserem logischen Design hinzugefügt, diese vier Tabellen, und dann haben wir Spalten erstellt und dann ihre Datentypen definiert.
Außerdem haben wir die Fremdschlüssel und natürlich den Primärschlüssel und den eindeutigen Schlüssel für jede der Tabellen erstellt.
And you can see the foreign key relationship you know clearly showing here and that You know, that's what you would do to create a data model.
Alright, so now actually, let's just go ahead and create a SQL script for this data model.
So you go to database, and then do forward engineer.
And then basically, you provide the database details where you want to create this, these tables are the schema.
So this is, these are my details continue, go to the next one, provide the password.
Right now we are connected, I had to try the password two, three times.
And this has basically created SQL script for us to create the schema and the tables with all the primary key unique key and foreign key constraints.
So what we can do is we can just continue and then now the database or the schema is created as it goes through and then executes that script.
And close.
And now you can see the stables are actually created.
So you can even go to your SQL editor, and then you can start reading your can start querying your tables.
There you go.
So you ready came back, of course, there is no data in it.
And you can now start using your database.
So we actually successfully created the basic schema, or designed the data model for this e commerce website.
Table creation or a CREATE TABLE command starts with CREATE TABLE keyword followed by the name of the table and followed by parenthesis.
So within the parenthesis, this pair of parentheses, you have all these column names, followed by the column data types, and followed by the constraints.
And you can also use this auto increment keyword, if you want your column value to be incremented.
Automatically, as you load values to the as you load records to this table, and after the column definition, you have the option of specifying the keys like primary keys, unique keys, foreign keys, and so on, you can also specify the storage engine type as part of your table creation.
And this is a very simple table.
You can also have partition tables or partition tables that have compressed tables, encrypted tables, and all these things require special keywords to be used in your table definition.
And please check my sequel documentation.
If you want more details about the syntax.
As mentioned, I'm using just integer watch char data types, the MySQL documentation shows like all these different data types like numeric, date, and time data types, string data types, like the ones I'm using, and JSON spatial.
So these are all available in MySQL for you to use.
So let's go ahead and create this table.
And before creating the table, I want to run this drop command just to make sure the table doesn't exist.
And I'm going to be creating that table and see if the table has been created.
Yes, the table has been created successfully, I'm going to be running a select star from the table name to see if I can successfully query from this table as well.
And then it returns.
Basically, it doesn't return anything that means no data exists in the stable.
And that's how you create a table using CREATE TABLE syntax.
Finally, there is actually a default keyword which helps you specify default values for a certain or for your columns.
So if you don't specify a value for this quantity column in your insert statements, or when you're loading through procedures, loading data through procedures, it will automatically take this default value.
That's pretty much it.
And I'll see you guys in my next MySQL SQL session.
So I just did a describe on the table that I created and it has product ID product name, product type, price and quantity.
And you can see that product ID is also an auto incrementing column right now there is no data in it a typical insert Statement looks like this, let's go to insert into keyword and the table name a bunch of columns within parenthesis, the ones that you want to populate, followed by the values keyword.
And followed by the actual column values.
If you can realize I haven't actually specified the product ID value because it's an auto incrementing column.
So let's go ahead and execute this and insert statement goes through.
So let me also run the select statement.
As you can see, the product ID table has taken the value one, and that's happened automatically ident supply the value one, so I'll go ahead and commit the change.
And then let's actually move on to the second variation.
So this time, I'm going to specify a value for product ID, nothing else is different.
So just want to show you that it is possible.
So it goes through and then a commit.
And then let's do a select to make sure the value has been inserted.
So let's go to this third variation of this insert statement.
So it's going to be pretty much the same, except Actually, I'm going to just jump some values and then insert the value 10.
For this product ID column, I'll go ahead and do that.
It goes through a comment and select again, then you can see that that is also fine.
So yeah, so that worked.
So you can actually jump a few values.
let's actually look at the next variation.
Again, I'm going to insert a record into the stable, with no product ID specified exclusively.
Or explicitly, the product ID column is missing over here, and I'm going to run the insert statement and commit.
And then I'm going to run the select statement.
So just wanted to show you that wherever the latest value is for this auto incrementing column, I inserted the value 10 for product ID last time, and then the next time I do an insert is auto increment kicks in and then you know increases, increases this value from 10 to 11, right picks up from the value that was inserted last time.
And I'm gonna just take another insert statement, and this time, it's actually insert into the table name.
And instead of the values keyword, specifying the column names, values, etc, we actually select from a different table.
Basically, if the products three table is exactly matching the structure of products, one table, then we can do even a select star from if the columns don't match exactly as in like products, one has a different set of columns, and product three has a different set of columns, then we need to make sure that we actually select the columns.
And then, for example, this product ID from products, three maps to this product ID and products one, and product name from products, three maps to product one in I'm sorry, Product Name and product one, and so on.
Let's go ahead and run this and see what happens.
And then that goes through.
And then if I now select the products, one table, you can see like take all these rows are inserted properly.
And basically the products one table is populated.
And then we got all the data from products three table.
So this time I want to show you the insert statement.
Again, this is kind of like a bulk insert or multiple insert just combined into one statement, you can see the insert into clause is specified only once but in the values spark in this clause, actually, we have two rows specified at the same time.
So we can even use such as syntax and a commit, and then do a select all good.
So these are a few variations of insert statement.
I hope you understood how this works.
I will see you guys in the next session.
Hey, my sequel learners.
So in this session, actually, I'm going to be talking about update and delete statements.
So as usual, I'm going to be using my eecom store schema.
And I will be using my products table to do this demo.
So just quickly, if we select products table, there's two rows right now.
So the first update is just to show you the syntax of update.
So you have the update keyword followed by the table name followed by set keyword.
And then you can have as many columns as your table contains, but in this case, I've got only one column and I can just run this update.
So let's actually add one more clause to it, which is the where clause and this is to just update the rows that Do you really want to update so we will be updating only the rows with product ID equals one.
So let's go ahead and do that.
And then I'll just come in and do a SELECT FROM products quantity has gone up by 50, it went from 299 to 349.
Now one more thing to realize is actually like you can, you know, you can specify literal values, when you are updating, you know, that happens all the time.
Or you can also like specify a formula, or you can have SQL functions like replace substring, length, and so on, you know, you can look at my SQL documentation to see what kind of functions are available in this update, like, I just wanted to show you the syntax, basically, to let you know that like you can have multiple, you can update multiple rows at once.
In this case, I put like, values one, two, and three, you know, you don't have to do one row at a time or anything.
So when you use the end keyword, and you can say product ID or whatever, call them in and then a bunch of values to select the rows that you want.
And there are other ways to do it.
But the point being, you can update multiple records at once.
And another interesting usage is using the case statement, you know, you can let's say you have a bunch of update statements, one for product ID equals one another for product ID equals two and another for the other product ID values.
And you can combine all that into one UPDATE statement using a case when then and clause or keyword basically, in this case, actually, for product ID equals one, I want to increment the quantity by 50.
And product ID equals two, I want to increment the quantity by 100, and so on.
So then I've got this similar WHERE clause are similar to the one that I showed you before, I'm going to run this you can see the columns are getting incremental, I'm not going to go back and check I'm pretty sure that it's done the right thing.
So the next one is basically when you want to delete records from a table or purge data from a table, then you can just use a simple delete statement.
And if you are wanting to delete a particular row, again, similar to the update, you can use a where clause to actually like narrow down the data that you want to delete this particular statement, which is delete from a table name, and then where column name equals or the column value.
And you can have multiple filters in here.
So here I don't have the row number three, I think I deleted it already.
Alright, so let's keep going products three table, I just wanted to show you it contains a lot more data than my other table.
You can see it contains data about 5849 rows, I wanted to also show you this particular parameter MySQL configuration parameter to basically enable and disable safe updates.
So let's say like if your delete statement or UPDATE statement is not using a primary key column in the where clause, you know, then basically if you enable this particular parameter, let's say by setting this one, and then if you run your delete, you will get like an error code 1175 it mean, and then it says you're using safe update mode, etc, etc.
It's not leading you to the run this kind of add delete statements, because it could be a good cause bad performance.
So if I disable the same thing, and then if I run the Delete statement, and then just run a select again, then it should go through because now the parameter is disabled.
And two more things.
One is actually like if you have a huge table and you want to delete only a few rows at a time, then you can use the limit keyword to limit the number of records that are deleted by the statement, you know, in this case, because I wanted to delete only 10 rows, let's go ahead and do that.
And it should work just fine.
And then if I do a select, you'll see the difference in the row count actually, now it's like 5839, before it was fired four nights.
So that's how the LIMIT clause helps you also in the limit floors, you can also specify the ORDER BY clause.
It basically sorts the data by these columns, first by quantity, then by product ID, then it deletes the top and or 100 or whatever value you put here, actually.
So let's go ahead and do it and then select again.
Yeah, Kearney, seven D is gone.
So the top 10 rows are gone.
And yeah, that's pretty much it.
Actually, those are all a few variations of update and delete statements.
And of course, there's lots of tangents we can get into but I will leave that task to you.
And I hope it was useful.
And if you have any questions, let me know in the comments.
I'll see you guys in the next session.
MySQL learners.
So in this session, we'll look at SELECT statements, not just the syntax But also like some ways you can actually like improve the performance of your queries, I'm going to be using the schema called income store to explain about this SELECT statement in its most simple form will look like this.
So you have the Select and from keywords and then after the Select, you specify the Select list, which is the columns that you want to select.
If you specify a star, or asterik, that actually selects all the column columns from this table, and then after the from keyword, you specify the table names where you want to select the data from.
So if I do a select star from products underscore three, it's going to return all the data from products underscore three table.
But do remember that anytime you are using a star after the Select, or in the Select list, you're basically querying all the columns in this table, you don't need to query all the columns in the table in most of the cases, so you only like specify the columns that you need to query.
So in this next query, let's go line by line and see what changes that have done to this query to make it better.
So let's say I want to select only these columns.
That's why I specified only these columns in the Select list.
In the from clause, I have specified products underscore three table very often you will be selecting from multiple tables, you need to join the tables and then retrieve useful data out of it.
And in the where clause, you specify all the filters, or the conditions based on which your data will be filtered out.
So here I am, including only the data which have quantity less than 25.
So this way, I'm able to actually filter most of the data out of this table, this is very useful in minimizing the amount of data that you retrieve from the database.
And your queries are going to be fast as ordered by is basically going to sort the data that is retrieved based on the columns that we specify here.
So here, I'm just like ordering by product name.
And of course, like when you're sorting data, especially when you're sorting a lot of data, the operation can be expensive, unless your source buffer size, that is actually the memory area where the slots happen.
Unless it is sized properly, the operation can be really slow.
So you need to pay attention to that configuration as well.
And I have this other query, which just goes to show you that like this is a very simple SELECT statement.
Again, in this select, actually, I have only the Select keyword and a function, I'm using the now function.
But there are several other SQL functions that you can use in the script, for example, I can use the database function to return the database that I am actually connected to.
And as you can see, I am actually able to invoke multiple functions in the same query.
So that's pretty much it.
I'll see you guys in the next session.
In this session, I will be teaching about SQL joints, let's dive straight into the demo, I will be using a schema called eecom store.
And I'm creating a table first called T one with one column, the column name is C one, and I'm inserting these two values in this table.
One and two, I'm creating another table called T two with a column called C one and inserting these two values again, into table D two, one and three.
So it's one and two here and one and three, here, we're going to go ahead and run a commit to make my changes permanent.
So I'm going to be just creating these two tables just to show you the records, D one has one and two, D two as one and three.
Of course, a join is an operation that joins two tables.
And we have all these different types of joints, we'll go one by one and understand what they are.
So this is the syntax, so select an a column list that you're selecting.
So we're joining T one and T two.
And then we're specifying the kind of join that we are making.
And then we also have this on keyword.
And then comes the condition on which the table is joined.
So I'm going to go ahead and run this query and see what happens.
As you can see, this query, this inner join has returned the value one, so that means actually, so it returns the values that exist in both the tables that match.
So that's what INNER JOIN does.
So let's just change it to a left to join, go ahead and run it.
Now the left join is gonna return all the values from your left to table which is T one.
So T one has values one and two are the rows one and two, and then T two, it's going to return only the matching values.
And then for this value, which only exists in table T one, it's going to return and now and then I'm going to change it to right join and as you might have guessed it's going to return all the way Use from table t to in the places where there is no matching value, it's going to return a null.
So let's see if that happens.
That's what we expected.
So we got all the rows from T two, and then for three, there is no matching value and T one, you know, that position has no value.
Now we'll jump quickly to a union.
And then we'll come back to a full join, a union is basically going to look like this.
So two queries, and then in between, we have the union keyword, let's see what it returns, you can see that it's written one, two, and three.
So that's actually the rows from both the tables, but it's kind of like combined the data and then smashes them together.
And then you have one, two, and three, and then let's run the same query with a slight difference.
We'll put union all and then we'll see what happens.
That's written one, two, and one, three.
So that's returned all the data from both the tables, but except this time, we have duplicate values, Union gets rid of all the duplicate values, it's almost like a set where you have a unique set of data, a union all returns all the values, including duplicate data.
Jumping back to full join, we don't have a full join keyword.
So rather, we do full join this way in my sequel.
So basically, you have the similar query where you're joining T one and T two, a left join first on this, there's one column that we have, and then you have another query, again, joining T one and T two on this, just one column, but then we are doing a union of these two, and that's going to return the data from both the tables, we have one, two, these two are matching, then for two, there is no matching value.
So it returns and now for three, there is no matching value in T one, it returns a null over here.
So this is a full joint, that's basically all the joints, all different types of joints that you can do in MySQL, I hope this example was clear.
And I'll see you guys in my next session.
All right, my SQL learners.
In this section, we're going to learn about locks.
More specifically, I want to talk about the isolation level section.
So the first thing is just see what I have here, I have two terminal sessions.
One is in black.
The other one is in slight maroon color.
So I'm actually going to log into the database as the root user.
And I'm going to do the same thing over here.
There you go.
I am logged into my SQL database.
So I have a little script here to create a dummy table called T one.
Okay, so let me show you the SQL script.
At this point, actually, you might not understand the SQL syntax and so on.
But then let me explain.
Briefly, first thing I'm doing is setting auto commit to zero or commit is basically a command that you use to save your work.
Basically, the data changes that you're doing is permanently stored in the database.
When you issue a commit command, in my sequel, you have this variable called auto commit, which is turned on by default, meaning all your commands will be automatically committed.
If you don't turn this off, I want to have more control over what I'm doing here.
So basically, I am doing an auto commit, disable first, so and then I'm starting a transaction.
And just to be safe, I'm dropping this table if I had already created it.
So this table doesn't exist.
So it says unknown table.
And the next thing is I'm creating a table called T one in eecom store schema.
And then the column name is C one.
And the data type is int and its primary key.
So and then I'm actually inserting value, just one row into this table called p one, right, the one that we just created.
And I issue a commit command, alter or the alternative to commit is rollback command.
So which basically rolls back rewards the changes that you just done in that session.
So if I just do a select star from the stable, then I'm going to see this value, so which is fine so far.
So this is pretty straightforward.
So far, we haven't talked about the isolation levels.
So what I mean by isolation level is when multiple sessions are trying to modify or access the same data data, then you need locking mechanism to make sure the data is not corrupted, or the database is behaving in a way that you expect to see how you actually set isolation levels.
And this is the command.
So this is the other session I had opened show session variables like isolation.
So that shows like the transaction isolation level is set to read committed.
Right.
So this is one of the possible options action.
So this is read committed, and you have read uncommitted, and you have repetative read, or repeatable read.
And then you have a serializable value, actually, so let's go one by one, right.
In this session, I already started a transaction.
So I'm going to actually try to update this value using an update command.
So basically, I am updating the same table, and I'm updating this column to to where the column value is currently one, right.
So I'm going to do that the auto commit is turned off.
So it's not committed yet for the start a transaction over here.
And let me run a query against the same table and just copy and paste the table name, want to type it, okay, so we see the value one, which is the previous value.
And if I ran the same query over here, in this session, I see the value two, because this is the session where we are modifying the data, right? So and I can see the changes before committing in the same session here.
Actually, since the value of this transaction isolation, or the isolation level is set to read committed, it is possible only to read the committed data.
In other words, when multiple sessions are accessing the same data, in this case, this column right here from this table, apart from the session that is actually modifying the data, the other sessions can only see committed data, any data that is committed just before this select is executed.
So I'm going to go here and run a commit, and come back over here and run a select.
So now you see the latest data because that commit happened before I ran this query.
Now let's talk about read uncommitted isolation, setting actually freshly log in again, because these things can get tricky.
So every time I want to just recreate the tables to remove any confusion.
So let's actually log in again, okay, in here, and I'm actually going to execute the same script that I showed you before.
So just disabling auto command, starting a transaction, dropping the stable and recreating it, inserting this value, and then running the command.
So now here, what we could do is go ahead and update this value to two.
But remember, I haven't committed this data yet.
Let's go to this session.
And here, go ahead and change the setting to the isolation setting to read uncommitted, because by default, it is always set to read committed action.
Right.
So you can see that here.
So and this is a session level setting.
And you can also change it at global level.
But for the purpose of this demo, we just need to change it at the session level.
So session level isolation initially read committed, then I ran the set session transaction, isolation level, read uncommitted, and then checking the value again.
Now it's changed to read uncommitted, if I ran a select star from this table, then I get the value two, and if you remember that I I only updated the value from one to two.
And you can already see this beta even though it is not committed over here.
So that is how read uncommitted works.
So there is not much locking going on here.
Because database is now letting the sessions do dirty reads because one session is able to read and other sessions changes even before the commits happen actually, right.
So those are dirty reads.
Yes, actually.
So let's go on to the next one.
So we have seen read, committed and read Committed so far.
So now let's move on to repeatable reads action.
Recht? So exit.
So here I am going to just commit.
And I'm gonna re rerun my initial script just to clear the table.
So drop table and then recreated insert, value one again, and then commit.
So now, the table is back to how it looked before.
So here, let me log in again.
So this is repeatable read setting, right? So remember that the default value for this isolation setting is always read committed.
So if I change it to repeatable read, write, and then check the value again, then you can see this.
So and again, remember, or show variables is the command to check the current value.
And then set is the command to set the configuration right, so I will put all these commands in like a git GitHub repo file, then you can actually grab the commands from there, and then you can try them yourself.
Basically, I'm changing the I'm changing the setting from read committed to repeatable read, right, so I'm going to just start a new transaction over here in here, I'm going to update this value to two.
And over here, I'm going to run the Select query that we saw before just selecting everything from this table.
And you see that the value is currently one.
And that makes sense.
So let me go ahead and run commit.
And if I ran the same query, again, I see the value one.
And this is the same as the value that was read before, even though the data was changed by this other session.
And then committed within this transaction, the data that we are seeing is the same in in other terms, basically, we are, we are reading the same data, or the reads are being repeated.
Right.
So that is the third setting.
And the last one is the most strict locking configuration.
So which is called serializable.
So I'm going to, as usual, I'm going to drop the table and then just recreate them recreated, inserted value one again, they might come in.
So here, we're going to log in again.
And as usual, the default setting is read committed, right? So let's check that first, just to show you, and then I'm going to change it to serial serializable.
So what this means is, basically, I'm going to start a transaction.
So on the first session, I'm going to run an update, basically changing the value from one to two.
And here, I'm going to start a transaction, and I'm going to run a query on that table.
Right.
And now this query, even though it's just a select, select is just a read, it's not updating, it's not deleting or doing anything, it's just a read, it is waiting, because the update is basically updating this data.
And then it's not database, MySQL databases, not even letting this read or the Select query from the other session to see the data.
So this is the most strict setting action.
So if I do a commit over here, then on this other session, you will see that the Gradius return and it's seeing the latest value, right.
So if I go ahead and run another select, of course, it's returning the same thing.
But if I try to update this value from two to three, another update, that is basically going to wait on the Select, basically this transaction that is running right now because the Select again, select is just a read, it is just reading the data.
But still it is locking that row in the database, and it's not letting any updates or modifications to that data.
And then you can see that the update even failed because it waited for some time and then the timeout value exceeded so we don't have to go into those details.
But I'm going to try updating now.
And here.
I'm just going to exit out of this session, which will release all the locks.
And that will help the update to go through.
And then I can commit and exit as well, and how you hope it was clear to you guys.
And if you have any questions, please put it in the comments and reach out to me somehow I know you can figure it out, as you guys are next section.
Hey, MySQL learners.
So welcome back to this new section of my MySQL tutorial.
So in this video, or in this section, we're going to talk about locks.
So what are these locks? Recht? So let's actually approach this kind of like logically.
So if you have a database, and if you're the only person working in this database, then you basically need not worry about anything, right? You know what you're doing.
So you will insert data, delete, or update data the way you want.
And there is no one else trying to intervene or interrupt your work.
But unfortunately, that's not the case.
In today's world.
If you think of a busy ecommerce database like Amazon, then then there's like, a lot going on on the on those websites.
There's like multiple people browsing is like, a lot of people buying stuff.
There's the people who are selling stuff on on these websites, they're updating data relevant to their products.
So that is basically concurrency, right? So you have many users trying to do something on this website at the same time, so how do you manage this concurrency, that's why we need locks.
So if I let everyone work on the same data at the same time, then there's going to be a lot of confusion.
And we might end up losing some data.
So let me actually show you a simple example of how that happens.
So I have a table, a product table.
So if you've been following my tutorial, thus far, we talked about this table called products.
So where we store all the product information, right.
So now, there's a couple of records over here.
And let's say that we have a seller and a buyer who are working on these records, especially like this particular record, the first one, which is a book, and the books, prizes, this and the quantity, the thing we didn't have quantity when we talked about it in my previous sections.
But then I added quantity here.
So there's this quantity column.
And there's a there's a seller and buying buyer interested in this record, let's look at this, right, so we have sort of like a time sequence here.
So what the seller of this particular product is trying to do is he's trying to update the quantity of this product at nine one, he is adding 60 more quantity to that product, which is you know, 40 plus 60, which 100.
And that's what we have over here.
So then a buyer comes and he looks at the quantity.
And then he basically wants to order two or these books, that's 100 minus 90 100 minus two, it's 98 and then you have the quantity 98 over here.
So this happened in a sequence.
So but we are worried about concurrency, right? concurrency is like when things happen at the same time.
But what if Okay, first the seller comes and then he reads the quantity of this item.
Initially it was 40 and then buyer comes and he also sees that the quantity is 40.
Recht? And at 901.
So the first two operations happen at the same time at nine or one seller comes in he says I want to update I want to add 60 more quantity, like meaning I have 60 more books of this title, but then buyer comes and he says okay, I'm buying two items or two of these books.
So but while you that he saw before was 40.
So 40 minus two is 38.
So he updates the quantity 38.
So the seller updates at 200.
But then, because of this previous look up, the quantity is updated to 38.
due to which this whole thing, this whole operation is lost.
And we end up with sort of like corrupted data for this quantity column.
So this is a simple example of how concurrency when not managed well might cause issue data issues like this.
MySQL learners.
So in this video, we are going to look at basically how table locks works.
In the context of e commerce database, we created a simple database or schema called the column store.
And we created a bunch of tables or used another dummy table to explain our transaction isolation levels.
So if you haven't seen my previous material, go back and check it out.
And come back here.
But then yeah, you have four tables for main tables.
And the main table that we are interested in is products table here.
And in the products table, I inserted a couple of records.
These are dummy records.
So I don't have a front end or application running over here.
So we're just looking at database, right.
So what what's going to happen in this tutorial is, so we, we're going to basically simulate a situation where a seller is trying to update the quantity of the book that he is selling on this website, which is this first book actually, the common path to uncommon success.
And then the right now the quantity of this the quantity available.
You know, for this book is 40, right? So he wants to update this quantity 200.
And also, we'll have a couple of more users, or buyers, basically one buyer is trying to buy the same book, we'll have another buyer Hill, who tried to buy a different book, which is this book, tiny habits, and then the same buyer will also try to browse the website, like of course, like, we are going to have to imagine a little bit because I don't have a front end to show you everything.
So let's actually see how this goes.
So first of all, you know basics first, actually, let's actually turn off the auto commit.
Just so just so actually, we have more control over what's happening.
And let me do that in all the three sessions I have open and the first session is the seller session.
The second session is the buyer one session.
And the third session is the buyer to session, basically.
So I'm going to turn off the auto commit, which is basically a mechanism that commits automatically if it's enabled.
And I don't want that.
So I'm disabling it.
So next is I want to show you the transaction isolation level.
And we talked about it in my previous session.
So right now it's a repeatable read.
And it's the same for all.
So we are going to change that to read committed, because read committed is isolation is the right isolation level for OLTP databases.
So now let's actually start with the first seller session.
So three sessions.
So the first seller session is going to update the quantity of this book that he's interested in or his selling action.
But we are going to take this aggressive approach and log the whole table.
Right.
So let's say the application is returned in a way that it logs the whole product stable for right.
And then the other session, let's say by one second session, buyer one comes and he is going to try to buy two books and and how actually we're going To do that is by running an update.
So we are basically updating the products table and we are subtracting the quantity by two, which means actually the we are buying two books.
And which book is there in the book? Where are the record where product ID equals one, right? So if you remember the data, product ID one is this book, let's go ahead and run this update in the second session.
And it's going to obviously, wait, because the table itself has been locked for right by the seller session, the buyer, one session is waiting.
And let's go to the buyer to session the buyer to Australia trying to buy a different book, which book is it this other book, which is tiny habits book where product ID equals two.
And we're gonna do that.
Of course, even that is hanging or waiting.
And that is actually a little bit crazy, isn't it.
So just sellers trying to update the quantity of this one record with just one book.
And everything is tanking.
And the buyer, too, was trying to buy a different book, he kind of gives up.
So he moves to a different session.
And instead of buying or trying to buy a book, he just tries to browse the website, which is a select query or read query, read a select query, which is also hanging.
So the buyer too is getting frustrated right now.
So you can see how restricted this kind of sequences.
So if someone's using table logs, that's going to basically reduce the concurrency of the operations that can happen in this database.
So that's the main point here in this demo.
Hey, my sequel learners.
So in this session, we are going to take a brief look at row level locks.
In my sequel, I have three sessions, I'm already connected to my ecommerce database, MySQL database, and this is how the data looks now.
So we have a products table which holds you know, this data, only two books now, just dummy data that I created this, this is the price and you have the quantity column showing you how many, how much quantity is left for each of these books.
So the first session is seller session.
The second session is buyer session, we can call this buyer one session.
And the third session is a buyer to session.
So this is the data.
And just for clarity, actually, I wanted to show you the transaction isolation setting, which is read committed.
And the auto commit is turned to turned off basically, it's disabled.
So unless I commit explicitly, my transactions will not be permanent.
So let's actually start with a seller.
He's going on the website or a portal that he has available to update the inventory of, let's say the book one, it or the product one, which is this book.
And so he is going to click some buttons, which is going to translate to an update statement being executed in this database, right? So let's say he wants to increase the number of books available in the inventory.
So that will mean quantity is going to be increased incremented by 50.
So that's the UPDATE statement.
And he's going to run that update.
And we can look at the buyer one session, let's say buyer one is trying to buy the same book.
And and then, so he's going to go on the website and then click on buy now or whatever and then is going to translate into this UPDATE statement in the database, choose quantity equals quantity minus one.
So reducing the quantity by one, meaning he's buying a, buying a book.
And of course, there's going to be, you know, other statements updating other tables.
But then to keep it simple, I'm just showing you the product table changes section.
So as you can see, this is going to wait because seller is updating this particular row action.
And that can be seen using acquittee.
On data locks, so if you're under this greddy, of course, you can modify this query as per your needs.
But then if you query this, you will see that there's bunch of sessions and is, is the lock mode column.
And then the table on which the database on which the locks are happening the table, so it gives you a lot of details.
So, so if you want to understand what's going on here.
So we have products table, and then we have ix lock, which is intention, exclusive lock on the table itself, meaning like a transaction is about to get an exclusive lock.
And this is at the table level, but don't get tricked by that.
There is also another row indicating there is a record level or a row level lock.
And, and that is logging only this data equals one.
So if you remember that UPDATE statement, we are using product ID.
So and data for which is one, actually, so product ID equals one.
So that's what we are seeing over here.
And if you see here, this buyer session has actually timed out already, so he's going to attempt to buy again.
So that's how like, you can actually look at the locking details in this table.
Let's try, let's say like buyer two comes in at this point.
And then he just tries to browse the inventory on this ecommerce website.
So that would mean a select query or read query.
And he's, he's able to do this happy reaction.
Right.
So there is no problem.
So while the rollouts are happening, other sessions can read this table, they can even look at the data for the same product.
But they they just cannot buy this book, because that is being blocked by the seller.
So again, it timed out.
So at this point, buyer two wants to buy a different book, you know, I'm not able to buy this book, let me try buying a different book, that's going to translate to, you know, product ID ID equals two, which is not being locked by the seller.
And then that update goes through.
And at this point, let's say the seller has completed updating the inventory.
And, of course, if you look at the data, now, it's going to look different, because this has been updated to 150.
And of course, this hasn't gone down because buyer, buyer, one is still in the process of buying the book, because the commit has not happened yet in the application.
And then if we look at the data, again, the data has gone down, or the quantity has gone down, then via two, let's say wants to buy the first book that buyer one wanted to buy.
At this point, there are no no locks in this table.
Because everyone's committed, and let's say buyer, who is trying to buy this, this book, and then he goes through with that date, and then commits and look at data.
And then the data is changing actually.
So this is how row level log basically allows for high concurrency.
So only the rows which are logged by your transactions are not available for these other sessions to modify.
Right So the other records which are not touched by your transactions are available for updating, deleting, etc.
and all, of course, you can add new books, that means inserting new records in this table.
So I just wanted to show you the difference between table level logs and row level locks.
So this session and my previous session will, will be useful in understanding that difference.
Thank you, I'll see you in my next session.
In this session, we're going to be talking about deadlocks.
And I just want to show you how deadlocks happen, they do happen in in a busy ecommerce or B.
database often, so it's good to know what they are.
So it's going to be a very short and sweet session.
So here, we have a couple of sessions again, so connecting a connected to the same database has two sessions, two different sessions.
So let's say that we are working with products table, right.
So we have seen the stable before in my previous sessions.
Basically, this table has information about the products that are being sold on, you know, an e commerce website.
So we have a couple of records over here, you know, we're going to first let's say, you know, I seller comes to actually update the quantity of this product, basically, let's say if he wants to increase the quantity by 25.
For this first book, this is the command that he's, you know, that's going to be executed, you know, whatever buttons he is clicking, will be translated to an update command like this.
Right.
And let's say like a different person from the same company wants to update the price of this book, not this book, let's say we have it the other book, I'm just actually using the product ID to update the right product, right.
So we have one session where seller, one is updating the quantity of this item, we have another session where we are updating the price of this item.
And then if you see the prices incremented by two, let's say $2.
And this is fine, right? So now we have row level locks.
So this guy is holding a row level lock on this row.
And this guy is holding a row level lock on this row.
So this is fine, right? So we are operating on two different records, two different locks are independent of each other.
All good.
So now let's say the same seller, the second person who is updating with price, wants to update the price of this other book to actually like he is actually increasing the price.
Again, by $2 of this book, the product ID equals one, which book, this one right here, let's go ahead and try to increment the price.
By running this command, you know, he's waiting on waiting for the lock ECI exclusive lock.
And that's not available, because this seller has not committed actually is not committed.
So let's actually go back here and, and this seller at the same time price to update the price of or quantity of this book.
So two sessions are fighting for pretty much the same resource, you know, we ended up in a deadlock situation.
So my sequel was smart, smart enough to just kill the session.
Otherwise, we would have two sessions waiting for each other endlessly.
Recht? So here you can see the error code that is thrown, it says deadlock found when trying to get locks and try restarting that transaction.
So let's go ahead and query the products table and see how it looks.
You can see this, this whole transaction was rolled back.
Correct.
Both the transactions were rolled back.
There's even this one was rolled back.
So I think that Locke was also killed.
So that's why this this one went through.
If you can see the prices have increased by $2.
right because initially For 1699 and 2039, and here 8099 and 20 to 39.
Okay, so that's how it works.
This is a typical deadlock situation, I hope this explanation was clear.
And I will see you guys in my next session.
All right, my sequel learners.
So in this session, we're going to talk about clustered indexes.
So, so clustered index is not a different index type as in, like, you can, you know, directly create a create a clustered index yourself.
So it is a type of index that, that MySQL kind of maintains in the, you know, behind the scenes actually.
So, in also your table data, the data that you insert into your tables or load into your tables are maintained in these indexes.
indexes only what I mean by that is, so let's say this is a B tree index, right, so this is a B tree index.
So you have my sequel, creating this B tree index, as you load the data into these tables.
And then, you know, in the leaf nodes, what you have is actually the data, the data that you're loading into these tables, right? In the clustering, the sorting is based on the primary key that you define, or, you know, in this table, actually, so if you don't define a primary key, MySQL will automatically pick up a non nullable index key, what that means is, so let's say that, in fact, actually, let's jump straight into the example that I have prepared for you guys.
So so this is my MySQL Workbench.
And, you know, I'll show you this table definition.
So this is called products underscore one.
And it's basically a products table that is typically used in a ecommerce store.
And if you've been following my lessons, this is what I've been using, I just changed the name of the table for, you know, demonstrating this concept, this clustering, clustered index concept.
So you have all these like columns, and I'm defining a primary key.
Okay, so let's just start by, you know, I'm just going to switch to a database called eecom, store our schema called the econ store, I'm going to drop, you know, these tables if they exist already, by any chance.
So the table doesn't exist, which is okay, so I'm going to create this table, which I just talked about, called products.
And then this table has primary key in a primary key is product ID.
So product ID is sort of like an integer column.
So this is an auto increment, right? So you don't even have to provide value for this column, actually, when you load the data, so you can just put all this information and load it and then we are good, MySQL will automatically increment the value of this column action.
So and then, of course, like I said, like there is isbm column, which is over here, sort of leg book iasb.
And information if you are, you know, if you remember your school days like this, this is be a number attached with any book, so something like that.
So some kind of ISDN alphanumeric number.
So I'm going to call that like a unique key or a unique constraint.
And let's go ahead and create the stable and this constraint.
So that was successfully created.
And I'm going to create a procedure, which I can use to kind of like populate the stable, right, so don't worry about the details of this procedure.
This is something that I wrote to populate this table.
And then that is successfully created and change the delimiter back to a semi colon.
And then I'm going to call this procedure and which is going to throw some warnings, which is okay with me.
As long as as long as the data gets populated, I'm fine.
So it's going to probably generate some, you know, load some 6000 plus rows into this table.
So we'll see how much we get this awesome.
So it's actually loading a lot of data.
It seems to be done.
So let's go ahead and commit the data and Now Actually, I'm going to select the data in this table, right? Just select all the data, and you will see that the data by default, or the data is actually sorted based on the primary key, which is product ID.
And you can see, we know, I haven't like specified any ordering.
So this is, you know, this is the default ordering of data, right.
And so basically, your table data is sorted based on your clustered index, which is primary key over here, because you have the primary key in the table section.
Right.
So now the next thing is actually, I'm going to create a similar table, which is, you know, so I'm going to call it products too.
But in this case, I'm going to basically not define a primary key, I'm still going to have a unique key called, again, the same thing, you know, it's isbm, it's a unique key.
And let's just give it a different name, just so we have kind of like, we have different names for different constraints.
So let's actually go ahead and create this table.
And so this table is created, I'm going to copy the data from the first table that you know, where I loaded a lot of data.
So I'm going to copy the data from that table into this table, right.
So just very simple.
And then I'm going to commit, right, so that's a board 6455 6455 number of rows inserted into this table.
And I'm going to select all the rows from this table.
And you can see that now, the data is not sorted by product Id rather it is sorted by this iasb.
And it is sorting based on first character first, and then Initially, the first and second characters are the same, then 010 true.
And that keeps going 05 and then 090, a BCD of GE hedge and then having after the zeros, you know, see one, so it is basically sorting data based on iasb.
And and why is being because because of the absence of primary key, it's going to choose this iasb and column, as are the it's going to choose this non nullable unique index key, which is based on iasb and column, right.
So it's starting based on this, but this is actually a terrible, terrible idea.
Because if you're generating random, alphanumeric strings for iasb.
And, you know, then you're not going to be generating the string in sort of like an ascending order or in any type of order, actually.
So in that case, actually, you know, when you're, as you're inserting data into the stable, this B tree is going to be created behind the scenes.
And then my sequel, like whatever program is creating or maintaining this data structure behind the scenes has to work really, really hard to manage this Bre B tree index, actually, right.
That's why this is a terrible idea to have like a you UID or some kind of alphanumeric string as a primary key actually, or in the absence of primary key.
Well, my sequel is going to use this this key for clustering.
And again, it is very bad.
So keep that in mind when you're creating tables actually.
Right.
So finally, what I'm going to do is create another table called product three.
And before that, I'm going to show you the output of this query, which is basically going to come up empty or no, no, no road rows returned.
All I'm doing is actually checking whether this index the index with named Jen flushed index is there in this database, actually.
And then I'm checking the InnoDB tables and information schema I'm joining in odb tables and in odb indexes.
And I'm checking whether this index indeed exists, right? Saying it doesn't exist, which is where the this, this credit, return no rows, and I'm going to create this table and this time, I'm not even going to create the create a unique key.
And I'm going to make all these columns as nullable columns, you know.
So I just want to show you what happens when you have a scenario where you're creating a table with all nullable columns and no primary key index no unique, not nullable index and you know Then I'm going to insert data into this table.
Again, six, the 400 plus rows inserted, commit.
And then I'm going to select from this product three table right now.
And when the data comes up, you can see that there is still some ordering that's happening.
And, you know, we don't have any of these options primary key or a not nullable, unique key available, then how is MySQL able to sort data? What is it using, so it actually uses a hidden, hidden key actually, right, a hidden primary key.
So if you run the same query, again, is ready, you can see that this index has been created on products three table, which is maintained internally by my SQL, for just the purpose of clustering this table, actually.
Okay, so that's a lot of information.
I hope you found this useful.
And I will see you guys in my next video.
Hello, my SQL learners.
So in this session, I want to teach you the basics of using explain or explained plan in MySQL.
Alright, so now let's just let me just show you the table that I'm going to be working with, I'm going to be working with that table called products underscore one.
And it's got some net in a product name, product type price.
And if the product is a book, it will have an ISP a number attached with it.
And then there is a quantity column.
So these are some basic columns that you would see in an e commerce online store.
So let's get started by just looking at the indexes of this table.
So this basically has two indexes.
One is a primary key index, which is on the product ID.
And the other one is an index on the iasb and column.
And this is a unique index, actually.
So let's get started by picking a simple query that we are going to kind of like optimize using explain.
So the query that I'm going to be using is this.
So I'm going to be selecting iasb.
And from this products underscore one table where product name has cat in it.
So the product name is cat.
Okay, so And before I run this query, I'm going to look at the explained plan of it.
And I'm going to put a slash g at the end.
So I get that we'll put in there in a readable format.
So first of all, it gives this output, right, and selectors, just one straights, simple select.
That's what this is showing.
But the main thing is we are working with our this particular row is referring to this table.
And apart from that, actually, you have all these columns, and then they are all null right now, like they don't make much sense apart from this.
So this is a tight column and all means that it is doing a full table scan.
Basically, MySQL is doing a full table scan, it's scanning the whole table.
And how many rows is that it's these many rows.
And we are using a filter over here, it gets all those rows and then it filters the output.
And basically a you know, there's about 600 rows with product name equals cat, right, so the filtered person ages like 10%, basically, and then there is some extra information.
Let's go ahead and create an index on this table.
Create index called, you know, we can give an arbitrary name.
And, and I'm going to create add on products, one table and the column is product name, of course.
This is the column on which I'm creating the index.
Actually, let's just go ahead and run the explain again.
So this is the explained plan.
And that's how it looks.
So basically, you can see that the Again, it's pretty much the same kind of output, but this time, it is also showing some data for all these columns.
So first of all possible keys column shows like all the indexes that this query can use.
And, and out of which, like this is the key or index that it is, you know, it is going to use this particular execution is going to use, and this is the key length in bytes actually write the number of rows that is being scanned in this key, which is 589.
And, you know, since this is index based, we're not really filtering data, rather, we're just going to the index and getting the data.
So there is no filtering over there.
Let's actually create another index, which also includes iasb.
And, and see, like, what happens, actually, we're gonna create the other index and give it a different name.
So let's go ahead and run the explain plan again.
So now, again, the possible keys are these two indexes, but it still chooses to go with this particular index, and the index, key length is the same, and then grows, and etc, etc.
So there's no filtering that happened, right? Because we're choosing an index.
So you might be wondering, like, you know, why it's not using the covering index, right.
So this is supposed to be the covering index and covering indexes are supposed to be better than normal, non clustered index or a secondary index.
So you can actually like, use a format like JSON format to get more information.
So how you can do that is by just specifying like format equals JSON, and use the use that.
And so that's going to give you the output in JSON format.
And you can see that the you know, it gives you a little bit more information as then like the query cost, you know, this is how much it's going to cost for my sequel to execute this query.
And this is a representation of the amount of work MySQL has to do to run this query actually.
So the cost for this one is 7690, right.
And then again, it says these are the possible keys.
And used key is used key parts is product name, which was not given over here.
And then there is a cost and for which is a split of where the cost is going.
So you can read my SQL documentation on all these fields.
You know, you might be wondering why the covering index is not being used.
And we can actually force that index by using this use index.
Syntax or use index keyword.
And then I'm going to put the index name that I want to force which is this one.
And when I ran it, this ran the explained plan this time, it shows the cost of this one is going to be 109 point two seven, you know in comparison to the previous explain plan, where the cost is only 76.
And this is why my sequel is going with this particular plan instead of this guy.
Okay, I hope this session was useful.