Wir sollten erwägen, ProxySQL auf Client-Knoten zu installieren, um ein effizientes Workload-Management im gesamten Cluster ohne Änderungen an den Anwendungen, die Abfragen generieren, zu ermöglichen. Dies ist die empfohlene Hochverfügbarkeitslösung für Percona XtraDB Cluster.
Einige der beliebtesten Funktionen von ProxySQL sind:
- Hochleistung
- Effizientes Workload-Management
- Abfrage-Caching
- Abfrage-Routing
- Unterstützt Failover
- Erweiterte Konfiguration ohne Ausfallzeit
- Proxy der Anwendungsschicht
- Plattformübergreifend
- Erweiterte Topologieunterstützung
- Firewall
Umgebungsspezifikation:
192.168.56.115
centos
Voraussetzungen:
Wir müssen die folgenden Ports auf allen Servern öffnen
firewall-cmd --zone=public --add-service=mysql --permanent

firewall-cmd --zone=public --add-port=3306/tcp --permanent
firewall-cmd --zone=public --add-port=4567/tcp --permanent
firewall-cmd --zone=public --add-port=4568/tcp --permanent
firewall-cmd --zone=public --add-port=4444/tcp --permanent
firewall-cmd --zone=public --add-port=4567/udp --permanent
Erlauben Sie ProxySQL-Dienstport 6033/tcp (das Gegenteil von MySQL-Standardport 3306) in der Linux-Firewall.
firewall-cmd --permanent --add-port=6033/tcp

firewall-cmd --reload
Installieren von ProxySQL Load Balancer für Percona XtraDB-Cluster auf CentOS 7
ProxySQL v2 unterstützt nativ Percona XtraDB Cluster. Um ProxySql zu installieren, installieren Sie es aus dem Percona-Repository
sudo yum install proxysql2
Um eine Verbindung zur ProxySQL-Verwaltungsschnittstelle herzustellen, benötigen Sie einen MySQL-Client.
yum install Percona-XtraDB-Cluster-client-57
Starten Sie jetzt den proxysql-Dienst
[example@sqldat.com ~]# systemctl start proxysql.service
Verwenden Sie die folgende Abfrage, um den Port auf dem Cluster-Knoten zu überprüfen.
mysql -uroot -p -e "SHOW GLOBAL VARIABLES LIKE 'PORT'";
Stellen Sie jetzt eine Verbindung zum ProxySQL-Admin-Panel her und konfigurieren Sie den Load Balancer.
mysql -u admin -p123 -h 127.0.0.1 -P6032 --prompt='ProxySQL> '

INSERT INTO mysql_servers(hostgroup_id, hostname, port) VALUES (0,'192.168.56.110',3306);
INSERT INTO mysql_servers(hostgroup_id, hostname, port) VALUES (0,'192.168.56.113',3306);
INSERT INTO mysql_servers(hostgroup_id, hostname, port) VALUES (0,'192.168.56.114',3306);

ProxySQL> SELECT * FROM mysql_servers;
+--------------+----------------+------+-----------+--------+--------+-------------+-----------------+---------------------+---------+----------------+---------+
| hostgroup_id | hostname | port | gtid_port | status | weight | compression | max_connections | max_replication_lag | use_ssl | max_latency_ms | comment |
+--------------+----------------+------+-----------+--------+--------+-------------+-----------------+---------------------+---------+----------------+---------+
| 0 | 192.168.56.110 | 3306 | 0 | ONLINE | 1 | 0 | 1000 | 0 | 0 | 0 | |
| 0 | 192.168.56.113 | 3306 | 0 | ONLINE | 1 | 0 | 1000 | 0 | 0 | 0 | |
| 0 | 192.168.56.114 | 3306 | 0 | ONLINE | 1 | 0 | 1000 | 0 | 0 | 0 | |
+--------------+----------------+------+-----------+--------+--------+-------------+-----------------+---------------------+---------+----------------+---------+
3 rows in set (0.00 sec)
ProxySQL-Knotenüberwachung konfigurieren:
Melden Sie sich bei der MySQL-Datenbankinstanz an und führen Sie die folgenden Befehle aus, um den Überwachungsbenutzer mit der Berechtigung NUTZUNG zu erstellen
auf jedem percona NODE:
CREATE USER 'proxysql'@'%' IDENTIFIED BY 'ProxySQL';
GRANT USAGE ON *.* TO 'proxysql'@'%';

mysql> CREATE USER 'proxysql'@'%' IDENTIFIED BY 'ProxySQL';
Query OK, 0 rows affected (0.01 sec)

mysql> GRANT USAGE ON *.* TO 'proxysql'@'%';
Query OK, 0 rows affected (0.02 sec)

UPDATE global_variables SET variable_value='proxysql' WHERE variable_name='mysql-monitor_username';

UPDATE global_variables SET variable_value='ProxySQL' WHERE variable_name='mysql-monitor_password';

LOAD MYSQL VARIABLES TO RUNTIME;

SAVE MYSQL VARIABLES TO DISK;

ProxySQL> UPDATE global_variables SET variable_value='proxysql' WHERE variable_name='mysql-monitor_username';
Query OK, 1 row affected (0.01 sec)

ProxySQL> UPDATE global_variables SET variable_value='ProxySQL' WHERE variable_name='mysql-monitor_password';
Query OK, 1 row affected (0.00 sec)

ProxySQL> LOAD MYSQL VARIABLES TO RUNTIME;
Query OK, 0 rows affected (0.00 sec)

ProxySQL> SAVE MYSQL VARIABLES TO DISK;
Query OK, 136 rows affected (0.01 sec)

ProxySQL> LOAD MYSQL SERVERS TO RUNTIME;
Query OK, 0 rows affected (0.01 sec)
ProxySQL-Client-Benutzer erstellen
Provide read/write access to the cluster for ProxySQL, add this user on one of the Percona XtraDB Cluster nodes:

CREATE USER 'lbuser'@'192.168.56.115' IDENTIFIED BY 'lbpass';

GRANT ALL ON *.* TO 'lbuser'@'192.168.56.115';
ProxySQL-Client-Benutzer erstellen:
ProxySQL> INSERT INTO mysql_users (username,password) VALUES ('lbuser','lbpass');
Query OK, 1 row affected (0.00 sec)
ProxySQL> LOAD MYSQL USERS TO RUNTIME;
Query OK, 0 rows affected (0.00 sec)
ProxySQL> SAVE MYSQL USERS TO DISK;
Query OK, 0 rows affected (0.02 sec)
Bestätigen Sie, dass der Benutzer korrekt eingerichtet wurde, und versuchen Sie, sich anzumelden:
[example@sqldat.com ~]# mysql -u lbuser -plbpass -h 127.0.0.1 -P 6033
mysql: [Warning] Using a password on the command line interface can be insecure.
Welcome to the MySQL monitor. Commands end with ; or \g.
Your MySQL connection id is 4
Server version: 5.5.30 (ProxySQL)

Copyright (c) 2009-2019 Percona LLC and/or its affiliates
Copyright (c) 2000, 2019, Oracle and/or its affiliates. All rights reserved.

Oracle is a registered trademark of Oracle Corporation and/or its
affiliates. Other names may be trademarks of their respective
owners.
Type 'help;' or '\h' for help. Type '\c' to clear the current input statement.
mysql>
Mal sehen, mit welchem Knoten sich unser Client im Cluster verbinden wird.
[example@sqldat.com ~]# mysql -u lbuser -plbpass -h 127.0.0.1 -P 6033 -e "select @@hostname;";
mysql: [Warning] Using a password on the command line interface can be insecure.
+----------------------+
| @@hostname |
+----------------------+
| percona3.localdomain |
+----------------------+
Sie können sehen, dass der Proxy-Server mit percona3 verbunden ist
Ich habe es von einer anderen Putty-Sitzung aus versucht, dann wird es mit percona2 verbunden:
[example@sqldat.com ~]# mysql -u lbuser -plbpass -h 127.0.0.1 -P 6033 -e "select @@hostname;";
mysql: [Warning] Using a password on the command line interface can be insecure.
+----------------------+
| @@hostname |
+----------------------+
| percona2.localdomain |
+----------------------+
Nach ein paar Mehrfachsitzungen wird es mit percona1 verbunden:
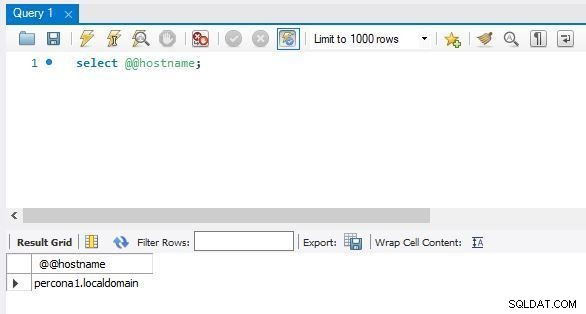
[example@sqldat.com ~]# mysql -u lbuser -plbpass -h 127.0.0.1 -P 6033 -e "select @@hostname;";
mysql: [Warning] Using a password on the command line interface can be insecure.
+----------------------+
| @@hostname |
+----------------------+
| percona1.localdomain |
+----------------------+
Von MySQL Workbench aus verbinden:
Unten ist die Konfiguration meiner Sitzung in der MySQL-Workbench:
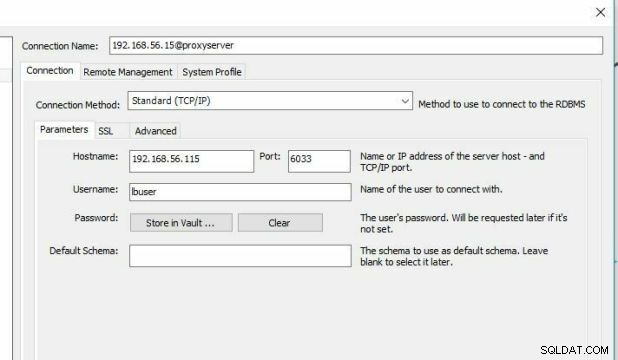
Ich habe versucht zu sehen, welcher Knoten von MySQL Workbench eine Verbindung herstellt
Failover:
Jetzt werden wir prüfen, wie dies das Failover durchführt
[example@sqldat.com mysql]# service mysql stop
Redirecting to /bin/systemctl stop mysql.service

ProxySQL> select hostgroup_id,hostname,port,status from runtime_mysql_servers;
+--------------+----------------+------+---------+
| hostgroup_id | hostname | port | status |
+--------------+----------------+------+---------+
| 0 | 192.168.56.110 | 3306 | ONLINE |
| 0 | 192.168.56.114 | 3306 | SHUNNED |
| 0 | 192.168.56.113 | 3306 | ONLINE |
+--------------+----------------+------+---------+
3 rows in set (0.01 sec)
Lassen Sie nun mysql auf dem Knoten 3 erneut starten und überprüfen Sie den Clusterstatus erneut vom Proxyserver
[example@sqldat.com mysql]#systemctl start mysql.service

ProxySQL> SELECT hostgroup_id hg,count(status) cnt from main.runtime_mysql_servers WHERE status = "ONLINE" GROUP BY hg having cnt ;
+----+-----+
| hg | cnt |
+----+-----+
| 0 | 3 |
+----+-----+
1 row in set (0.00 sec)

ProxySQL> select hostgroup_id,hostname,port,status from runtime_mysql_servers;
+--------------+----------------+------+--------+
| hostgroup_id | hostname | port | status |
+--------------+----------------+------+--------+
| 0 | 192.168.56.110 | 3306 | ONLINE |
| 0 | 192.168.56.114 | 3306 | ONLINE |
| 0 | 192.168.56.113 | 3306 | ONLINE |
+--------------+----------------+------+--------+
3 rows in set (0.00 sec)
HINWEIS: Wenn der Knotenstatus als VERMEIDET angezeigt wird Versuchen Sie dann mehrmals, eine Verbindung herzustellen, damit der Client den neuesten Status des Clusters erhält, da runtime_mysql_servers den neuesten Status des Knotens speichert, als er das letzte Mal versucht hat, eine Verbindung herzustellen.
Cluster mit sysbench testen:
yum install sysbench
sysbench erfordert ProxySQL-Client-Benutzeranmeldeinformationen, die Sie erstellt haben (luser/lbpass) in ProxySQL-Client-Benutzer erstellen.
sysbench /usr/share/sysbench/oltp_read_only.lua --threads=4 --mysql-host=127.0.0.1
--mysql-user=lbuser --mysql-password=lbpass --mysql-port=6033 --tables=10 --table-size=10000 prepare

sysbench /usr/share/sysbench/oltp_read_only.lua --threads=4 --events=0 --time=300 --mysql-host=27.0.0.1
--mysql-user=lbuser --mysql-password=lbpass --mysql-port=6033 --tables=10
--table-size=10000 --range_selects=off --db-ps-mode=disable --report-interval=1 run
So sehen Sie die Anzahl der Befehle, die auf dem Cluster ausgeführt werden:
proxysql> SELECT * FROM stats_mysql_commands_counters;