Das Bauen von Projekten ist wohl eine der zugänglicheren und effektiveren Methoden, um das Programmieren zu lernen. Echte Projekte erfordern, dass Sie unterschiedliche und vielfältige Programmierkenntnisse anwenden. Sie ermutigen Sie auch, Themen zu recherchieren, die beim Lösen von Problemen im Entwicklungsprozess auftauchen. In diesem Tutorial erstellen Sie eine Kontaktbuchanwendung mit Python, PyQt und SQLite.
In diesem Tutorial erfahren Sie, wie Sie:
- Erstellen Sie eine grafische Benutzeroberfläche (GUI) für Ihre Kontaktbuchanwendung mit Python und PyQt
- Verbinden Sie die Anwendung mit einer SQLite-Datenbank unter Verwendung der SQL-Unterstützung von PyQt
- Verwalten Sie Kontaktdaten mit der Model-View-Architektur von PyQt
Am Ende dieses Projekts haben Sie eine funktionale Kontaktbuchanwendung, mit der Sie Ihre Kontaktinformationen speichern und verwalten können.
Um den vollständigen Quellcode für die Anwendung sowie den Code für jeden Schritt, den Sie in diesem Tutorial durchlaufen, zu erhalten, klicken Sie auf den folgenden Link:
Quellcode abrufen: Klicken Sie hier, um den Quellcode abzurufen, mit dem Sie in diesem Tutorial ein Kontaktbuch mit Python, PyQt und SQLite erstellen.
Demo:Ein Kontaktbuch mit Python
Kontaktbücher sind eine nützliche und weit verbreitete Art der Anwendung. Sie sind überall. Sie haben wahrscheinlich ein Kontaktbuch auf Ihrem Telefon und auf Ihrem Computer. Mit einem Kontaktbuch können Sie Kontaktinformationen für Ihre Familienmitglieder, Freunde, Kollegen usw. speichern und verwalten.
In diesem Lernprogramm codieren Sie eine Kontaktbuch-GUI-Anwendung mit Python, SQLite und PyQt. Hier ist eine Demo, wie Ihr Kontaktbuch aussehen und funktionieren wird, nachdem Sie die Schritte in diesem Tutorial befolgt haben:
Ihr Kontaktbuch bietet die minimal erforderlichen Funktionen für diese Art von Anwendung. Sie können die Informationen in Ihrer Kontaktliste anzeigen, erstellen, aktualisieren und entfernen.
Projektübersicht
Um Ihre Kontaktbuchanwendung zu erstellen, müssen Sie den Code in Module und Pakete organisieren und Ihrem Projekt eine kohärente Struktur geben. In diesem Tutorial verwenden Sie die folgende Verzeichnis- und Dateistruktur:
rpcontacts_project/
│
├── rpcontacts/
│   ├── __init__.py
│   ├── views.py
│   ├── database.py
│   ├── main.py
│   └── model.py
│
├── requirements.txt
├── README.md
└── rpcontacts.py
Hier ist eine kurze Zusammenfassung des Inhalts Ihres Projektverzeichnisses:
rpcontacts_project/ist das Stammverzeichnis des Projekts. Es enthält die folgenden Dateien:requirements.txtstellt die Anforderungsliste des Projekts bereit.README.mdbietet allgemeine Informationen über das Projekt.rpcontacts.pystellt das Einstiegspunktskript zum Ausführen der Anwendung bereit.
rpcontacts/ist ein Unterverzeichnis, das das Hauptpaket der Anwendung bereitstellt. Es bietet die folgenden Module:__init__.pyviews.pydatabase.pymain.pymodel.py
In diesem Lernprogramm werden Sie jede dieser Dateien Schritt für Schritt behandeln. Der Name jeder Datei gibt einen Eindruck von ihrer Rolle in der Anwendung. Beispiel:views.py enthält den Code zum Generieren der GUI von Fenstern und Dialogen, database.py wird Code enthalten, um mit der Datenbank zu arbeiten, und main.py wird die Anwendung selbst hosten. Schließlich model.py wird das Modell implementieren, um die Daten in der Datenbank der Anwendung zu verwalten.
Im Allgemeinen hat die Anwendung ein Hauptfenster zum Anzeigen, Hinzufügen, Entfernen und Aktualisieren von Kontakten. Es wird auch einen Dialog geben, um neue Kontakte zur Datenbank hinzuzufügen.
Voraussetzungen
Um das Beste aus diesem Projekt herauszuholen, wären einige Vorkenntnisse in der GUI-Programmierung mit Python und PyQt hilfreich. In dieser Hinsicht müssen Sie die Grundlagen kennen, wie man:
- GUI-Anwendungen mit PyQt und Python erstellen
- GUIs mit PyQt erstellen und gestalten
- SQL-Datenbanken mit Python und PyQt verwalten
- Mit SQLite-Datenbanken arbeiten
Um diese Themen aufzufrischen, können Sie sich die folgenden Ressourcen ansehen:
- Python und PyQt:Erstellen eines GUI-Desktop-Rechners
- Python und PyQt:Erstellen von Menüs, Symbolleisten und Statusleisten
- PyQt-Layouts:Erstellen Sie professionell aussehende GUI-Anwendungen
- Umgang mit SQL-Datenbanken mit PyQt:Die Grundlagen
- Einführung in Python SQL-Bibliotheken
- Datenverwaltung mit Python, SQLite und SQLAlchemy
Machen Sie sich keine Sorgen, wenn Sie kein Experte in diesen Bereichen sind, bevor Sie mit diesem Tutorial beginnen. Sie lernen durch den Prozess, sich an einem echten Projekt die Hände schmutzig zu machen. Wenn Sie nicht weiterkommen, nehmen Sie sich Zeit und sehen Sie sich die oben verlinkten Ressourcen an. Dann zurück zum Code.
Die Kontaktbuchanwendung, die Sie in diesem Tutorial erstellen werden, hat eine einzige externe Abhängigkeit:PyQt.
Hinweis: In diesem Lernprogramm verwenden Sie PyQt Version 5.15.2, um Ihre Kontaktbuchanwendung zu erstellen. Version 5.15.2 ist erforderlich, damit das Projekt auf macOS Big Sur funktioniert.
PyQt Version 6.0 wurde am 4. Januar 2021 veröffentlicht. Dies ist die erste Version der Bibliothek, die an Qt Version 6 gebunden ist. Das Projekt in diesem Tutorial wurde jedoch nicht mit PyQt 6.0 getestet.
Wenn Sie das Bedürfnis haben, das Projekt mit dieser neuen Version von PyQt auszuführen, probieren Sie es aus. Als Hinweis sollten Sie pip install PyQt6 und aktualisieren Sie dann die Importe, um PyQt6 zu verwenden statt PyQt5 .
Um Best Practices in Ihrem Entwicklungsprozess zu befolgen, können Sie damit beginnen, eine virtuelle Umgebung zu erstellen und dann PyQt mit pip zu installieren . Sobald Sie PyQt installiert haben, können Sie mit dem Programmieren beginnen!
Schritt 1:Erstellen der Skeleton-App des Kontaktbuchs mit PyQt
In diesem ersten Schritt erstellen Sie eine minimale, aber funktionale PyQt-GUI-Anwendung, um die Grundlage zu schaffen, auf der Sie mit dem Aufbau des Kontaktbuchs beginnen. Sie erstellen auch die minimal erforderliche Projektstruktur, einschließlich des Hauptpakets des Projekts und eines Einstiegsskripts zum Ausführen der Anwendung.
Alle Codes und Dateien, die Sie in diesem Abschnitt zum Kontaktbuchprojekt hinzufügen, werden unter source_code_step_1/ gesammelt Verzeichnis. Sie können sie herunterladen, indem Sie auf den folgenden Link klicken:
Quellcode abrufen: Klicken Sie hier, um den Quellcode abzurufen, mit dem Sie in diesem Tutorial ein Kontaktbuch mit Python, PyQt und SQLite erstellen.
Am Ende dieses Abschnitts können Sie zum ersten Mal die Skelett-GUI-Anwendung für Ihr Kontaktbuch ausführen.
Strukturierung des Kontaktbuchprojekts
Um mit dem Programmieren der Anwendung zu beginnen, erstellen Sie ein neues Verzeichnis mit dem Namen rpcontacts_project/ . Dies ist das Stammverzeichnis des Projekts. Erstellen Sie nun ein neues Unterverzeichnis namens rpcontacts/ innerhalb von rpcontacts_project/ . Dieses Unterverzeichnis enthält das Hauptpaket der Anwendung. Starten Sie schließlich Ihren Code-Editor oder Ihre IDE im Stammverzeichnis.
Um ein Verzeichnis in ein Paket umzuwandeln, benötigt Python eine __init__.py Modul, um das Paket zu initialisieren. Erstellen Sie diese Datei in rpcontacts/ und fügen Sie den folgenden Code hinzu:
# -*- coding: utf-8 -*-

"""This module provides the rpcontacts package."""

__version__ = "0.1.0"
Diese Datei teilt Python mit, dass rpcontacts ist ein Paket. Der Code in der Datei wird ausgeführt, wenn Sie das Paket oder einige seiner Module importieren.
Sie müssen keinen Code in eine __init__.py einfügen Datei, um das Paket zu initialisieren. Eine leere __init__.py Datei wird die Arbeit erledigen. In diesem Fall definieren Sie jedoch eine Konstante auf Modulebene namens __version__ um die Versionsnummer Ihrer Anwendung zu speichern.
Hauptfenster der Anwendung erstellen
Jetzt ist es an der Zeit, das Hauptfenster Ihres Kontaktbuchs zu erstellen. Erstellen Sie dazu ein Modul namens views.py in Ihren rpcontacts Paket. Fügen Sie dann den folgenden Code zum Modul hinzu und speichern Sie ihn:
# -*- coding: utf-8 -*-
"""This module provides views to manage the contacts table."""
from PyQt5.QtWidgets import (
QHBoxLayout,
QMainWindow,
QWidget,
)
class Window(QMainWindow):
"""Main Window."""
def __init__(self, parent=None):
"""Initializer."""
super().__init__(parent)
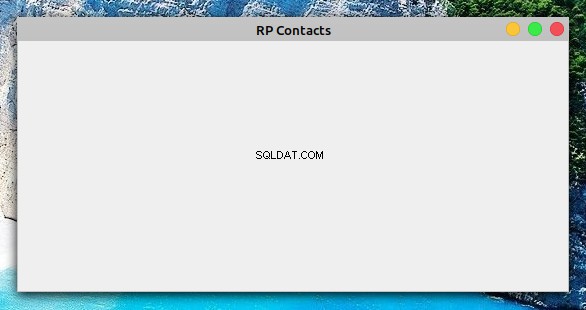
self.setWindowTitle("RP Contacts")
self.resize(550, 250)
self.centralWidget = QWidget()
self.setCentralWidget(self.centralWidget)
self.layout = QHBoxLayout()
self.centralWidget.setLayout(self.layout)
Zuerst importieren Sie die erforderlichen Klassen aus PyQt5.QtWidgets . Dann erstellen Sie Window . Diese Klasse erbt von QMainWindow und stellt den Code zum Generieren des Hauptfensters der Anwendung bereit. In der Initialisierungsmethode setzen Sie den Titel des Fensters auf "RP Contacts" , verkleinern Sie das Fenster auf 550 um 250 Pixel, definieren und setzen Sie das zentrale Widget mit QWidget , und definieren Sie schließlich ein Layout für das zentrale Widget mithilfe eines horizontalen Box-Layouts.
Programmieren und Ausführen der Anwendung
Da Sie bereits ein Hauptfenster für das Kontaktbuch haben, ist es an der Zeit, den Code zum Erstellen einer funktionsfähigen PyQt-Anwendung mit QApplication zu schreiben . Erstellen Sie dazu ein neues Modul namens main.py in Ihren rpcontacts Paket und fügen Sie den folgenden Code hinzu:
# -*- coding: utf-8 -*-
# rpcontacts/main.py

"""This module provides RP Contacts application."""

import sys

from PyQt5.QtWidgets import QApplication

from .views import Window

def main():
    """RP Contacts main function."""
    # Create the application
    app = QApplication(sys.argv)
    # Create the main window
    win = Window()
    win.show()
    # Run the event loop
    sys.exit(app.exec())
In diesem Modul importieren Sie sys um Zugriff auf exit() zu erhalten , wodurch Sie die Anwendung sauber beenden können, wenn der Benutzer das Hauptfenster schließt. Dann importieren Sie QApplication aus PyQt5.QtWidgets und Window aus views . Der letzte Schritt besteht darin, main() zu definieren als Hauptfunktion Ihrer Anwendung.
Innerhalb von main() , instanziieren Sie QApplication und Window . Dann rufen Sie .show() auf auf Window , und schließlich führen Sie die Hauptschleife der Anwendung aus , oder Ereignisschleife , mit .exec() .
Wechseln Sie nun in das Projektstammverzeichnis rpcontacts_project/ und erstellen Sie eine Datei namens rpcontacts.py . Diese Datei stellt das Einstiegspunktskript zum Ausführen der Anwendung bereit. Fügen Sie der Datei den folgenden Code hinzu und speichern Sie sie:
#!/usr/bin/env python3
# -*- coding: utf-8 -*-
# rpcontacts_project/rpcontacts.py

"""This module provides RP Contacts entry point script."""

from rpcontacts.main import main

if __name__ == "__main__":
    main()
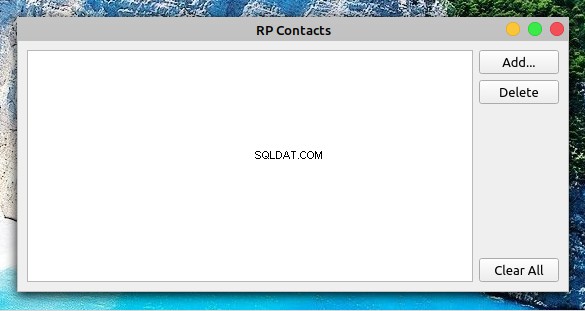
Diese Datei importiert main() aus Ihrer main.py Modul. Dann implementieren Sie die herkömmliche bedingte Anweisung, die main() aufruft wenn der Benutzer dieses Modul als Python-Skript ausführt. Starten Sie nun die Anwendung, indem Sie den Befehl python rpcontacts.py ausführen in Ihrer Python-Umgebung. Sie erhalten das folgende Fenster auf Ihrem Bildschirm:
Das ist es! Sie haben eine minimale, aber funktionale PyQt-GUI-Anwendung erstellt, die Sie als Ausgangspunkt für den Aufbau Ihres Kontaktbuchs verwenden können. Zu diesem Zeitpunkt sollte Ihr Projekt die folgende Struktur haben:
./rpcontacts_project/
│
├── rpcontacts/
│   ├── __init__.py
│   ├── views.py
│   └── main.py
│
└── rpcontacts.py
In diesem Abschnitt haben Sie mithilfe von Python-Modulen und -Paketen die minimal erforderliche Struktur für Ihr Kontaktbuchprojekt erstellt. Sie haben das Hauptfenster der Anwendung erstellt und den Boilerplate-Code zusammengestellt, um eine PyQt-GUI-Anwendung zu erstellen. Sie haben die Anwendung auch zum ersten Mal ausgeführt. Als Nächstes fügen Sie Funktionen zu Ihrer GUI hinzu.
Schritt 2:Erstellen der GUI des Kontaktbuchs mit Python
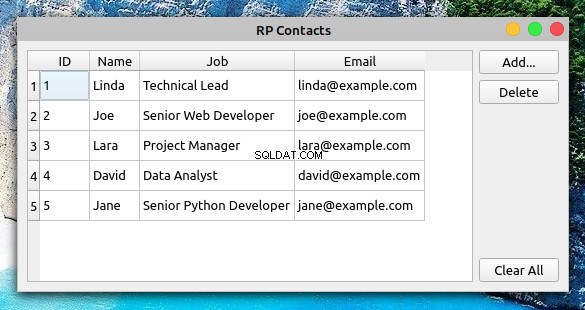
Nachdem Sie nun das Skelett Ihrer Kontaktbuchanwendung erstellt haben, können Sie mit der Programmierung der GUI des Hauptfensters beginnen. Am Ende dieses Abschnitts haben Sie die erforderlichen Schritte zum Erstellen der GUI Ihres Kontaktbuchs mit Python und PyQt abgeschlossen. Die GUI sieht folgendermaßen aus:
In der Mitte des Fensters haben Sie eine Tabellenansicht, um Ihre Kontaktliste anzuzeigen. Auf der rechten Seite des Formulars befinden sich drei Schaltflächen:
- Hinzufügen , um der Liste einen neuen Kontakt hinzuzufügen
- Löschen um einen ausgewählten Kontakt aus der Liste zu entfernen
- Alle löschen um alle Kontakte aus der Liste zu entfernen
Alle Codes und Dateien, die Sie in diesem Abschnitt hinzufügen oder ändern, werden unter source_code_step_2/ gesammelt Verzeichnis. Sie können sie herunterladen, indem Sie auf den folgenden Link klicken:
Quellcode abrufen: Klicken Sie hier, um den Quellcode abzurufen, mit dem Sie in diesem Tutorial ein Kontaktbuch mit Python, PyQt und SQLite erstellen.
Gehen Sie zurück zu views.py Modul und aktualisieren Sie den Code von Window um die obige GUI zu generieren:
 1# -*- coding: utf-8 -*-
 2# rpcontacts/views.py
 3
 4"""This module provides views to manage the contacts table."""
 5
 6from PyQt5.QtWidgets import (
 7    QAbstractItemView,
 8    QHBoxLayout,
 9    QMainWindow,
10    QPushButton,
11    QTableView,
12    QVBoxLayout,
13    QWidget,
14)
15
16class Window(QMainWindow):
17    """Main Window."""
18    def __init__(self, parent=None):
19        """Initializer."""
20        # Snip...
21
22        self.setupUI()
23
24    def setupUI(self):
25        """Setup the main window's GUI."""
26        # Create the table view widget
27        self.table = QTableView()
28        self.table.setSelectionBehavior(QAbstractItemView.SelectRows)
29        self.table.resizeColumnsToContents()
30        # Create buttons
31        self.addButton = QPushButton("Add...")
32        self.deleteButton = QPushButton("Delete")
33        self.clearAllButton = QPushButton("Clear All")
34        # Lay out the GUI
35        layout = QVBoxLayout()
36        layout.addWidget(self.addButton)
37        layout.addWidget(self.deleteButton)
38        layout.addStretch()
39        layout.addWidget(self.clearAllButton)
40        self.layout.addWidget(self.table)
41        self.layout.addLayout(layout)
Sie importieren zunächst einige zusätzliche PyQt-Klassen zur Verwendung in der GUI. Hier sind einige der relevanteren:
QPushButtonum das Hinzufügen zu erstellen , Löschen , und Alle löschen SchaltflächenQTableViewum die tabellenähnliche Ansicht bereitzustellen, die die Kontaktliste anzeigtQAbstractItemViewum Zugriff auf die Verhaltensrichtlinie für die Tabellenansichtsauswahl bereitzustellen
In diesem Code die erste Ergänzung zu Window ist ein Aufruf von .setupUI() am Ende von __init__() . Dieser Aufruf generiert die GUI des Hauptfensters, wenn Sie die Anwendung ausführen.
Hier ist der Code in .setupUI() tut:
- Zeile 27 erstellt eine
QTableViewInstanz, um die Kontaktliste anzuzeigen. - Zeile 28 setzt das
.selectionBehaviorEigenschaft zuQAbstractItemView.SelectRows. Dadurch wird sichergestellt, dass, wenn ein Benutzer auf eine beliebige Zelle der Tabellenansicht klickt, die gesamte Zeile ausgewählt wird. Die Zeilen in der Tabellenansicht enthalten alle Informationen zu einem einzelnen Kontakt in der Kontaktliste. - Zeilen 31 bis 33 Fügen Sie der GUI die drei Schaltflächen hinzu:Hinzufügen , Löschen , und Alle löschen . Diese Schaltflächen führen noch keine Aktionen aus.
- Zeilen 35 bis 41 Erstellen und setzen Sie ein kohärentes Layout für alle Widgets in der GUI.
Mit diesen Ergänzungen zu Window , können Sie die Anwendung erneut ausführen. Das Fenster auf Ihrem Bildschirm sieht aus wie das Fenster, das Sie am Anfang des Abschnitts gesehen haben.
Hinweis: Die Zeilennummern im obigen Code und in den restlichen Codebeispielen in diesem Tutorial sollen die Erläuterung erleichtern. Sie stimmen nicht mit der Reihenfolge der Zeilen im endgültigen Modul oder Skript überein.
In diesem Abschnitt haben Sie alle erforderlichen Schritte ausgeführt, um die GUI des Hauptfensters Ihres Kontaktbuchs zu erstellen. Sie können jetzt damit beginnen, wie Ihre Anwendung Ihre Kontaktdaten verwaltet und speichert.
Schritt 3:Einrichten der Datenbank des Kontaktbuchs
An diesem Punkt haben Sie eine PyQt-Anwendung und die GUI ihres Hauptfensters erstellt, um Ihr Kontaktbuchprojekt zu erstellen. In diesem Abschnitt schreiben Sie Code, um zu definieren, wie die Anwendung eine Verbindung zur Kontaktdatenbank herstellt. Um diesen Schritt abzuschließen, verwenden Sie SQLite, um die Datenbank zu verwalten, und die SQL-Unterstützung von PyQt, um die Anwendung mit der Datenbank zu verbinden und mit Ihren Kontaktdaten zu arbeiten.
Der Quellcode und die Dateien, die Sie in diesem Abschnitt hinzufügen oder ändern, werden unter source_code_step_3/ gespeichert Verzeichnis. Sie können sie herunterladen, indem Sie auf den folgenden Link klicken:
Quellcode abrufen: Klicken Sie hier, um den Quellcode abzurufen, mit dem Sie in diesem Tutorial ein Kontaktbuch mit Python, PyQt und SQLite erstellen.
Kehren Sie zuerst zu main.py zurück in den rpcontacts/ Verzeichnis und aktualisieren Sie den Code, um die Verbindung zur Datenbank herzustellen:
# -*- coding: utf-8 -*-
# rpcontacts/main.py

"""This module provides RP Contacts application."""

import sys

from PyQt5.QtWidgets import QApplication

from .database import createConnection
from .views import Window

def main():
    """RP Contacts main function."""
    # Create the application
    app = QApplication(sys.argv)
    # Connect to the database before creating any window
    if not createConnection("contacts.sqlite"):
        sys.exit(1)
    # Create the main window if the connection succeeded
    win = Window()
    win.show()
    # Run the event loop
    sys.exit(app.exec_())
In diesem Fall importieren Sie zuerst createConnection() aus database.py . Diese Funktion enthält Code zum Erstellen und Öffnen einer Verbindung zur Kontaktdatenbank. Sie erstellen database.py und schreiben Sie createConnection() im nächsten Abschnitt.
Innerhalb von main() , ist die erste hervorgehobene Zeile ein Versuch, mit createConnection() eine Verbindung zur Datenbank herzustellen . Wenn die Anwendung aus irgendeinem Grund keine Verbindung herstellen kann, wird der Aufruf von sys.exit(1) schließt die Anwendung, ohne ein grafisches Element zu erstellen, und zeigt an, dass ein Fehler aufgetreten ist.
Sie müssen die Verbindung auf diese Weise handhaben, da die Anwendung von der Datenbank abhängt, um ordnungsgemäß zu funktionieren. Wenn Sie keine funktionierende Verbindung haben, funktioniert Ihre Anwendung überhaupt nicht.
Auf diese Weise können Sie Fehler behandeln und die Anwendung sauber schließen, wenn ein Problem auftritt. Sie können dem Benutzer auch relevante Informationen über den Fehler präsentieren, auf den die Anwendung gestoßen ist, als sie versucht hat, eine Verbindung zur Datenbank herzustellen.
Nachdem diese Ergänzungen vorhanden sind, ist es an der Zeit, in den Code von createConnection() einzutauchen .
Mit PyQt und SQLite eine Verbindung zur Datenbank herstellen
Das Verbinden Ihrer Kontaktbuchanwendung mit der zugehörigen Datenbank ist ein grundlegender Schritt bei der Entwicklung der Anwendung. Dazu codieren Sie eine Funktion namens createConnection() , wodurch eine Verbindung zur Datenbank erstellt und geöffnet wird. Wenn die Verbindung erfolgreich ist, gibt die Funktion True zurück . Andernfalls liefert es Informationen über die Ursache des Verbindungsabbruchs.
Gehen Sie zurück zu den rpcontacts/ Verzeichnis und erstellen Sie ein neues Modul namens database.py darin. Fügen Sie diesem Modul dann den folgenden Code hinzu:
 1# -*- coding: utf-8 -*-
 2# rpcontacts/database.py
 3
 4"""This module provides a database connection."""
 5
 6from PyQt5.QtWidgets import QMessageBox
 7from PyQt5.QtSql import QSqlDatabase
 8
 9def createConnection(databaseName):
10    """Create and open a database connection."""
11    connection = QSqlDatabase.addDatabase("QSQLITE")
12    connection.setDatabaseName(databaseName)
13
14    if not connection.open():
15        QMessageBox.warning(
16            None,
17            "RP Contact",
18            f"Database Error: {connection.lastError().text()}",
19        )
20        return False
21
22    return True
Hier importieren Sie zunächst einige benötigte PyQt-Klassen. Dann definieren Sie createConnection() . Diese Funktion akzeptiert ein Argument:databaseName enthält den Namen oder Pfad zur physischen SQLite-Datenbankdatei in Ihrem Dateisystem.
Hier ist der Code in createConnection() tut:
- Zeile 11 erstellt die Datenbankverbindung mit
QSQLITEFahrer. - Zeile 12 setzt den Dateinamen oder den Pfad zur Datenbank.
- Zeile 14 versucht, die Verbindung zu öffnen. Wenn während des Aufrufs von
.open()ein Problem auftritt , dann dasifCodeblock zeigt eine Fehlermeldung und gibt dannFalsezurück um anzuzeigen, dass der Verbindungsversuch fehlgeschlagen ist. - Zeile 22 gibt
Truezurück wenn der Verbindungsversuch erfolgreich war.
Sie haben bereits createConnection() codiert . Jetzt können Sie den Code schreiben, um die contacts zu erstellen Tabellen in der Datenbank.
Anlegen der contacts Tabelle
Mit der Funktion, die die Verbindung zur Datenbank erstellt und öffnet, können Sie fortfahren, eine Hilfsfunktion zu codieren, um die contacts zu erstellen Tisch. In dieser Tabelle speichern Sie die Informationen zu Ihren Kontakten.
Hier ist der Code, der _createContactsTable() implementiert :
# -*- coding: utf-8 -*-
# rpcontacts/database.py

# Snip...
from PyQt5.QtSql import QSqlDatabase, QSqlQuery

def _createContactsTable():
    """Create the contacts table in the database."""
    createTableQuery = QSqlQuery()
    return createTableQuery.exec(
        """
        CREATE TABLE IF NOT EXISTS contacts (
            id INTEGER PRIMARY KEY AUTOINCREMENT UNIQUE NOT NULL,
            name VARCHAR(40) NOT NULL,
            job VARCHAR(50),
            email VARCHAR(40) NOT NULL
        )
        """
    )

def createConnection(databaseName):
    # Snip...
    _createContactsTable()
    return True
Hier fügen Sie zunächst einen neuen Import hinzu. Sie importieren QSqlQuery um SQL-Anweisungen auszuführen und zu manipulieren.
Innerhalb von _createContactsTable() erstellen Sie eine QSqlQuery Beispiel. Dann rufen Sie .exec() auf auf dem Abfrageobjekt mit einem stringbasierten SQL CREATE TABLE Aussage als Argument. Diese Anweisung erstellt eine neue Tabelle namens contacts in Ihrer Datenbank. Die Tabelle hat folgende Spalten:
| Spalte | Inhalt |
|---|---|
id | Eine Ganzzahl mit dem Primärschlüssel der Tabelle |
name | Ein String mit dem Namen eines Kontakts |
job | Ein String mit der Berufsbezeichnung eines Kontakts |
email | Ein String mit der E-Mail eines Kontakts |
Die contacts Tabelle in Ihrer Datenbank speichert relevante Informationen über Ihre Kontakte.
Der letzte Schritt, um die Codierung von database.py abzuschließen ist das Hinzufügen eines Aufrufs zu _createContactsTable() aus createConnection() , direkt vor dem letzten return Erklärung. Dadurch wird sichergestellt, dass die Anwendung die contacts erstellt Tabelle, bevor Sie irgendwelche Operationen an der Datenbank durchführen.
Nachdem Sie die contacts erstellt haben Tabelle können Sie einige Tests auf der Datenbank ausführen und auch einige Beispieldaten für weitere Tests hinzufügen.
Testen der Datenbank des Kontaktbuchs
Bisher haben Sie den erforderlichen Code geschrieben, um die Verbindung zur Datenbank des Kontaktbuchs herzustellen. In diesem Abschnitt führen Sie einige Tests durch, um sicherzustellen, dass dieser Code und die Datenbank selbst ordnungsgemäß funktionieren. Sie werden der Datenbank auch einige Beispieldaten hinzufügen, um später in diesem Tutorial weitere Tests durchzuführen.
Öffnen Sie nun ein Terminal oder eine Befehlszeile und wechseln Sie in das Stammverzeichnis des Projekts, rpcontacts_project/ . Starten Sie dort eine interaktive Python-Sitzung und geben Sie den folgenden Code ein:
>>> from rpcontacts.database import createConnection

>>> # Create a connection
>>> createConnection("contacts.sqlite")
True

>>> # Confirm that contacts table exists
>>> from PyQt5.QtSql import QSqlDatabase
>>> db = QSqlDatabase.database()
>>> db.tables()
['contacts', 'sqlite_sequence']
Hier importieren Sie zunächst createConnection() aus der database.py Modul. Dann rufen Sie diese Funktion auf, um eine Verbindung zur Kontaktdatenbank herzustellen und zu öffnen. Der Dateiname der Datenbank lautet contacts.sqlite . Da diese Datei nicht im Stammverzeichnis des Projekts vorhanden ist, erstellt SQLite sie für Sie. Sie können dies überprüfen, indem Sie sich Ihr aktuelles Verzeichnis ansehen.
Als Nächstes bestätigen Sie, dass die Datenbank eine Tabelle namens contacts enthält . Dazu rufen Sie .database() auf auf QSqlDatabase . Diese Klassenmethode gibt einen Zeiger auf die aktuelle Datenbankverbindung zurück. Mit diesem Verweis auf die Verbindung können Sie .tables() aufrufen um die Liste der Tabellen in der Datenbank zu erhalten. Beachten Sie, dass die erste Tabelle in der Liste contacts ist , sodass Sie jetzt sicher sind, dass alles gut funktioniert.
Jetzt können Sie eine SQL-Abfrage vorbereiten, um Beispieldaten in die contacts einzufügen Tabelle:
>>> # Prepare a query to insert sample data
>>> from PyQt5.QtSql import QSqlQuery

>>> insertDataQuery = QSqlQuery()
>>> insertDataQuery.prepare(
...     """
...     INSERT INTO contacts (
...         name,
...         job,
...         email
...     )
...     VALUES (?, ?, ?)
...     """
... )
True
Die obige Abfrage ermöglicht es Ihnen, bestimmte Werte in den name einzufügen , job , und email Attribute und zum Speichern dieser Werte in der Datenbank. Unten sehen Sie ein Beispiel dafür:
>>> # Sample data
>>> data = [
...     ("Linda", "Technical Lead", "linda@example.com"),
...     ("Joe", "Senior Web Developer", "joe@example.com"),
...     ("Lara", "Project Manager", "lara@example.com"),
...     ("David", "Data Analyst", "david@example.com"),
...     ("Jane", "Senior Python Developer", "jane@example.com"),
... ]

>>> # Insert sample data
>>> for name, job, email in data:
...     insertDataQuery.addBindValue(name)
...     insertDataQuery.addBindValue(job)
...     insertDataQuery.addBindValue(email)
...     insertDataQuery.exec()
...
True
True
True
True
True
In diesem Codestück definieren Sie zuerst data um die Kontaktinformationen einer Liste von Personen zu speichern. Als nächstes verwenden Sie einen for Schleife zum Einfügen der Daten durch Aufrufen von .addBindValue() . Dann rufen Sie .exec() auf auf das Abfrageobjekt, um die SQL-Abfrage effektiv auf der Datenbank auszuführen.
Da alle Aufrufe von .exec() gibt True zurück können Sie feststellen, dass die Daten erfolgreich in die Datenbank eingefügt wurden. Wenn Sie dies bestätigen möchten, führen Sie den folgenden Code aus:
>>> query = QSqlQuery()
>>> query.exec("SELECT name, job, email FROM contacts")
True

>>> while query.next():
...     print(query.value(0), query.value(1), query.value(2))
...
Linda Technical Lead linda@example.com
Joe Senior Web Developer joe@example.com
Lara Project Manager lara@example.com
David Data Analyst david@example.com
Jane Senior Python Developer jane@example.com
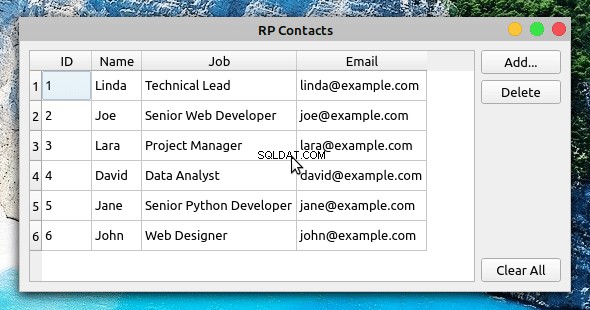
Das ist es! Ihre Datenbank funktioniert einwandfrei! Jetzt haben Sie einige Beispieldaten, mit denen Sie die Anwendung testen können, und Sie können sich darauf konzentrieren, wie die Kontaktinformationen geladen und im Hauptfenster Ihres Kontaktbuchs angezeigt werden.
Schritt 4:Vorhandene Kontakte anzeigen und aktualisieren
Um Ihre Kontaktdaten im Hauptfenster der Anwendung anzuzeigen, können Sie QTableView verwenden . Diese Klasse ist Teil der Model-View-Architektur von PyQt und bietet eine robuste und effiziente Möglichkeit, Elemente aus einem PyQt-Modellobjekt anzuzeigen.
Die Dateien und der Code, den Sie in diesem Abschnitt hinzufügen oder ändern, werden unter source_code_step_4/ gespeichert Verzeichnis. Um sie herunterzuladen, klicken Sie auf den folgenden Link:
Quellcode abrufen: Klicken Sie hier, um den Quellcode abzurufen, mit dem Sie in diesem Tutorial ein Kontaktbuch mit Python, PyQt und SQLite erstellen.
Sobald Sie diesen Schritt abgeschlossen haben, sieht Ihr Kontaktbuch so aus:
Das Tabellenansichtsobjekt im Hauptfenster bietet die erforderliche Funktionalität, damit Sie die Kontaktinformationen schnell ändern und aktualisieren können.
Um beispielsweise den Namen eines Kontakts zu aktualisieren, können Sie auf die Zelle mit dem Namen doppelklicken, den Namen aktualisieren und dann Enter drücken um die Änderungen automatisch in der Datenbank zu speichern. Aber bevor Sie dies tun können, müssen Sie ein Modell erstellen und es mit der Tabellenansicht verbinden.
Erstellen eines Modells zur Handhabung der Kontaktdaten
PyQt bietet eine große Auswahl an Klassen für die Arbeit mit SQL-Datenbanken. Für Ihre Kontaktbuchanwendung verwenden Sie QSqlTableModel , die ein bearbeitbares Datenmodell für eine einzelne Datenbanktabelle bereitstellt. Es ist perfekt für den Job, da Ihre Datenbank eine einzige Tabelle hat, contacts .
Kehren Sie zu Ihrem Code-Editor zurück und erstellen Sie ein neues Modul namens model.py innerhalb der rpcontacts/ Verzeichnis. Fügen Sie der Datei den folgenden Code hinzu und speichern Sie sie:
 1# -*- coding: utf-8 -*-
 2# rpcontacts/model.py
 3
 4"""This module provides a model to manage the contacts table."""
 5
 6from PyQt5.QtCore import Qt
 7from PyQt5.QtSql import QSqlTableModel
 8
 9class ContactsModel:
10    def __init__(self):
11        self.model = self._createModel()
12
13    @staticmethod
14    def _createModel():
15        """Create and set up the model."""
16        tableModel = QSqlTableModel()
17        tableModel.setTable("contacts")
18        tableModel.setEditStrategy(QSqlTableModel.OnFieldChange)
19        tableModel.select()
20        headers = ("ID", "Name", "Job", "Email")
21        for columnIndex, header in enumerate(headers):
22            tableModel.setHeaderData(columnIndex, Qt.Horizontal, header)
23        return tableModel
In diesem Code führen Sie zuerst einige erforderliche Importe durch, dann erstellen Sie ContactsModel . Im Klasseninitialisierer definieren Sie ein Instanzattribut namens .model um das Datenmodell zu halten.
Next, you add a static method to create and set up the model object. Here’s what the code in ._createModel() does:
- Line 16 creates an instance of
QSqlTableModel()calledtableModel. - Line 17 associates the model object with the
contactstable in your database. - Line 18 sets the
.editStrategyproperty of the model toQSqlTableModel.OnFieldChange. With this, you ensure that the changes on the model get saved into the database immediately. - Line 19 loads the table into the model by calling
.select(). - Lines 20 to 22 define and set user-friendly headers for the
contactstable’s columns. - Line 23 returns the newly created model.
At this point, you have your data model ready to use. Now you need to connect the table view widget to the model so you can present your users with the contact information.
Connecting the Model to the View
To display contact data in your contact book’s main window, you need to connect the table view with the data model. To perform this connection, you need to call .setModel() on the table view object and pass the model as an argument:
# -*- coding: utf-8 -*-
# rpcontacts/views.py

# Snip...
from .model import ContactsModel

class Window(QMainWindow):
    """Main Window."""
    def __init__(self, parent=None):
        # Snip...
        self.contactsModel = ContactsModel()
        self.setupUI()

    def setupUI(self):
        """Setup the main window's GUI."""
        # Create the table view widget
        self.table = QTableView()
        self.table.setModel(self.contactsModel.model)
        self.table.setSelectionBehavior(QAbstractItemView.SelectRows)
        # Snip...
In this code, you first import ContactsModel from model.py . This class provides the model that manages the data in your contact database.
In the initializer of Window , you create an instance of ContactsModel . Then inside .setupUI() , you call .setModel() on .table to connect the model with the table view. If you run the application after this update, then you’ll get the window you saw at the beginning of step 4.
Displaying and Updating Contacts
PyQt’s Model-View architecture provides a robust and user-friendly way to create GUI applications that manage databases. Models communicate with and access the data in the database. Any change in a model updates the database immediately. Views are responsible for displaying the data to the user and also for providing editable widgets to allow the user to modify the data directly in the view.
If the user modifies the data through the view, then the view internally communicates with and updates the model, which saves the changes to the physical database:
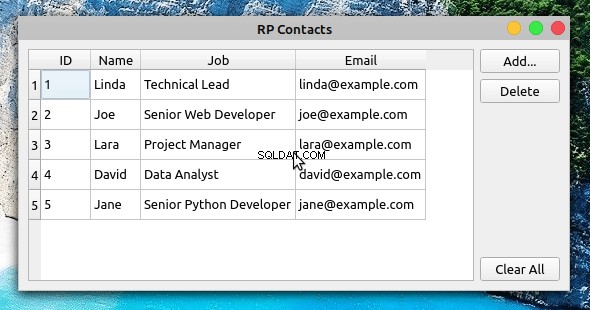
In this example, you double-click Joe’s Job Feld. This gives you access to an editable widget that allows you to modify the value in the cell. Then you update the job description from Senior Web Developer to Web Developer . When you hit Enter , the table view communicates the change to the model, and the model saves the change to the database immediately.
To confirm that the changes were successfully saved into the database, you can close the application and run it again. The table view should reflect your updates.
Step 5:Creating New Contacts
At this step, your contact book application provides functionality to load, display, and update the information about your contacts. Even though you’re able to modify and update the contact information, you can neither add nor remove contacts from the list.
All the files and the code you’ll add or modify in this section are collected in the source_code_step_5/ Verzeichnis. To download them, click the link below:
Get the Source Code: Click here to get the source code you’ll use to build a contact book with Python, PyQt, and SQLite in this tutorial.
In this section, you’ll provide the required functionality to add new contacts to the database, using a pop-up dialog to enter the new information. The first step is to create the Add Contact dialog.
Creating the Add Contact Dialog
Dialogs are small windows that you can use to communicate with your users. In this section, you’ll code the contact book’s Add Contact dialog to allow your users add new contacts to their current list of contacts.
To code the Add Contact dialog, you’ll subclass QDialog . This class provides a blueprint to build dialogs for your GUI applications.
Now open the views.py module and update the import section like this:
# -*- coding: utf-8 -*-
# rpcontacts/views.py

# Snip...
from PyQt5.QtCore import Qt
from PyQt5.QtWidgets import (
    QAbstractItemView,
    QDialog,
    QDialogButtonBox,
    QFormLayout,
    QHBoxLayout,
    QLineEdit,
    QMainWindow,
    QMessageBox,
    QPushButton,
    QTableView,
    QVBoxLayout,
    QWidget,
)
The highlighted lines in the above code import the required classes to build the Add Contact dialog. With these classes in your namespace, add the following class at the end of views.py :
 1# -*- coding: utf-8 -*-
 2# rpcontacts/views.py
 3
 4# Snip...
 5class AddDialog(QDialog):
 6    """Add Contact dialog."""
 7    def __init__(self, parent=None):
 8        """Initializer."""
 9        super().__init__(parent=parent)
10        self.setWindowTitle("Add Contact")
11        self.layout = QVBoxLayout()
12        self.setLayout(self.layout)
13        self.data = None
14
15        self.setupUI()
16
17    def setupUI(self):
18        """Setup the Add Contact dialog's GUI."""
19        # Create line edits for data fields
20        self.nameField = QLineEdit()
21        self.nameField.setObjectName("Name")
22        self.jobField = QLineEdit()
23        self.jobField.setObjectName("Job")
24        self.emailField = QLineEdit()
25        self.emailField.setObjectName("Email")
26        # Lay out the data fields
27        layout = QFormLayout()
28        layout.addRow("Name:", self.nameField)
29        layout.addRow("Job:", self.jobField)
30        layout.addRow("Email:", self.emailField)
31        self.layout.addLayout(layout)
32        # Add standard buttons to the dialog and connect them
33        self.buttonsBox = QDialogButtonBox(self)
34        self.buttonsBox.setOrientation(Qt.Horizontal)
35        self.buttonsBox.setStandardButtons(
36            QDialogButtonBox.Ok | QDialogButtonBox.Cancel
37        )
38        self.buttonsBox.accepted.connect(self.accept)
39        self.buttonsBox.rejected.connect(self.reject)
40        self.layout.addWidget(self.buttonsBox)
There are a lot of things happening in this code. Here’s a summary:
- Line 5 defines a new class that inherits from
QDialog. - Lines 7 to 15 define the class initializer. In this case, the most relevant addition is
.data, which is an instance attribute that you’ll use to hold the data your users provide.
In .setupUI() , you define the dialog’s GUI:
- Lines 20 to 25 add three
QLineEditobjects:name,job, andemail. You’ll use these line edits to take the user’s input for the name, job description, and email of the contact to add. They represent the corresponding fields in the database. - Lines 27 to 30 create a
QFormLayoutinstance that arranges the line edits in a form. This layout manager also provides user-friendly labels for each line edit or field. - Lines 33 to 37 add a
QDialogButtonBoxobject that provides two standard buttons:OK and Cancel . The OK button accepts the user’s input and the Cancel button rejects it. - Lines 38 and 39 connect the dialog’s built-in
.accepted()and.rejected()signals with the.accept()andreject()slots, respectively. In this case, you’ll rely on the dialog’s built-in.reject()slot, which closes the dialog without processing the input. Other than that, you just need to code the.accept()slot.
To code the dialog’s .accept() slot, you need to consider that any user input needs validation to make sure that it’s correct and safe. This is especially true when you’re working with SQL databases because of the risk of an SQL injection attack.
In this example, you’ll add a minimal validation rule just to make sure that the user provides data for each input field in the dialog. However, adding your own, more robust validation rules would be a good exercise.
Without further ado, get back to AddDialog and add the following code for its .accept() slot:
 1# -*- coding: utf-8 -*-
 2# rpcontacts/views.py
 3
 4# Snip...
 5class AddDialog(QDialog):
 6    def __init__(self, parent=None):
 7        # Snip...
 8
 9    def setupUI(self):
10        # Snip...
11
12    def accept(self):
13        """Accept the data provided through the dialog."""
14        self.data = []
15        for field in (self.nameField, self.jobField, self.emailField):
16            if not field.text():
17                QMessageBox.critical(
18                    self,
19                    "Error!",
20                    f"You must provide a contact's {field.objectName()}",
21                )
22                self.data = None  # Reset .data
23                return
24
25            self.data.append(field.text())
26
27        if not self.data:
28            return
29
30        super().accept()
The code within .accept() does the following:
- Line 14 initializes
.datato an empty list ([]). This list will store the user’s input data. - Line 15 defines a
forloop that iterates over the three line edits, or fields, in the dialog. - Lines 16 to 23 define a conditional statement that checks if the user has provided data for each field in the dialog. If not, then the dialog shows an error message that warns the user about the missing data.
- Line 25 adds the user’s input for each field to
.data. - Line 30 calls the superclass’s
.accept()slot to provide the standard behavior that closes the dialog after the user clicks OK .
With this code, you’re ready to add a new slot to the contact book’s main window. This slot will launch the dialog, and if the user provides valid input, then the slot will use the model to save the newly added contact to the database.
Launching the Add Contact Dialog
Now that you’ve coded the Add Contact dialog, it’s time to add a new slot to Window so you can launch the dialog by clicking Add and process the user’s input once they click OK .
Go to the definition of Window and add the following code:
 1# -*- coding: utf-8 -*-
 2# rpcontacts/views.py
 3
 4# Snip...
 5class Window(QMainWindow):
 6    # Snip...
 7
 8    def setupUI(self):
 9        # Snip...
10        self.addButton = QPushButton("Add...")
11        self.addButton.clicked.connect(self.openAddDialog)
12        # Snip...
13
14    def openAddDialog(self):
15        """Open the Add Contact dialog."""
16        dialog = AddDialog(self)
17        if dialog.exec() == QDialog.Accepted:
18            self.contactsModel.addContact(dialog.data)
19            self.table.resizeColumnsToContents()
Here’s a summary of what’s happening in the above code:
- Line 11 connects the
.clicked()signal of the Add button to the newly created slot,.openAddDialog(). This way, a click on the button will automatically call the slot. - Line 14 defines the
.openAddDialog()slot. - Line 16 creates an instance of
AddDialog. - Lines 17 to 19 define a conditional statement to check if the dialog was accepted. If so, then line 14 calls
.addContact()on the data model with the dialog’s.dataattribute as an argument. The final statement in theifcode block resizes the table view to fit the size of its updated content.
Now that you have a way to launch the Add Contact dialog and to process its data, you need to provide the code for .addContact() in your data model. That’s a topic for the next section.
Processing the Add Dialog’s Data in the Model
In this section, you’ll add a method called .addContact() to your data model, ContactsModel . Open model.py in your code editor, go to the definition of ContactsModel , and add the following code:
 1# -*- coding: utf-8 -*-
 2# rpcontacts/model.py
 3
 4# Snip...
 5class ContactsModel:
 6    # Snip...
 7
 8    def addContact(self, data):
 9        """Add a contact to the database."""
10        rows = self.model.rowCount()
11        self.model.insertRows(rows, 1)
12        for column, field in enumerate(data):
13            self.model.setData(self.model.index(rows, column + 1), field)
14        self.model.submitAll()
15        self.model.select()
Inside .addContact() , the code does the following:
- Line 10 gets the current number of rows in the data model.
- Line 11 inserts a new row at the end of the data model.
- Lines 12 and 13 run a
forloop that inserts every item indatainto the corresponding cell in the data model. To do this, line 9 calls.setData()on the model, with the index of the cell and the current datafieldas arguments. - Line 14 submits the changes to the database by calling
.submitAll()on the model. - Line 15 reloads the data from the database into the model.
If you run the application with these new additions, then you’ll get the following behavior:
Now when you click Add , the Add Contact dialog appears on your screen. You can use the dialog to provide the required information for a new contact and to add the contact to the database by clicking OK .
Step 6:Deleting Existing Contacts
The final feature you’ll add to the contact book application is the ability to remove contacts from the database using the GUI.
Again, you’ll find all the files and the code added or modified in this section under the source_code_step_6/ Verzeichnis. You can download them by clicking the link below:
Get the Source Code: Click here to get the source code you’ll use to build a contact book with Python, PyQt, and SQLite in this tutorial.
In this section, you’ll first add the capability to delete a single contact at a time. Then you’ll add code to remove all the contacts from the database.
Deleting Selected Contacts
To remove a single contact from the contact database, you need to select the desired contact in the table view on the contact book’s main window. Once you’ve selected the contact, you can click Delete to perform the operation on the database.
Go to the model.py module and add the following code to implement .deleteContact() inside ContactsModel :
# -*- coding: utf-8 -*-
# rpcontacts/model.py

# Snip...
class ContactsModel:
    # Snip...

    def deleteContact(self, row):
        """Remove a contact from the database."""
        self.model.removeRow(row)
        self.model.submitAll()
        self.model.select()
This method has three lines of code. The first line removes the selected row . The second line submits the change to the database. Finally, the third line reloads the data into the model.
Next, get back to the views.py module and add the code behind the Delete button in Window :
# -*- coding: utf-8 -*-
# rpcontacts/views.py

# Snip...
class Window(QMainWindow):
    # Snip...

    def setupUI(self):
        """Setup the main window's GUI."""
        # Snip...
        self.deleteButton = QPushButton("Delete")
        self.deleteButton.clicked.connect(self.deleteContact)
        # Snip...

    def deleteContact(self):
        """Delete the selected contact from the database."""
        row = self.table.currentIndex().row()
        if row < 0:
            return

        messageBox = QMessageBox.warning(
            self,
            "Warning!",
            "Do you want to remove the selected contact?",
            QMessageBox.Ok | QMessageBox.Cancel,
        )

        if messageBox == QMessageBox.Ok:
            self.contactsModel.deleteContact(row)
In the first highlighted line, you connect the .clicked() signal of the Delete button to the .deleteContact() Slot. This connection triggers a call to .deleteContact() every time the user clicks the button.
In .deleteContact() , you first get the index of the currently selected row in the table view. The if statement checks if the index is lower than 0 , which would mean that there are no contacts in the table view. If so, then the method returns immediately without performing any further actions.
Then the method shows a warning message confirming that the user wants to delete the selected contact. If the user accepts the operation, then .deleteContact(row) gets called. In this case, row represents the index of the currently selected row in the table.
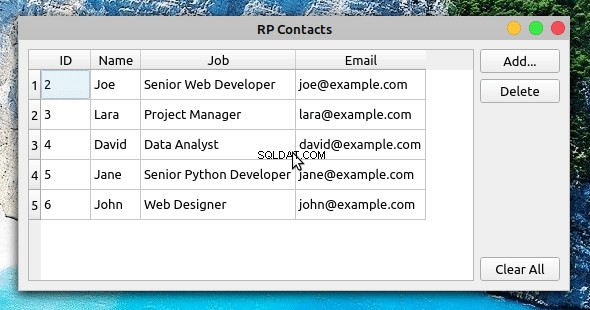
After these additions, you can run the application again to get the following behavior:
Now when you select a contact from the table view and click Delete , you’re presented with a warning message. If you click the message dialog’s OK button, then the application removes the selected contact from the database, updating the table view accordingly.
Clearing the Contact Database
To remove all the contacts from the database, you’ll start by adding a method called .clearContacts() to ContactsModel . Open your model.py module and add the following method at the end of the class:
 1# -*- coding: utf-8 -*-
 2# rpcontacts/model.py
 3
 4# Snip...
 5class ContactsModel:
 6    # Snip...
 7
 8    def clearContacts(self):
 9        """Remove all contacts in the database."""
10        self.model.setEditStrategy(QSqlTableModel.OnManualSubmit)
11        self.model.removeRows(0, self.model.rowCount())
12        self.model.submitAll()
13        self.model.setEditStrategy(QSqlTableModel.OnFieldChange)
14        self.model.select()
Here’s what each line of code does:
- Line 10 sets the data model’s
.editStrategyproperty toQSqlTableModel.OnManualSubmit. This allows you to cache all the changes until you call.submitAll()später. You need to do this because you’re changing several rows at the same time. - Line 11 removes all the rows from the model.
- Line 12 saves changes to the database.
- Line 13 resets the model’s
.editStrategyproperty to its original value,QSqlTableModel.OnFieldChange. If you don’t reset this property to its original value, then you won’t be able to update the contacts directly in the table view. - Line 14 reloads the data into the model.
Once you’ve coded .clearContacts() , you can get back to the views.py file and update Window with the following code:
# -*- coding: utf-8 -*-
# rpcontacts/views.py

# Snip...
class Window(QMainWindow):
    # Snip...

    def setupUI(self):
        """Setup the main window's GUI."""
        # Snip...
        self.clearAllButton = QPushButton("Clear All")
        self.clearAllButton.clicked.connect(self.clearContacts)
        # Snip...

    def clearContacts(self):
        """Remove all contacts from the database."""
        messageBox = QMessageBox.warning(
            self,
            "Warning!",
            "Do you want to remove all your contacts?",
            QMessageBox.Ok | QMessageBox.Cancel,
        )

        if messageBox == QMessageBox.Ok:
            self.contactsModel.clearContacts()
The first highlighted line in this code connects the .clicked() signal of the Clear All button to the .clearContacts() slot below.
In .clearContacts() , you first create a message dialog, messageBox , to ask the user to confirm the removing operation. If the user confirms the operation by clicking OK , then .clearContacts() gets called on the model to remove all the contacts from the database:
Das ist es! With this last piece of code, your contact book application is complete. The application provides features that allow your users to display, add, update, and remove contacts from the database.
Conclusion
Building a contact book GUI application with Python, PyQt, and SQLite is an excellent exercise for you to expand your skills with these tools and as a developer in general. Coding projects like this allows you to apply the knowledge and skills you already have and also pushes you to research and learn about new topics every time you encounter a new programming problem.
In this tutorial, you learned how to:
- Build the GUI for a contact book application using PyQt
- Use PyQt’s SQL support to connect the application to an SQLite database
- Use PyQt’s Model-View architecture to work with the application’s database
You can download the complete source code for the contact book application and also the code to complete each step in this tutorial by clicking the link below:
Get the Source Code: Click here to get the source code you’ll use to build a contact book with Python, PyQt, and SQLite in this tutorial.
Next Steps
At this point, you’ve completed a fully functional contact book project. The application provides minimal functionality, but it’s a good starting point to continue adding features and take your Python and PyQt skills to the next level. Here are some next step ideas that you can implement:
-
Add new data fields: Adding new data fields to store more information about your contacts would be great. For example, you can add the contact’s photo, phone number, web page, Twitter handle, and so on. To do this, you might need to create new tables and set up relations between them. PyQt provides the
QSqlRelationalTableModel, which defines an editable data model for a single table and provides foreign key support. -
Provide search capability: Giving your users a way to search for a contact in the database is arguably a must-have feature in this kind of application. To implement it, you can use PyQt’s
QSqlQueryandQSqlQueryModel. -
Add back-up capability: Providing a way of backing up contact information is another interesting feature. Users might face problems with their computers and lose their data. You can provide options to upload the data to a cloud service or to back it up to an external disk.
These are just a few ideas for how you can continue adding features to your contact book. Take the challenge and build something amazing on top of this!