1 Einführung in das MS Access 2010, 2013, 2016 und 2019 Tutorial
Willkommen beim MS Access-Tutorial. Dieses Tutorial soll den Benutzer schnell mit MS Access (im Folgenden einfach „Access“) vertraut machen. Die vier Grundmodule von Access werden demonstriert:Tabellen, Formulare, Berichte und Abfragen. Zuerst wird ein Geschäftsbeispiel besprochen, das einen Hintergrund für die Entwicklung einer einfachen Datenbank liefert.
Es wird davon ausgegangen, dass Benutzer dieses Tutorials im Umgang mit Microsoft Windows XP/Vista/Win7/Win10 usw. und mit MS Excel vertraut sind. Dies schließt die Verwendung von Tastatur und Maus ein. Das Tutorial basiert auf Microsoft Access, das Teil der Microsoft Office Professional-Suite ist, die auch MS Excel, MS Word und MS Powerpoint enthält.
Dieses Tutorial behandelt MS Access 2007, 2010, 2013, 2016 und 2019, die eine gemeinsame Schnittstelle (die „Ribbon Bar“ oben) haben, die sich von früheren Versionen unterscheidet. Wenn Sie daran interessiert sind, mit MS Access ’97 oder 2000 zu arbeiten, besuchen Sie bitte die Webseite Microsoft Access Tutorial – Covering MS Access ’97 and 2000.
Das Tutorial beginnt mit einem kurzen Überblick über relationale Datenbanken . Die Mehrzahl der heute verwendeten Datenbankverwaltungssysteme basiert auf dem sogenannten relationalen Datenbankmodell. Access ist ein relationales Datenbankverwaltungssystem. Anschließend beschreiben wir ein Geschäftsbeispiel und skizzieren die Datenbank und die Anwendungen, die wir entwickeln möchten. In den folgenden Abschnitten geben wir Schritt-für-Schritt-Anleitungen zum Erstellen der Tabellen, Dateneingabeformulare, Berichte und Abfragen für die Anwendung.
1.1 Zielgruppe
Dieses Tutorial richtet sich an Studenten, die gerade erst mit dem MS Access-Datenbankverwaltungssystem begonnen haben.
1.2 Erforderliche Kenntnisse
Dieses Tutorial setzt voraus, dass der Kursteilnehmer mit der grundlegenden Bedienung eines Personal Computers und Windows 2000, Windows XP, Windows Vista oder Windows 7 vertraut ist. Für dieses Tutorial sind folgende spezifische Fähigkeiten erforderlich:
- Verwendung von Maus und Tastatur
- Öffnen und Speichern von Dateien beispielsweise auf der Festplatte und auf einem USB-Speicherstick (Thumb Drive)
- Verwaltung von Dateien im Allgemeinen einschließlich der Unterscheidung zwischen Laufwerksbuchstaben, Festplatte usw.
- Programme über das Windows-Startmenü ausführen
- Minimieren, Maximieren und Ändern der Größe von Fenstern
Der Schüler sollte einen USB-Speicherstick (Stick) oder ein anderes tragbares Speichergerät zur Verfügung haben, um seine Dateien zu speichern, die während dieses Tutorials erstellt werden.
1.3 Ausführen von Microsoft Access auf einem Apple Mac
Ein Problem, mit dem einige Studenten konfrontiert sein könnten, ist die Tatsache, dass MS Access nur unter dem Windows-Betriebssystem (z. B. Windows XP, Vista oder Windows 7) ausgeführt werden kann. Wenn Sie ein MacBook, iMac oder ein anderes Apple-System mit MacOS haben, das eine Intel-CPU verwendet, gibt es einige mögliche Alternativen, die Sie ausprobieren können. Auf vielen modernen Apple-Computern mit Intel-CPU kann das Windows-Betriebssystem ausgeführt werden. Beachten Sie, dass Sie dazu eine legal lizenzierte Kopie des Windows-Betriebssystems benötigen. Es gibt zwei Möglichkeiten, dies zu erreichen:
- Sie können Ihren Mac sowohl für MacOS X als auch für Windows für „Dual Boot“ einrichten. Ein Produkt, das dies ermöglichen kann, ist die Apple BootCamp-Software.
- Sie können Windows OS „nebeneinander“ mit Mac OS X ausführen, indem Sie einen „virtuellen“ Computer wie VirtualBox verwenden
Inhaltsverzeichnis
- 1 Einführung in das MS Access Tutorial
- 1.1 Zielgruppe
- 1.2 Erforderliche Kenntnisse
- 1.3 Ausführen von Microsoft Access auf einem Apple Mac
- 2 Kurzer Überblick über relationale Datenbanken und Datenbankanwendungen
- 3 Ein Geschäftsbeispiel
- 4 Microsoft Access starten
- 4.1 Überprüfung des Startens von Microsoft Access
- 5 Erstellen und Anzeigen von Tabellen
- 5.1 Erstellen einer Tabelle mit der Entwurfsansicht
- 5.2 Übung:Erstellen einer Tabelle
- 5.3 Anzeigen und Hinzufügen von Daten zu einer Tabelle
- 5.4 Übung:Hinzufügen von Daten zu einer Tabelle
- 5.5 Erstellen von Beziehungen zwischen Tabellen
- 5.6 Überprüfung des Erstellens und Anzeigens von Tabellen
- 6 Erstellen und Ausführen von Abfragen
- 6.1 Einzelne Tabellenabfragen
- 6.2 Übung:Einzelne Tabellenabfragen
- 6.3 Mehrere Tabellenabfragen
- 6.4 Übung:Mehrere Tabellenabfragen
- 6.5 Überprüfung des Erstellens und Ausführens von Abfragen
- 7 Erstellen und Ausführen von Dateneingabeformularen
- 7.1 Erstellen eines einzelnen Tabellenformulars mit dem Assistenten
- 7.2 Übung:Ein einzelnes Tabellenformular erstellen
- 7.3 Überprüfung der Erstellung und Ausführung eines Dateneingabeformulars
- 8 Erstellen und Ausführen von Berichten
- 8.1 Erstellen eines Einzeltabellenberichts mit dem Assistenten
- 8.2 Übung:Erstellen eines Einzeltabellenberichts
- 8.3 Überprüfung der Erstellung und Ausführung eines Berichts
- 9 Erstellen und Ausführen eines Master-/Detailformulars (Formular mit einem Unterformular)
- 10 Erstellen und Ausführen eines Switchboards
- 11 Erstellen und Ausführen eines Navigationsformulars
- 11.1 Übung:Ändern eines Navigationsformulars
- 11.2 Festlegen des Navigationsformulars als Standard
- 12 Tutorial-Zusammenfassung und weiterführende Themen
Die nächste Seite gibt eine kurze Einführung in relationale Datenbanken.
2 Kurzer Überblick über relationale Datenbanken und Datenbankanwendungen
Die ersten Datenbanken, die in den 1960er und 1970er Jahren implementiert wurden, basierten entweder auf flachen Datendateien oder den hierarchischen oder vernetzten Datenmodellen. Diese Methoden zum Speichern von Daten waren aufgrund ihrer starren Struktur und der starken Abhängigkeit von Anwendungsprogrammen, um selbst die routinemäßigste Verarbeitung durchzuführen, relativ unflexibel.
In den späten 1970er Jahren das relationale Datenbankmodell die aus der akademischen Forschungsgemeinschaft stammten, wurden in kommerziellen Implementierungen wie IBM DB2 und Oracle verfügbar. Das relationale Datenmodell spezifiziert Daten, die in Beziehungen gespeichert sind die einige Beziehungen haben darunter (daher der Name relational). ).
In relationalen Datenbanken wie Sybase, MySQL, Oracle, IBM DB2, MS SQL Server und MS Access werden Daten in Tabellen gespeichert bestehend aus einer oder mehreren Spalten (Access nennt eine Spalte ein Feld ). Die in jeder Spalte gespeicherten Daten müssen von einem einzigen Datentyp sein wie Zeichen (manchmal auch als „String“ bezeichnet), Zahl oder Datum. Eine Sammlung von Werten aus jeder Spalte einer Tabelle wird als Datensatz bezeichnet oder eine Zeile in der Tabelle.
Verschiedene Tabellen können dieselbe Spalte gemeinsam haben. Diese Funktion wird verwendet, um explizit eine Beziehung zwischen zwei Tabellen anzugeben. Werte, die in Spalte A in einer Tabelle erscheinen, werden mit einer anderen Tabelle geteilt.
Unten sind zwei Beispiele für Tabellen in einer relationalen Datenbank für eine lokale Bank:
Kundentabelle
| Kundennummer | Vorname | Nachname | Adresse | Stadt | Staat | Zip |
|---|---|---|---|---|---|---|
| Nummer | Charakter | Charakter | Charakter | Charakter | Charakter | Charakter |
| 1001 | Joseph | Smith | 123 Lexington | Smithville | KY | 91232 |
| 1002 | Alberta | Jones | 12 Davis Ave. | Smithville | KY | 91232 |
| 1003 | Nathanial | Axt | 443 Grinder Ln. | Broadville | GA | 81992 |
| 1004 | Paulina | Baumeister | 661 Parker Rd. | Streetville | GA | 81990 |
Kontentabelle
| Kundennummer | Kontonummer | Kontotyp | Eröffnungsdatum | Guthaben |
|---|---|---|---|---|
| Nummer | Nummer | Charakter | Datum | Nummer |
| 1001 | 9987 | Überprüfen | 12.10.1989 | 4000,00 |
| 1001 | 9980 | Einsparungen | 12.10.1989 | 2000,00 |
| 1002 | 8811 | Einsparungen | 01.05.1992 | 1000,00 |
| 1003 | 4422 | Überprüfen | 01.12.1994 | 6000,00 |
| 1003 | 4433 | Einsparungen | 01.12.1994 | 9000,00 |
| 1004 | 3322 | Einsparungen | 22.08.1994 | 500,00 |
| 1004 | 1122 | Überprüfen | 13.11.1988 | 800,00 |
Die Customer-Tabelle hat 7 Spalten (CustomerID, First Name, Last Name, Street Address, City, State und Postleitzahl) und 4 Zeilen (oder Datensätze) mit Daten. Die Tabelle Konten hat 5 Spalten (CustomerID, AccountNumber, AccountType, DateOpened und Balance) mit 7 Datenzeilen.
Jede der Spalten entspricht einem von drei grundlegenden Datentypen :Zeichen, Zahl oder Datum. Der Datentyp für eine Spalte gibt den Typ der Datenwerte an, die in dieser Spalte gespeichert werden können.
- Zahl – darf nur Zahlen speichern, eventuell mit Dezimalpunkt. Kann positiv oder negativ sein.
- Zeichen – kann Zahlen, Buchstaben und Satzzeichen speichern. Access nennt diesen Datentyp Text .
- Datum – kann nur Datums- und Uhrzeitdaten speichern.
In manchen Datenbankimplementierungen existieren andere Datentypen wie Bilder (für Bilder oder andere Daten). Die drei oben genannten Datentypen werden jedoch am häufigsten verwendet.
Beachten Sie, dass die beiden Tabellen die Spalte „CustomerID“ gemeinsam nutzen und dass die Werte der Spalte „CustomerID“ in der Tabelle „Customer“ mit den Werten in der Spalte „CustomerID“ in der Tabelle „Accounts“ übereinstimmen. Diese Beziehung ermöglicht es uns anzugeben, dass der Kunde Nathanial Axe hat sowohl ein Giro- als auch ein Sparkonto, die beide am selben Tag eröffnet wurden:1. Dezember 1994.
Eine andere Bezeichnung für eine solche Beziehung ist Master/Detail . In einer Master/Detail-Beziehung können mit einem einzelnen Master-Datensatz (z. B. Kunde 1003, Nathanial Axe) viele Detaildatensätze (die beiden Konten) verknüpft sein.
In einer Master/Detail-Beziehung ist es möglich, dass ein Master-Datensatz ohne Details existiert. Es ist jedoch unmöglich, einen Detaildatensatz ohne einen passenden Master-Datensatz zu haben. Beispielsweise hat ein Kunde möglicherweise überhaupt keine Kontoinformationen. Alle Kontoinformationen müssen jedoch müssen einem einzelnen Kunden zugeordnet werden.
Jede Tabelle muss auch eine spezielle Spalte namens Key haben die verwendet wird, um Zeilen oder Datensätze in der Tabelle eindeutig zu identifizieren. Werte in einer Schlüsselspalte (oder -spalten) dürfen niemals dupliziert werden. In den obigen Tabellen ist die CustomerID der Schlüssel für die Customer-Tabelle, während die AccountNumber der Schlüssel für die Accounts-Tabelle ist.
3 Ein Geschäftsbeispiel
In diesem Abschnitt skizzieren wir ein Geschäftsbeispiel, das als Grundlage für die Beispiele im gesamten Tutorial verwendet wird. In Organisationen wird die Aufgabe, das Geschäft zu analysieren und die geeignete Datenbankstruktur (Tabellen und Spalten) festzulegen, normalerweise von Systemanalysten ausgeführt . Ein Systemanalyst sammelt Informationen darüber, wie das Unternehmen arbeitet, und erstellt ein Modell der Anforderungen an die Datenspeicherung. Ausgehend von diesem Modell erstellt ein Datenbankprogrammierer die Datenbanktabellen und arbeitet dann mit den Anwendungsentwicklern zusammen, um den Rest der Datenbankanwendung zu entwickeln.
Für dieses Tutorial betrachten wir ein einfaches Bankgeschäft. Die Bank hat viele Kunden, die ein oder mehrere Konten eröffnen und führen. Für jeden Kunden speichern wir seinen Namen und seine Adresse. Wir weisen ihnen auch eine eindeutige Kunden-ID zu. Wir weisen diese eindeutige Kennung sowohl aus praktischen Gründen als auch aus Gründen der Genauigkeit zu. Es ist viel einfacher, einen einzelnen Kunden anhand seiner Kunden-ID zu identifizieren, als anhand seines vollständigen Namens und seiner Adresse. Außerdem ist es möglich, dass die Bank zwei Kunden mit demselben Namen hat (z. B. Bill Smith). In solchen Fällen kann immer die eindeutige Kunden-ID zur Unterscheidung verwendet werden.
In ähnlicher Weise wird allen Konten eine eindeutige Kontonummer zugewiesen. Ein Konto kann entweder ein Girokonto oder ein Sparkonto sein. Sparkonten verdienen Zinsen, aber die einzigen zulässigen Transaktionen sind Ein- und Auszahlungen. Girokonten werden nicht verzinst. Wir behalten das Datum der Kontoeröffnung bei. Dies hilft uns, unsere Kunden zu verfolgen und kann für Marketingzwecke nützlich sein. Schließlich pflegen wir den aktuellen Kontostand.
Im vorherigen Abschnitt haben wir die Struktur und einige Beispieldaten für die Kundentabelle und die Kontentabelle angegeben. Diese werden verwendet, um den Datenspeicherungsteil unserer Bankanwendung zu unterstützen.
Datenbankanwendungen
In jeder Datenbankanwendung erfordert jede der Tabellen ein Mittel, um Daten in sie einzulesen und die Daten zu einem späteren Zeitpunkt abzurufen und zu ändern. Die primäre Möglichkeit, Daten in Tabellen einzugeben, ist die Verwendung von Dateneingabeformularen. Die wichtigsten Methoden, um Daten aus Tabellen zurückzugewinnen oder Daten in Tabellen anzuzeigen, sind die Verwendung von Abfragen oder Berichten. In einer vollständigen Datenbankanwendung sind alle Formulare und Berichte in einem Navigationsformular miteinander verknüpft – einer einzelnen Seite, die Links zu allen Teilen der Anwendung enthält. Eine große Datenbankanwendung kann Dutzende von Dateneingabeformularen und Berichten enthalten.
Für dieses Tutorial erstellen wir ein Dateneingabeformular für jede Tabelle, eine Abfrage für jede Tabelle und einen Bericht für jede Tabelle.
In den folgenden Abschnitten stellen wir Ihnen zunächst vor, wie Sie Access starten und eine neue Datenbank erstellen.
4 Microsoft Access starten
Wie bei den meisten Windows-Programmen kann Access durch Navigieren im Startmenü in der linken unteren Ecke des Windows-Desktops ausgeführt werden.
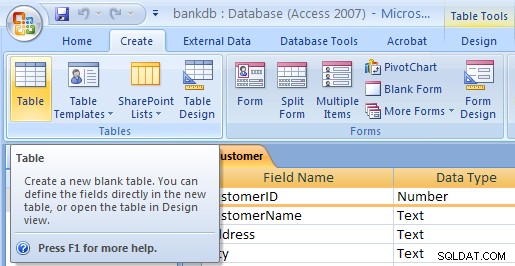
Um Access zu starten, klicken Sie auf die Schaltfläche Start, dann auf das Menü Programme, wechseln Sie dann zum Menü Microsoft Office und klicken Sie schließlich auf das Menüelement Microsoft Access. Das Menü von MS Office Professional ist unten abgebildet.
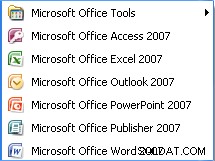
Beachten Sie, dass diese Anordnung der Menüs variieren kann, je nachdem, wie MS Office auf dem von Ihnen verwendeten PC installiert wurde.
Sobald Access ausgeführt wird, wird ein Anfangsbildschirm angezeigt:
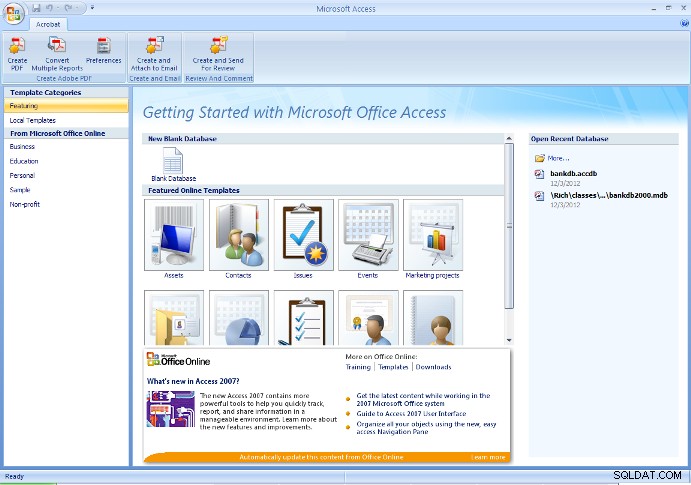
Von diesem Anfangsbildschirm aus kann der Benutzer eine neue Datenbank erstellen (entweder leer oder mit einigen Tabellen, die mit dem Datenbankassistenten erstellt wurden) oder eine vorhandene Datenbank öffnen.
Im Allgemeinen sollte zu Beginn eines Projekts eine neue, leere Datenbank erstellt werden. Verwenden Sie danach die Option Vorhandene Datenbank öffnen Option zum erneuten Öffnen der zuvor erstellten Datenbank.
Warnung – Wenn Sie zuvor eine Datenbank erstellt haben und diese dann unter demselben Namen erneut erstellen, überschreiben Sie alle von Ihnen vorgenommenen Arbeiten.
Wenn Sie diese Schritte zum ersten Mal durchführen, wählen Sie für die Zwecke dieses Lernprogramms die Option zum Erstellen einer neuen, leeren Datenbank, wie in der obigen Abbildung gezeigt.
Klicken Sie in Access 2007 auf die runde Office-Schaltfläche in der oberen linken Ecke und wählen Sie Neu aus dem Dropdown-Menü. Geben Sie Dateiname ein als bankdb.accdb und klicken Sie auf die Schaltfläche Erstellen, um die Datenbank wie in der Abbildung unten zu erstellen.
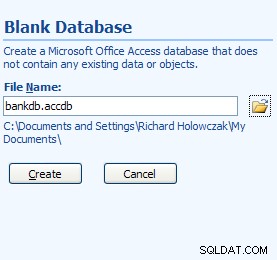
Neuer Datenbankbildschirm für Access 2007
Im obigen Dateinamen ist bankdb der Name, der für diese bestimmte Datenbank gewählt wurde, und .accdb ist die Dateinamenerweiterung für Microsoft DataBase 2007 2010- und 2013-Dateien.
Es ist ratsam, den Namen der Datenbank (im obigen Beispiel bankdb) relativ kurz zu halten und keine Leerzeichen oder andere Satzzeichen im Namen der Datenbank zu verwenden. Außerdem sollte der Name der Datenbank den Inhalt der Datenbank widerspiegeln.
Nachdem die neue Datenbank erstellt wurde, erscheint der folgende Hauptzugangsbildschirm:
Das Bildschirmlayout für MS Access 2007 unterscheidet sich erheblich von früheren Versionen. Die meisten Registerkarten am oberen Rand des Bildschirms wurden neu angeordnet. Außerdem wechselt der standardmäßige Hauptbildschirm nach dem Erstellen einer neuen Datenbank automatisch zur Entwurfsansicht, um eine neue Tabelle zu erstellen.
Die folgenden Registerkarten werden oben auf dem Bildschirm angezeigt:
- Startseite – Steuerelemente zum Ändern von Schriftarten, Durchführen von Abfragen, Kopieren/Einfügen/Ausschneiden von Daten usw.
- Tab erstellen – Steuerelemente zum Erstellen von Tabellen, Formularen, Berichten usw.
- Registerkarte "Externe Daten" – Steuerelemente zum Laden von Daten aus anderen Datenquellen in MS Access.
- Registerkarte "Datenbanktools" – Steuerelemente zur Verwaltung von Datenbanken (Sicherheit, Telefonzentrale usw.)
- Design-Tab – Dies erscheint beim Entwerfen einer neuen Tabelle, eines Formulars, eines Berichts usw.
Beachten Sie, dass die Benutzeroberflächen für Access 2007, 2010 und 2013 alle ähnlich sind, obwohl die von Ihnen verwendete Version möglicherweise leicht von den Bildern in diesem Tutorial abweicht.
4.1 Überprüfung des Startens von Microsoft Access
So starten Sie Microsoft Access:
- Öffnen Sie über die Schaltfläche Start in der Taskleiste:Programme -> MS Office -> Microsoft Access
- Um eine neue Datenbank zu erstellen, wählen Sie Leere Datenbank und geben Sie einen neuen Dateinamen für die Datenbank an. Achten Sie darauf, einen aussagekräftigen Namen für die neue Datenbank zu verwenden. Klicken Sie auf die Schaltfläche OK, um die neue Datenbank zu erstellen.
- Um eine vorhandene Datenbank zu öffnen, wählen Sie Vorhandene Datenbank öffnen , markieren Sie Weitere Dateien… und klicken Sie auf die Schaltfläche OK. Navigieren Sie dann zum Laufwerk, markieren Sie die vorhandene Datenbankdatei auf der Festplatte oder dem USB-Laufwerk und klicken Sie erneut auf die Schaltfläche OK, um die Datenbank zu öffnen.
Um Access zu beenden, öffnen Sie das Menü „Datei“ (oder das Menü „Office“) und wählen Sie das Menüelement „Beenden“.
5 Erstellen und Anzeigen von Tabellen
Tabellen sind die Haupteinheiten der Datenspeicherung in Access. Denken Sie daran, dass eine Tabelle aus einer oder mehreren Spalten besteht (oder Felder ) und dass eine bestimmte Spalte in mehr als einer Tabelle erscheinen kann, um eine Beziehung zwischen den Tabellen anzuzeigen.
Aus dem zuvor besprochenen Geschäftsbeispiel haben wir geschlossen, dass zwei Tabellen ausreichen würden, um die Daten über Kunden zu speichern und ihre Bankkonten . Wir geben nun die Schritt-für-Schritt-Anleitung zum Erstellen dieser beiden Tabellen in Access.
Es gibt verschiedene Möglichkeiten, eine Tabelle in Access zu erstellen. Access bietet Assistenten die den Benutzer durch das Erstellen einer Tabelle führen, indem sie Namen für Tabellen und Spalten vorschlagen. Die andere Hauptmethode zum Erstellen einer Tabelle ist die Verwendung der Entwurfsansicht um die Spalten (Felder) und ihre Datentypen manuell zu definieren.
Während die Verwendung der Assistenten eine schnelle Möglichkeit zum Erstellen von Tabellen ist, hat der Benutzer weniger Kontrolle über die Spaltennamen (Felder) und Datentypen. In diesem Tutorial beschreiben wir die Schritte zum Erstellen einer Tabelle mit der Entwurfsansicht . Die Schüler werden ermutigt, selbst mit dem Assistenten zum Erstellen von Tabellen zu experimentieren.
5.1 Erstellen einer Tabelle mit der Entwurfsansicht
Führen Sie die folgenden Schritte aus, um eine Tabelle in Access mithilfe der Entwurfsansicht zu erstellen:
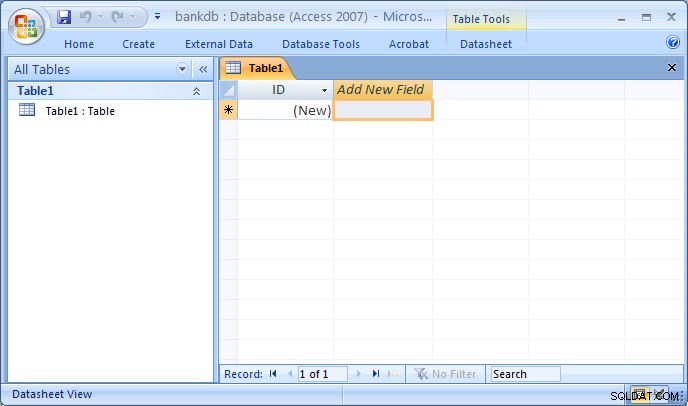
- In Access 2007, 2010 und 2013 sollte die Registerkarte "Neue Tabelle erstellen" bereits hervorgehoben und eine neue Tabelle mit dem Namen "table1" erstellt werden. Ist dies nicht der Fall, klicken Sie auf Erstellen und klicken Sie auf die Tabelle Symbol. Ziehen Sie dann die Ansicht herunter Menü und wählen Sie Entwurfsansicht .

- Die Tabellenentwurfsansicht wird angezeigt. Geben Sie den Feldnamen ein , Datentyp und Beschreibung für jede Spalte/Feld in der Tabelle. Das Feld CustomerID wird unten ausgefüllt:
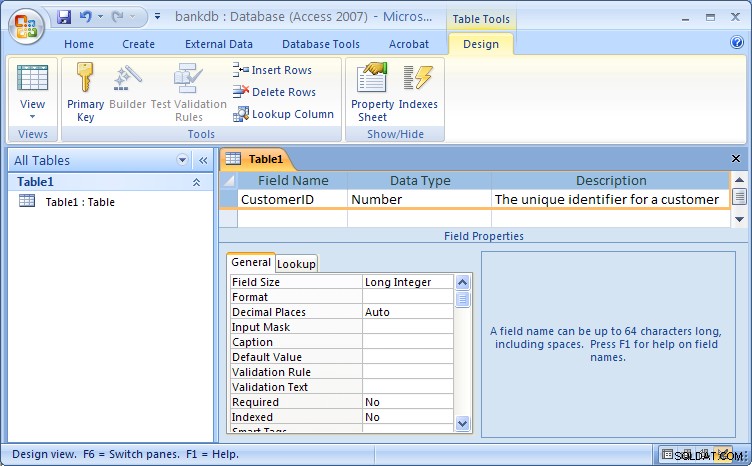
Tabellenentwurfsansicht für Access 2007Beachten Sie, dass der Standardname für die Tabelle Table1 ist . In einem späteren Schritt werden wir dieser Tabelle einen passenden Namen zuweisen.
Füllen Sie die Informationen für die Felder wie folgt aus:
Feldname Datentyp Beschreibung Kundennummer Nummer Die eindeutige Kennung für einen Kunden Vorname Text Der Vorname des Kunden Nachname Text Der Nachname des Kunden Straßenadresse Text Die Anschrift des Kunden Stadt Text Die Stadt des Kunden Staat Text Der Heimatstaat des Kunden Zip Text Die Postleitzahl des Kunden Unten sehen Sie eine Abbildung, die die Entwurfsansicht mit der ausgefüllten neuen Tabellendefinition zeigt:

Der nächste Schritt besteht darin, den Schlüssel für die Tabelle zu definieren und die Tabelle zu speichern.
- Da nun alle Felder für die Tabelle definiert wurden, sollte ein Primärschlüssel definiert werden. Denken Sie daran, dass der Primärschlüssel verwendet wird, um einen Datensatz in der Tabelle (in diesem Fall einen Kunden) eindeutig zu identifizieren. Markieren Sie die Kundennummer Feld und klicken Sie auf die Schaltfläche Primärschlüssel in der Schaltflächenleiste
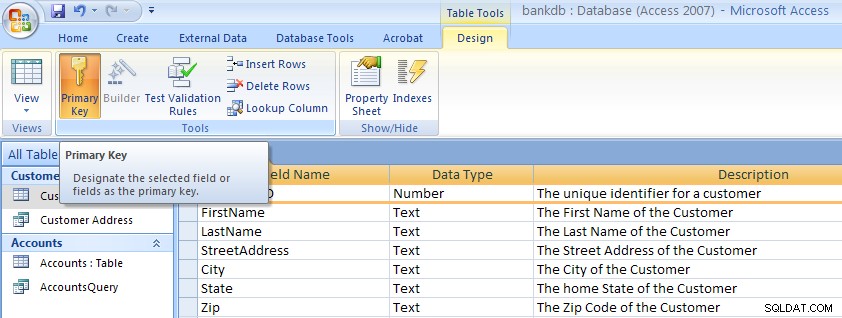 Beachten Sie, dass neben dem Feldnamen auf der linken Seite ein kleiner Schlüssel angezeigt wird.Hinweis:So entfernen Sie einen Primärschlüssel , wiederholen Sie einfach diesen Vorgang, um den Primärschlüssel auszuschalten.
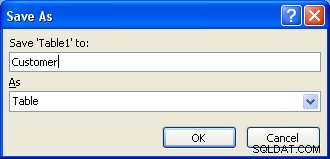
- Als letzten Schritt muss die Tabelle gespeichert werden. Öffnen Sie das Office-Menü und wählen Sie den Menüeintrag Speichern unter. Es erscheint ein Dialogfeld, in dem der Name der neuen Tabelle angegeben werden muss. Beachten Sie, dass Access einen Standardnamen wie Table1 angibt oder Tabelle2 . Überschreiben Sie einfach diesen Standardnamen mit dem Namen der Tabelle. Benennen Sie die Tabelle für dieses Beispiel:Kunde Klicken Sie dann auf die Schaltfläche OK.
An diesem Punkt wurde die neue Kundentabelle erstellt und gespeichert.
Ein Hinweis zur Benennung von Feldern (Spalten) in MS Access
Beim Definieren der Felder (Spalten) für eine Tabelle ist es wichtig, Feldnamen zu verwenden, die ein klares Verständnis des Dateninhalts der Spalte vermitteln. Gibt das Feld CNO beispielsweise eine Kundennummer oder eine Containernummer an?
Feldnamen in Access können bis zu 64 Zeichen lang sein und Leerzeichen enthalten. Jedoch wird dringend davon abgeraten, Leerzeichen in Feldnamen und Tabellennamen zu verwenden . Wenn Sie möchten, dass Feldnamen leichter lesbar sind, sollten Sie einen Unterstrich verwenden, um Wörter zu trennen. Stellen Sie jedoch sicher, dass keine Leerzeichen vor oder nach dem Unterstrich erscheinen.
Die folgende Tabelle fasst einige verschiedene Möglichkeiten zur Vergabe von Feldnamen zusammen:
| Beschreibung | Schlecht | Gut |
|---|---|---|
| Eindeutige Kennung für einen Kunden | CID | Kunden-ID oder Kunden-ID |
| Beschreibung für ein Produkt | PDESC | Produktbeschreibung |
| Private Telefonnummer des Mitarbeiters | Eigene_Telefonnummer_des Mitarbeiters | Telefon zu Hause |
| Bankkontonummer | BA# | Kontonummer |
5.2 Übung:Erstellen einer Tabelle
Erstellen Sie die Konten Tabelle, indem Sie denselben Schritten folgen, die zum Erstellen der Customer-Tabelle verwendet wurden.
- Klicken Sie auf die Registerkarte Erstellen und dann auf die Tabelle Taste.
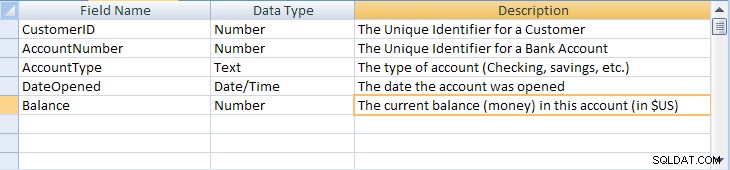
- Öffnen Sie das Menü Ansicht und wählen Sie Design. Die Tabellenentwurfsansicht wird angezeigt. Geben Sie den Feldnamen ein , Datentyp und Beschreibung für jede Spalte/jedes Feld in der Kontentabelle.
Feldname Datentyp Beschreibung Kundennummer Nummer Die eindeutige Kennung für einen Kunden Kontonummer Nummer Die eindeutige Kennung für ein Bankkonto Kontotyp Text Die Art des Kontos (Girokonto, Sparkonto usw.) Eröffnungsdatum Datum Das Datum, an dem das Konto eröffnet wurde Guthaben Nummer Das aktuelle Guthaben (Geld) auf diesem Konto (in US-Dollar) Unten sehen Sie eine Abbildung, die die Entwurfsansicht mit der ausgefüllten neuen Tabellendefinition zeigt:
- Definieren Sie einen Primärschlüssel für die Kontentabelle. Klicken Sie auf die Kontonummer Feld mit der Rechts Maustaste und wählen Sie Primärschlüssel aus dem Popup-Menü.
- Speichern Sie die neue Kontentabelle, indem Sie das Menü Datei öffnen und den Menüeintrag Speichern auswählen. Geben Sie den Namen der Tabelle ein:Konten Klicken Sie dann auf die Schaltfläche OK.
Beachten Sie, dass es eine Reihe zusätzlicher Schritte gibt, die Sie unternehmen können, um Tabellen in MS Access zu verbessern und zu verschönern, darunter das Festlegen von Standardwerten, das Erstellen von Nachschlagewerten und das Maskieren von Dateneingaben, um einem bestimmten Muster zu folgen. Die Details sind für dieses aktuelle Tutorial nicht wichtig, aber wenn Sie interessiert sind, sehen Sie sich die hier verlinkte Seite Advanced MS Access Table Design an.
5.3 Anzeigen und Hinzufügen von Daten zu einer Tabelle
Daten können in Tabellen mithilfe einer einfachen tabellenähnlichen Anzeige hinzugefügt, gelöscht oder geändert werden. Um diese Ansicht der Daten einer einzelnen Tabelle aufzurufen, markieren Sie den Namen der Tabelle und doppelklicken Sie dann auf den Namen der Tabelle.
In dieser Ansicht der Customer-Tabelle (siehe Abbildung unten) werden die Felder (Spalten) am oberen Rand des Fensters und die Zeilen oder Datensätze darunter angezeigt. Diese Ansicht ähnelt dem Design einer Tabellenkalkulation.
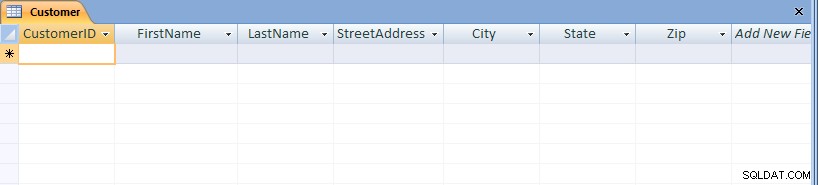
Beachten Sie, dass unten im Fenster die Anzahl der Datensätze angezeigt wird. Da die Tabelle gerade erst erstellt wurde, erscheint in diesem Fall nur ein leerer Datensatz.
Um der Tabelle Daten hinzuzufügen, geben Sie einfach Werte für jedes der Felder (Spalten) ein. Drücken Sie die Tabulatortaste, um zwischen den Feldern innerhalb eines Datensatzes zu wechseln. Verwenden Sie die Aufwärts- und Abwärtspfeiltasten, um zwischen den Datensätzen zu wechseln. Geben Sie die Daten wie folgt ein:
| Kundennummer | Vorname | Nachname | Straßenadresse | Stadt | Staat | Zip |
|---|---|---|---|---|---|---|
| 1001 | Joseph | Smith | 123 Lexington | Smithville | KY | 91232 |
| 1002 | Alberta | Jones | 12 Davis Ave. | Smithville | KY | 91232 |
| 1003 | Nathanial | Axt | 443 Grinder Ln. | Broadville | GA | 81992 |
| 1004 | Paulina | Baumeister | 661 Parker Rd. | Streetville | GA | 81990 |

Um die neuen Daten zu speichern, öffnen Sie das Office-Menü und wählen Sie Speichern.
Um zu anderen Datensätzen in der Tabelle zu navigieren, verwenden Sie die Navigationsleiste am unteren Bildschirmrand:
Um vorhandene Daten zu ändern, navigieren Sie einfach zum gewünschten Datensatz und navigieren Sie mit der Tabulatortaste zum entsprechenden Feld. Verwenden Sie die Pfeiltasten und die Lösch- oder Rücktaste, um die vorhandenen Daten zu ändern.
Um einen Datensatz zu löschen, navigieren Sie zuerst zum gewünschten Datensatz. Öffnen Sie dann das Menü „Bearbeiten“ und wählen Sie den Menüpunkt „Löschen“.
Um die Tabelle zu schließen und zum Hauptbildschirm von Access zurückzukehren, öffnen Sie das Menü Datei und wählen Sie den Menüeintrag Schließen.
5.4 Übung:Hinzufügen von Daten zu einer Tabelle
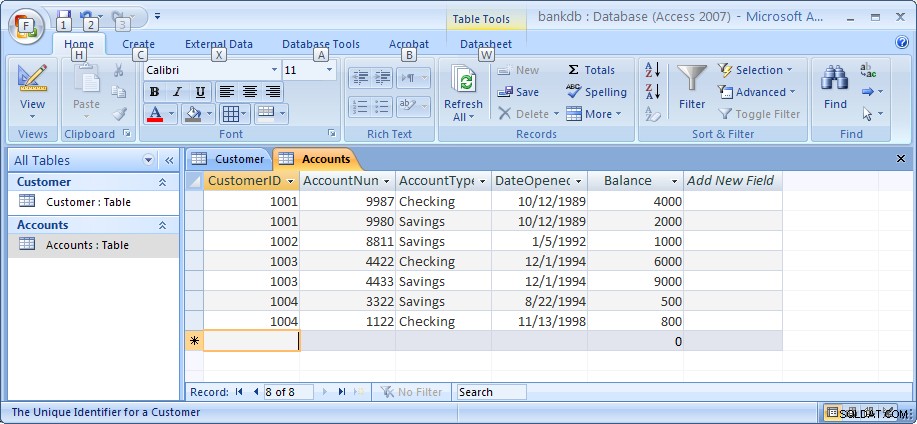
Öffnen Sie für diese Übung die Tabelle Konten und fügen Sie Daten für die sieben in Abschnitt 2 gezeigten Konten hinzu. Stellen Sie sicher, dass Sie die Daten genau wie gezeigt eingeben, einschließlich der Groß- und Kleinschreibung der Daten im Feld AccountType. Geben Sie z. B. Einsparungen statt Einsparungen oder EINSPARUNGEN ein.
Beachten Sie, dass Sie bei der Eingabe der Daten die vollständigen vier Ziffern für das Jahr eingeben. Standardmäßig zeigt Access alle 4 Ziffern des Jahres an (ältere Access-Versionen zeigten nur zwei Ziffern an).
Achten Sie darauf, die Daten zu speichern, wenn Sie fertig sind. Die folgende Abbildung zeigt die Kontentabelle und die Daten, wie sie nach Abschluss dieser Übung erscheinen sollten.
An dieser Stelle des Tutorials haben wir zwei Tabellen erstellt, Kunden und Konten, und jeder Tabelle Daten hinzugefügt. In den folgenden Abschnitten behandeln wir, wie die Daten in den Tabellen abgefragt und gemeldet werden und wie ein benutzerfreundliches Dateneingabeformular mit den Access-Assistenten erstellt wird.
Hinweis:Mein Tutorial zu MS Access Advanced Table Design finden Sie unter diesem Link. Vielleicht möchten Sie das überprüfen, nachdem Sie den Rest dieses Tutorials abgeschlossen haben.
5.5 Erstellen von Beziehungen zwischen Tabellen
Denken Sie daran, dass eines der Hauptmerkmale relationaler Datenbanken die Tatsache ist, dass alle Tabellen miteinander in Beziehung stehen. In der bisherigen Bankdatenbank ist die Customers-Tabelle mit der Accounts-Tabelle verbunden, da das CustomerID-Feld in beiden Tabellen erscheint. Access verfügt über eine Möglichkeit, diese Beziehung mithilfe des Bildschirms „Beziehungen“ explizit zu machen. Access verwendet diese Informationen beim Entwerfen von Berichten, Formularen und Abfragen, für die mehr als eine Tabelle angezeigt werden muss.
Stellen Sie zunächst sicher, dass sowohl die Kontentabelle als auch die Kundentabelle geschlossen sind. Access stoppt die Erstellung von Beziehungen, wenn die Tabelle derzeit geöffnet ist. Um eine Tabelle zu schließen, klicken Sie entweder mit der rechten Maustaste auf den Tabellennamen in der Registerkarte über der Tabelle und wählen Sie das Menüelement „Schließen“ oder klicken Sie auf das kleine X rechts über der Tabelle.

Zeigen Sie als Nächstes den Bildschirm „Beziehungen“ an, indem Sie auf die Registerkarte „Datenbanktools“ und dann auf die Schaltfläche „Beziehungen“ klicken, wie unten gezeigt. 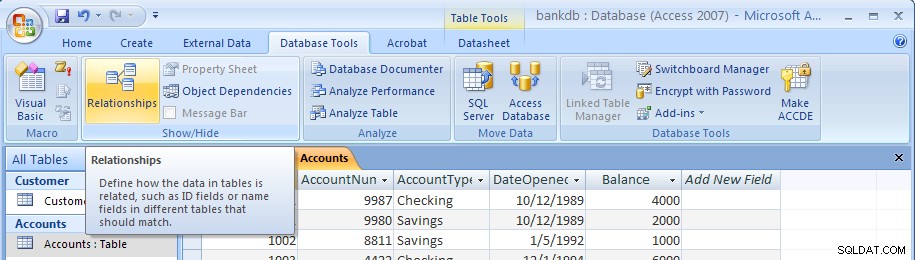
Der leere Bildschirm „Beziehungen“ wird wie folgt angezeigt:
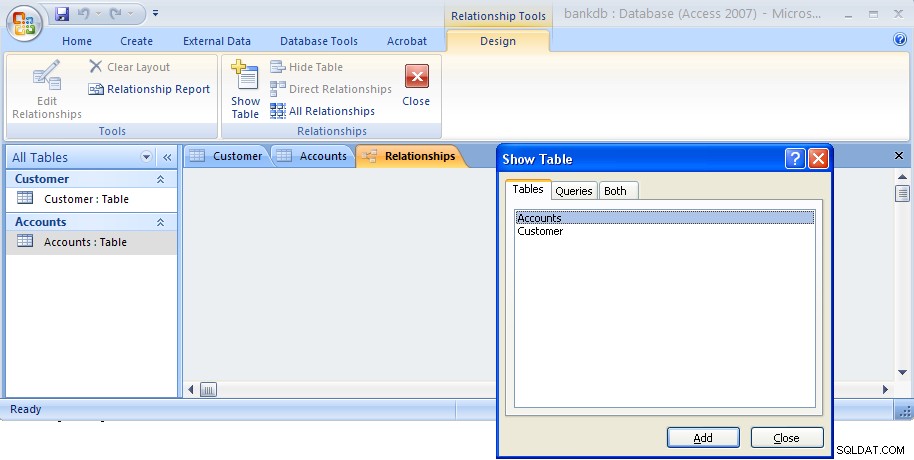
Das Dialogfeld „Tabelle anzeigen“ wird standardmäßig angezeigt. Markieren Sie sowohl die Tabelle „Kunden“ als auch die Tabelle „Konten“, wie unten gezeigt, und klicken Sie dann auf die Schaltfläche „Hinzufügen“.

Klicken Sie dann auf die Schaltfläche Schließen, um dieses Dialogfeld zu schließen. Der Bildschirm „Beziehungen“ wird nun erneut angezeigt, wobei die beiden Tabellen wie folgt angezeigt werden:
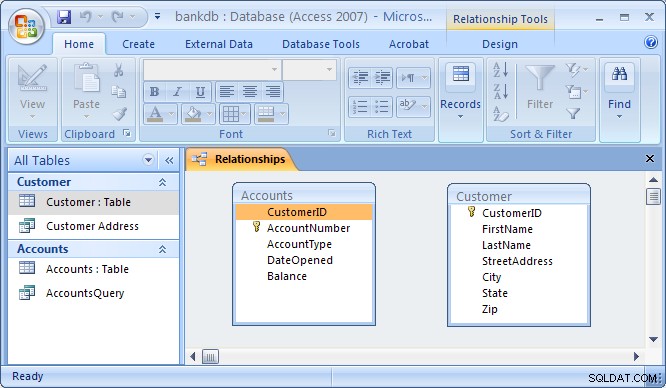
Um die Customers-Tabelle mit der Accounts-Tabelle zu verbinden, um eine Beziehung zu bilden, klicken Sie auf das CustomerID-Feld in der Customers-Tabelle und ziehen Sie es über das CustomerID-Feld in der Accounts-Tabelle. Beim Loslassen der Maustaste erscheint das Dialogfeld „Beziehungen bearbeiten“ wie folgt:
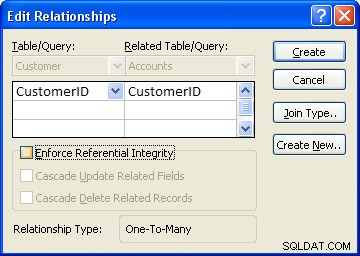
Access wird sein Bestes tun, um den Beziehungstyp zu bestimmen (fast immer wird One-to-Many ausgewählt ). Für dieses Beispiel weiß Access, dass CustomerID ein Schlüssel der Customer-Tabelle ist, also wählt es dieses Feld als „Eins“-Seite aus. Dadurch wird die „Viele“-Seite der Kontentabelle zu Einer Kunde kann Viele haben Konten.
One additional step to be taken is the check off the box labeled “Enforce Referential Integrity”. This option puts constraints into effect such that an Accounts record can not be created without a valid Customer record, and Access will also prevent a user from deleting a Customer record if a related Accounts record exists. At this point, click on the Create button to create the relationship. The Relationships screen should reappear with the new relationship in place as follows:
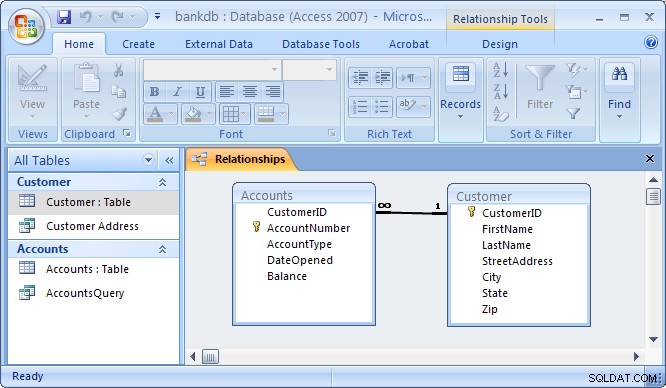
Note the symbols “1” (indicating the “One” side) and the infinity symbol (indicating the “Many” side) on the relationship. Close the relationships screen and select Yes to save the changes to the Relationships layout.
If the relationship does not appear in the above fashion, highlight it and press the delete key to delete it. Then go back to the table design view and make certain that the CustomerID field is designated as the key of the Customers table. Then go back to the Relationships screen and try to recreate the relationship.
5.6 Review of Creating and Viewing Tables
Creating a new table requires the following steps:
- Click on the Tables tab on the Access main screen
- Click on the New button.
- Choose the Design View and click the OK button.
- Fill in the name, data type and description of each of the fields in the table.
- Designate a primary key by clicking on one of the fields with the right mouse button and then choose Primary Key from the pop-up menu.
- Save the table by pulling down the File menu and choosing Save.
- Close the new table by pulling down the File menu and choosing Close.
To change the design of an existing table (e.g., to add, change or delete a field):
- Click on the Tables tab on the Access main screen
- Highlight the name of the table to be modified and click on the Design button.
- Make the necessary changes.
- Save the table by pulling down the File menu and choosing Save.
- Close the table by pulling down the File menu and choosing Close.
To add, delete or change data in an existing table:
- Click on the Tables tab on the Access main screen
- Highlight the name of the table to be modified and click on the Open button.
- Make the necessary changes to the data.
- Save the table data by pulling down the File menu and choosing Save.
- Close the table by pulling down the File menu and choosing Close.
To create or edit relationships between tables:
- Pull down the Tools menu and select the Relationships menu item.
- To display tables, right click and choose Add Tables
- To create new relationships, drag a key field from one table and drop it on the associated field in another table
- To edit an existing relationship, double click on the relationship line.
- To delete an existing relationship, click on the relationship line and press the delete key.
6 Creating and Running Queries
Queries are a fundamental means of accessing and displaying data from tables. Queries can access a single table or multiple tables. Examples of queries for our bank database might include:
- Which Customers live in Georgia ?
- Which Accounts have less than a $500 balance ?
- What is the total amount of money deposited by each Cusomter?
- Which Checking account has the largest balance?
Queries can be used to carry out other tasks such as for creating formatted reports and data entry forms, and for exporting subsets of data to Excel or another software program.
In this section, we show how to use the Access Wizards to create queries for a single table and for multiple tables.
6.1 Single Table Queries
In this section, we demonstrate how to query a single table. Single table queries are useful to gain a view of the data in a table that:
- only displays certain fields (columns) in the output
- sorts the records in a particular order
- performs some statistics on the records such as calculating the sum of data values in a column or counting the number of records, or
- filters the records by showing only those records that match some criteria. For example, show only those bank customers living in GA.
Creating a query can be accomplished by using either the query design view or the Query wizard. In the following example, we will use the query wizard to create a query.
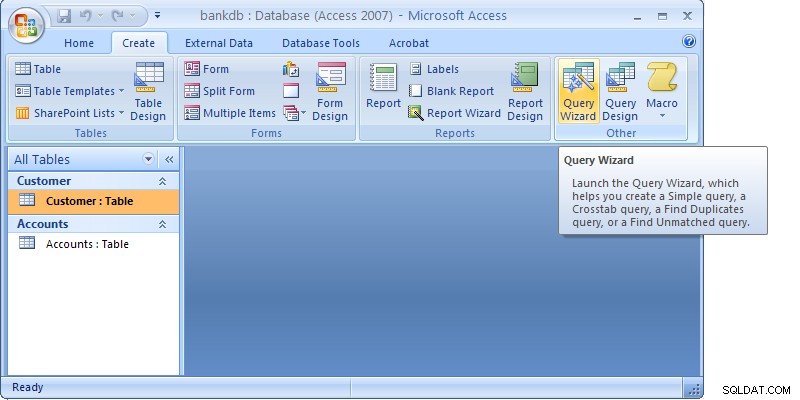
To create a new query, click on the Create tab. Then click on the Query wizard button.
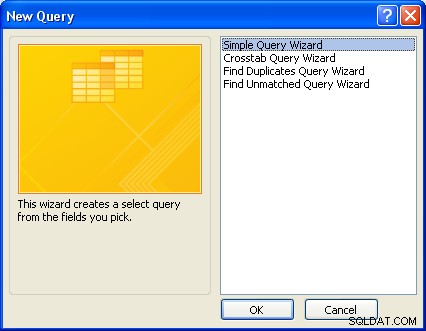
When the Query wizard appears, highlight the Simple Query Wizard selection and click on the OK button.
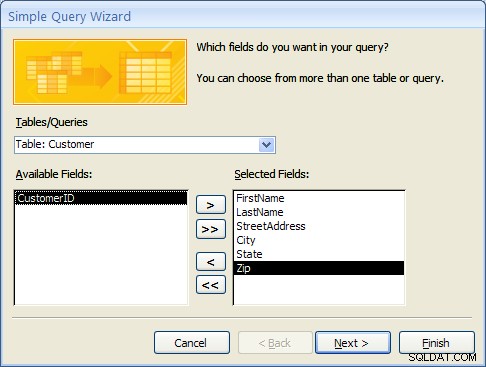
The first step in the Simple Query wizard is to specify the table for the query and which fields (columns) should be displayed in the query output. Three main sections of this step are:
- Tables/Queries – A pick list of tables or queries you have created.
- Available Fields – Those fields from the table that can be displayed.
- Selected Fields – Those fields from the table that will be displayed.
For this example, pull down the Tables/Queries list and choose the Customer table. Notice that the available fields change to list only those fields in the Customer table. This step is shown below:

From the list of Available fields on the left, move the FirstName, LastName, StreetAddress, City and State fields over to the Selected Fields area on the right. Highlight one of the fields and then click on the right arrow button  in the center between the two areas. Repeat this for each of the four fields to be displayed. When done with this step, the wizard should appear as below:
Click on the Next button to move to the next and final step in the Simple Query wizard.
In the final step, give your new query a name. For this example, name the query:Customer Address
At this point, the wizard will create the new query with the option to either:
- Open the query to view information – that is, the wizard will execute the query and show the data.
- Modify the query design – the wizard will switch to the Design View to allow further modification of the query.
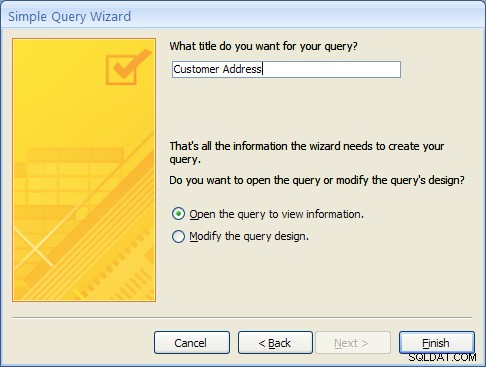
For this example, choose Open the query to view information and click on the Finish button. When this query executes, only the customer’s name, address, city and state fields appear, however, all of the rows appear as shown in the figure below:

Close this query by clicking on the X in the upper right corner of the query results as shown in the figure below:
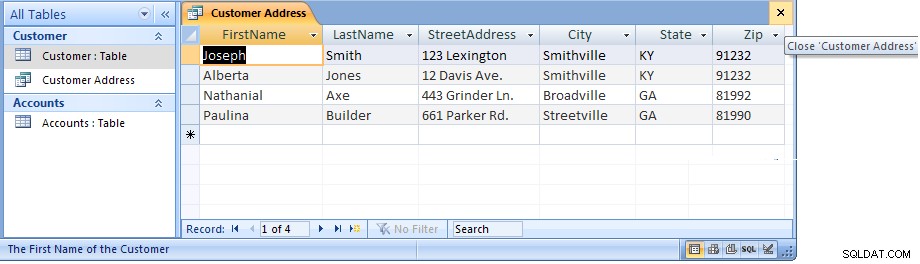
The Access main screen showing the Queries tab should appear. Note the new query Customer Address appears under the Customers table.
6.1 Single Table Queries (Continued)
In the following example, we will modify the Customer Address query to only display customers in a certain state. To accomplish this, we will make use of the Query Design View.
Open up the Customer Address query in the design view by right-clicking on the name of the query. Then select the Design View menu item as shown below.
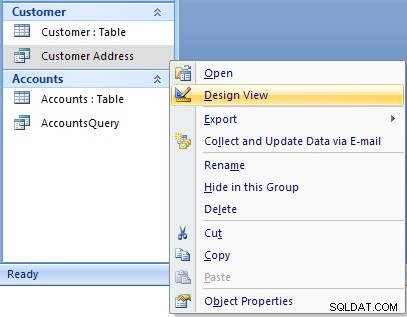
The design view will appear as in the figure below:
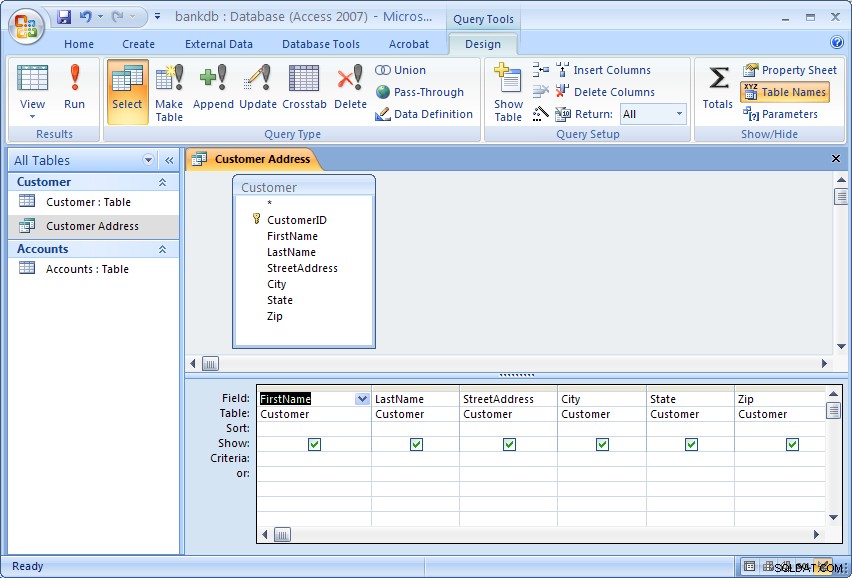
The Query Design view has two major sections. In the top section, the table(s) used for the query are displayed along with the available fields. In the bottom section, those fields that have been selected for use in the query are displayed.
Each field has several options associated with it:
- Field – The name of the field from the table
- Table – The table the field comes from
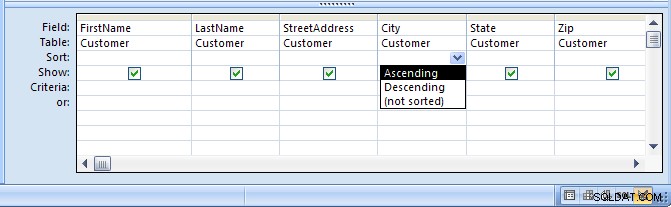
- Sort – The order in which to sort on this field (Ascending, Descending or Not Sorted)
- Show – Whether or not to display this field in the query output
- Criteria – Indicates how to filter the records in the query output.
For this example, we will filter the records to only display those customers living in the State of Georgia (GA). We will also sort the records on the City field.
To sort the records on the City field, click in the Sort area beneath the City Feld. Choose Ascending from the list as shown in the figure below:
To filter the output to only display Customers in Georgia, click in the Criteria area beneath the State field and type the following statement: ='GA'
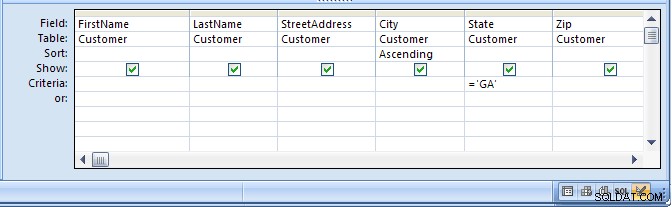
The ='GA' statement tells Access to only show those records where the value of the State field is equal to ‘GA’. Note the use of single quotes to surround the characters.
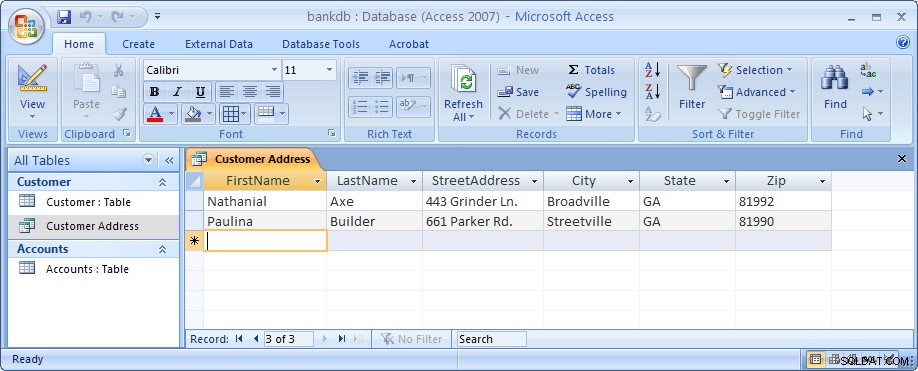
Run the query by clicking on the Run button (with the large red exclamation point). The output is shown in the figure below:
Finally, save and close this query to return to the Access main screen.
6.2 Exercise:Single Table Queries
For this exercise, use the Simple Query wizard to create a query on the Accounts table showing just the AccountNumber, AccountType and Balance fields.
- From the Access main screen, click on the Create tab. Then click on the Query Wizard button.
- Choose the Simple Query wizard option and click on the OK button.
- Under Table/Queries:choose the Accounts table. Then move the AccountNumber, AccountType and Balance fields over to the Selected fields area. Then click the Next button.
- In the next panel, you will be asked to choose between a detail or summary query. Choose detailed query and click on the Next button.
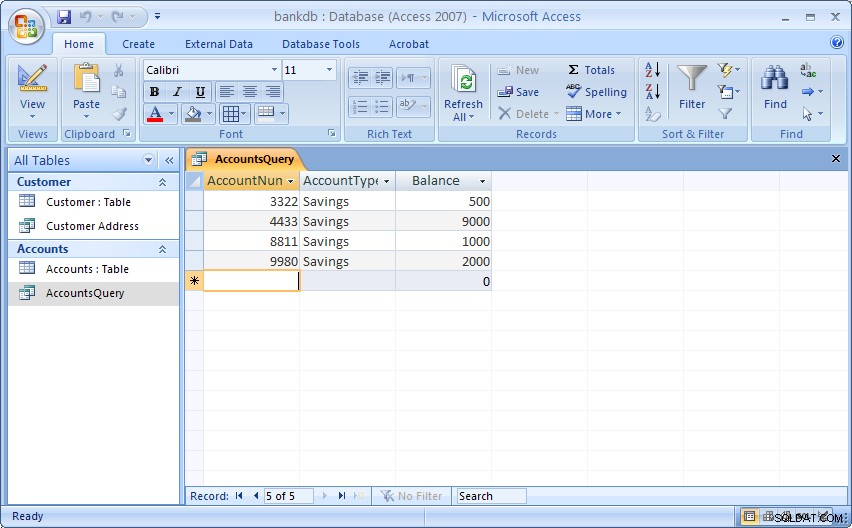
- Name the new Query :AccountsQuery and click on the Finish button.
The output is shown below:

Close this query by pulling down the Office menu and choosing Close.
In the next part of the exercise, we will modify the query to sort the output on the account number and only display the Savings accounts.
- From the Queries tab on the Access main screen, highlight the AccountsQuery and click on the Design button.
- Change the Sort order for the AccountNumber field to Ascending.Add the following statement to the Criteria:are under the AccountType field:=‘Savings’
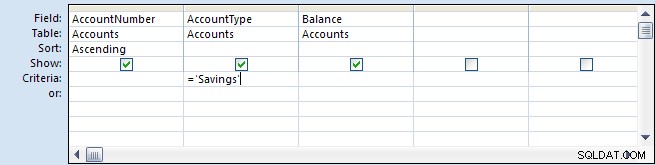
- Run the query by double-clicking on the AccountsQuery name. The output is shown below:
- Finally, save and close the query to return to the Access main screen.
6.3 Multiple Table Queries
Up to this point, queries involving only one table have been demonstrated. It is almost a given that queries will need to involve more than one table. For this example, assume that a manager would like to see a list of all of the customers and the type of account(s) that each one maintains at the bank. Such a query requires data from both the Customers table as well as the Accounts table. In such queries, Access will rely on the Relationships established between tables to guide how the data will be assembled to satisfy the query.
Before proceeding with these next instructions, make certain the One-to-Many relationship between the Customers and Accounts table has been created (see section 5.5 Creating Relationships for a review of this process).
To start the process of creating a multiple table query, highlight the Create tab and click on the Query Wizard button to create a new query. Select the “Simple Query Wizard” option as was done previously.
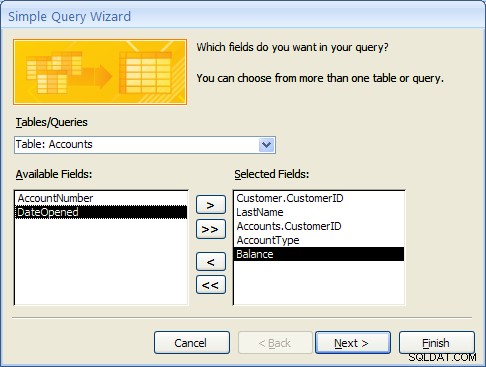
When the simple query wizard appears, select the CustomerID and LastName fields from the Customers table, then switch the Tables/Queries selection to the Accounts table and select the CustomerID, AccountType and Balance fields from the Accounts table. The result from this step is down below:
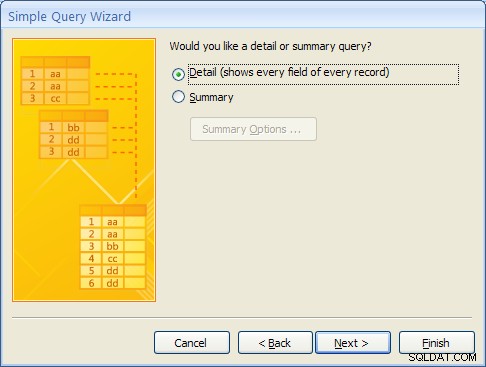
Click the Next button to continue. In the next step of the wizard, an option will appear to provide some level of Summary. For this example, leave the default at “Detail …” as shown below and then click on the Next button.
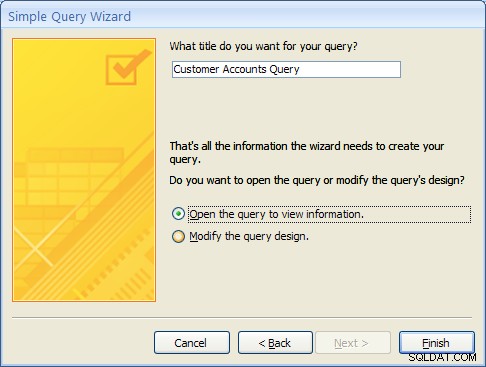
In the final step of the wizard, name the query “Customer Accounts Query” and click on the Finish button. The multiple table query results should appear as follows:
MS Access knows how to line up (or “join”) the accounts table to the Customer table for this query due to the relationship that was created when the tables were first defined.
As with single table queries demonstrated previously, one can change the query definition in design view by adding filters (e.g., show account information for all customers in ‘GA’).
6.4 Exercise:Multiple Table Queries
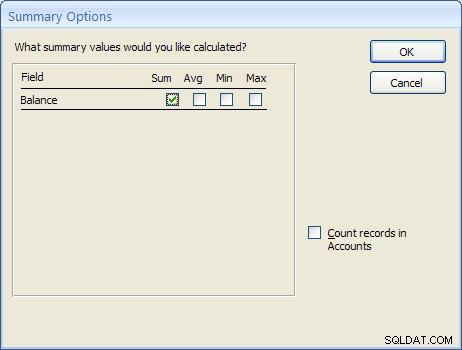
For this exercise, create a new query called “Accounts Summary Query” that joins the Customers table (include the CustomerID and LastName fields) with the Accounts table (include the Balance field only). In the second step of the wizard, click on the Summary choice (instead of Details) and then click on the Summary Options… button. Check off all of the Summary option boxes such as Sum , AVG , Min and Max as shown in the figure below:
The resulting query should appear as follows:
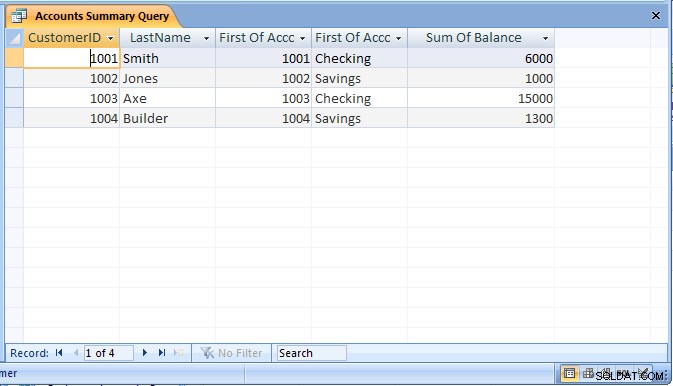
Be sure to save the query as “Accounts Summary Query”.
6.5 Review of Creating and Running Queries
In this section, the basic steps for creating and running queries were introduced. The query wizard can be used to create simple queries that access a single table. It is also possible to then modify the query to sort or filter the records.
Creating a query using the query wizard:
- From the Access main screen, click on the Queries tab. Then click on the New button.
- From the Queries tab on the main Access screen, click on the New button and choose the Simple Query wizard option.
- Under Table/Queries:choose the appropriate table for the query and then indicate which fields in the table will appear in the query output.If querying more than one table, change the Table/Queries:selection to display additional tables and select the necessary fields.
- If the table contains numeric fields, either detailed or summary information may be specified for the query.
- Finally, name the new query and click on the Finish button.
As a final note, Forms and Reports can be created based on existing queries.
7 Creating and Running a Data Entry Form
Data entry forms are the primary means of entering data into tables in the database. In a previous section, we described how to add data to a table using a spreadsheet-like view of the data. Data entry forms offer a more user-friendly interface by adding labels for each field and other helpful information.
Access provides several different ways of creating data entry forms. These include:
- Creating the forms by hand using a Design View
- Creating a default form based on all of the fields available in a table or a query
- Creating a form based on a number of different wizards that walk the user through the forms creation process.
As with queries, a data entry form can be based on a single table or it can work on multiple tables at the same time.
In this section, we cover the basic steps for using a wizard to create a data entry form based on a single table. After this exercise, a multiple-table form is demonstrated.
7.1 Creating a Single Table Form using the Wizard
In this example, we will create a simple data entry form for the Customer table. To begin the process, click on the Create tab on the Access main screen. As with the other components in Access, there are buttons for creating a New form, Open an existing form and Design an existing form. For this example, click on the New button to create a new form.
Several buttons for creating a new form will appear. For this tutorial, choose the Form wizard.
In the first step of the Form wizard, we need to specify the fields from the Customer table that will appear on the form. In this case, we want all of the fields to appear. Move each of the fields from the Available Fields side over to the Selected Fields side as in the following figure. Then click on the Next button.

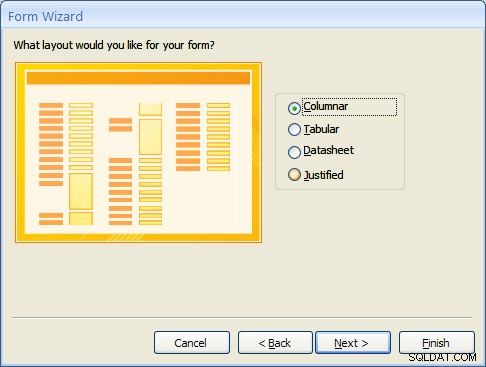
Forms can have several different layouts or arrangement of the labels and fields on the screen.
- Columnar – Places the labels to the left of each field. This is similar to a paper form. This layout is suitable for viewing data one record at a time.
- Tabular – Places the field labels at the top of the screen and the records are displayed below. This is similar to how a spreadsheet would display the data and is suitable for displaying multiple records of data at a time.
- Datasheet – The data appears in the same fashion as when viewing or adding data to a table.
- Justified – Places the labels above each field with the fields spread out on the form. This is suitable for viewing a single record at a time as with the columnar layout.
For this example, choose the columnar layout as shown in the figure below and click on the Next button.
At this point, MS Access 2007 and 2010/2013 versions are a bit different. Access 2007 will show several sample display styles that determine how the form will appear, including elements such as fonts, colors and the background used in the form. Access 2010 and 2013 skips this step in this wizard and provides styles that can be applied to the form in Design mode. For this example, for MS Access 2007, select the Office style as shown below and click on the Next button.

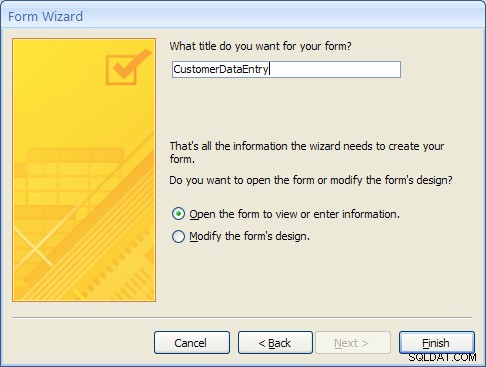
As a final step, give this new form the name:CustomerDataEntry and then click on the Finish button as shown below:
The new form will be created by the wizard and then opened. It should appear as in the figure below:
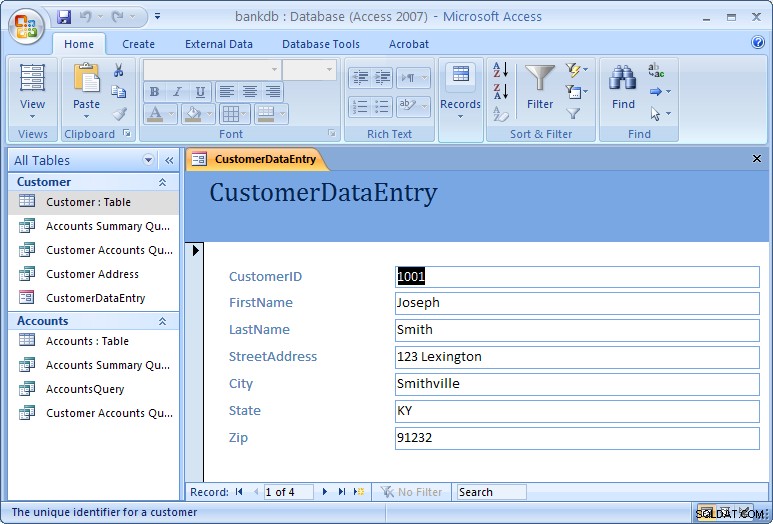
Use the tab key to navigate between fields in the form. To move to the next or previous record, use the record navigation bar at the bottom of the form:
The buttons on the navigation bar perform the following functions:
 | Go to the first record. |
 | Go to the previous record. |
 | Go to the next record. |
 | Go to the last record.  Go past the last record to add a new record. Go past the last record to add a new record. |
To close the form and return to the Access main screen, pull down the File menu and choose Close.
To open the form at any time, highlight the form name under the Forms tab on the Access main screen and click on the Open button.
One quick final note on forms. When the form is created, MS Access looks at how the table is designed and creates the form based on the properties of the table. If you make any changes to the table, you will need to re-create the form again in order to see those table changes reflected in the form. One example where this might happen is is if you change a column in your table from a text box to a combo box, or if you add or remove any columns from your table.
7.2 Exercise:Creating a Single Table Form
For this exercise, we will create a data entry form for the Accounts table created in a previous exercise.
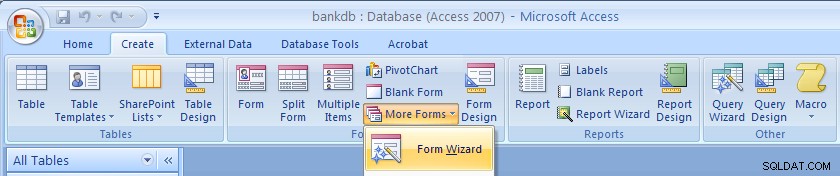
- Click on the Create tab on the Access main screen and then click on the More Forms… button and the “Forms Wizard” to create a new form.
- Select the Accounts table and all of the available fields and click on the Next button.
- Choose a Tabular layout and click on the Next button.
- For Access 2007 choose the Office style and click on the Next button.
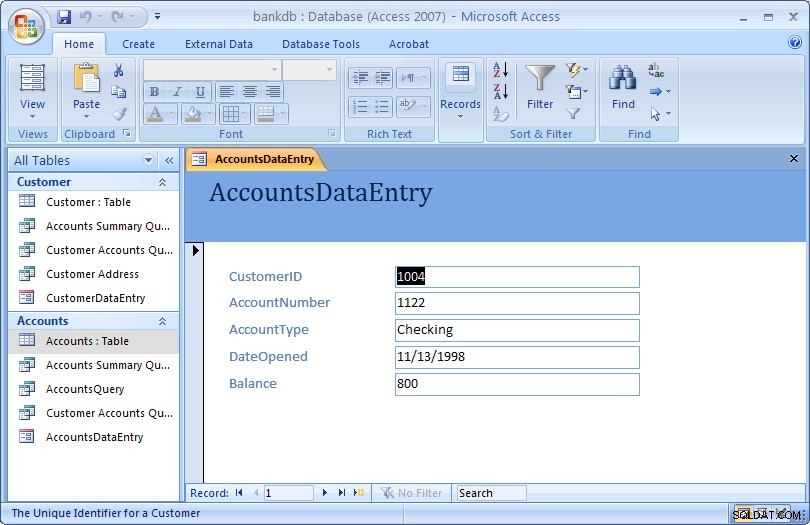
- Name the form:AccountsDataEntry Then click on the Finish button to create, save and view the new form.
The new form is shown in the figure below:
Close the form and return to the Access main screen, by pulling down the File (or Office) menu and choosing Close.
7.3 Review of Creating and Running a Data Entry Form
The basic steps for creating a simple data entry form are:
- Choose a table and a form wizard
- Specify the fields (columns) that will appear in the form
- Specify the layout for the form
- Specify the style (fonts/colors, etc.) for the form
- Save, create and run the new form
In this section we covered the basic steps required to create and run a data entry form. Access provides wizards which are adept at building simple forms with a minimal amount of work. More advanced work on forms would concentrate on using the Design View to change a form’s appearance and to add or remove fields and labels once a form is created. A more advanced tutorial on MS Access Forms Design is linked here.
8 Creating and Running a Report
Reports are similar to queries in that they retrieve data from one or more tables and display the records. Unlike queries, however, reports add formatting to the output including fonts, colors, backgrounds and other features. Reports are often printed out on paper rather than just viewed on the screen. They can also be attached to e-mail and exported and posted as web pages.
As with data entry forms, there are a number of ways to create reports in MS Access:
- A report can be created “by hand” in Design view
- A default report can be created automatically based on all of the firleds for a given table.
- A report can be created using the Create Report wizard.
In this section, we cover how to create simple reports using the Report wizard.
8.1 Creating a Single Table Report using the Wizard
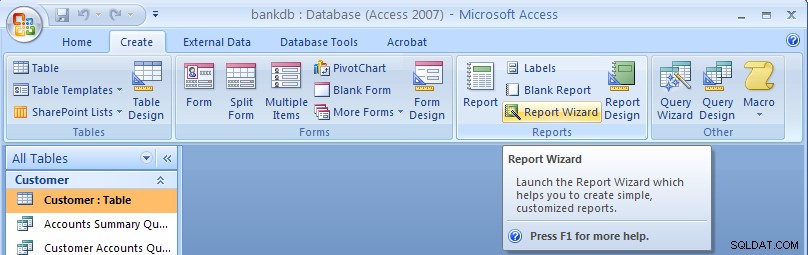
In this example, we will create a simple report for a single table using the Report wizard. As with the Queries and Forms, we begin by selecting the Create tab from the Access main screen.
To create a new report, click on the Report Wizard button.
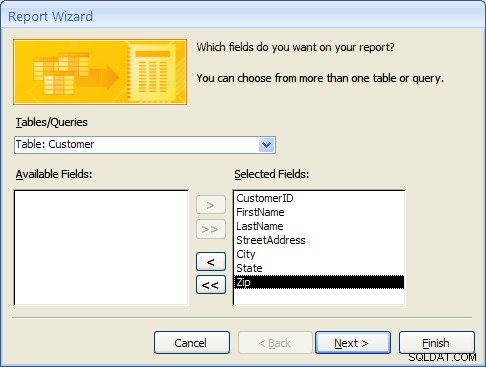
In the next step of the Report wizard, is used to specify the fields from the Customer table that will appear on the report. In this case, we want all of the fields to appear. Move each of the fields from the Available Fields side over to the Selected Fields side as in the following figure. Then click on the Next button.
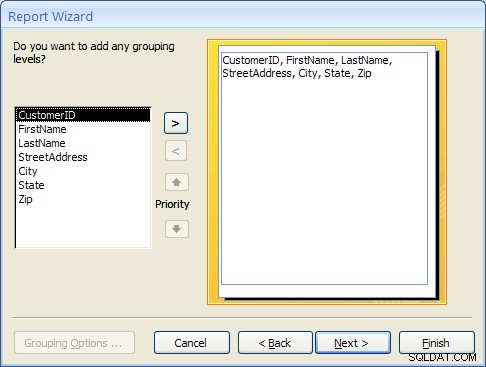
In the next step, we have the opportunity to add Grouping Levels to the report. A grouping level is where several records have the same value for a given field and we only display the value for the first records. In this case, we will not use any grouping levels so simply click on the Next button as shown below.
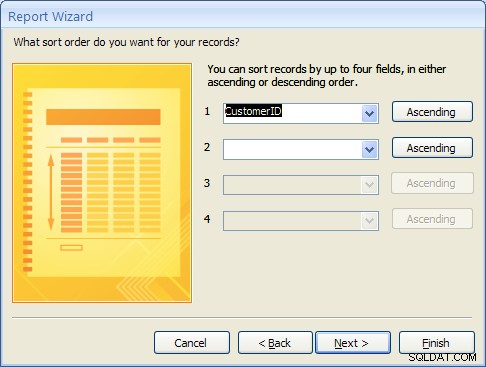
In the next step, the sorting order of the report can be specified. For this example, we will sort the records on the CustomerID field. To achieve this, pull down the list box next to the number 1:and choose the CustomerID field as shown in the figure below. Then click on the Next button.
8.1 Creating a Single Table Report using the Wizard (Continued)
The next step is to specify the layout of the report. The three options are:
- Columnar – Places the labels to the left of each field. This is similar to a paper form.
- Tabular – Places the field labels at the top of the report page and the records are displayed below. This is similar to how a spreadsheet would display the data.
- Justified – Places the labels above each field with the fields spread out on the report page.
Generally, reports use the tabular layout. For this example, choose Tabular layout and set the page Orientation to Landscape so that all of the fields will fit across one page. This is shown in the figure below. Click on the Next button to continue.

In the next step, the style of the report can be selected. For this example, choose the Office style and click on the Next button to continue.

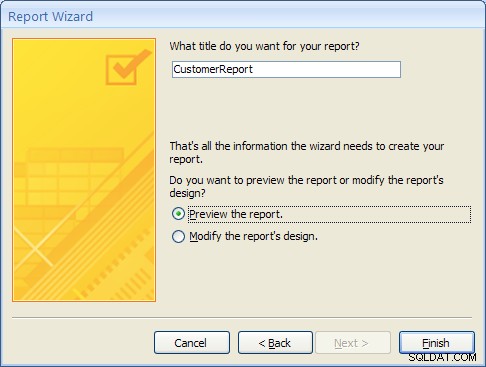
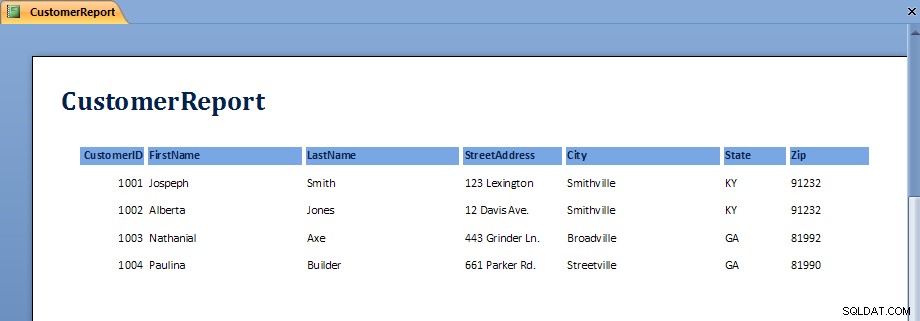
Finally, give a name for the new report:CustomerReport and then click on the Finish button to create, save and display the new report.
The output from the report is shown in the figure below. Note that on some screens, the last field, Zip, may not display without scrolling over to the right.
Once the report is displayed, it can be viewed, printed or transferred into Microsoft Word or Microsoft Excel. The button bar across the top of the screen has the following functions:
 | Print the report |
 | Zoom into a region of the report |
 | Display the report as one, two or multiple pages |
 | Zoom into or out of the report |
 | Transfer the report into MS Word |
 | Close the report |
To close the report and return to the Access main screen, click on the Close button.
8.2 Exercise:Creating a Single Table Report
For this exercise, we will create a report showing all of the Accounts information.
- From the Access main screen, click on the Create tab and Click on the Report wizard.
- Select all of the fields in the Accounts table by moving them all over to the Selected Fields side and then click Next
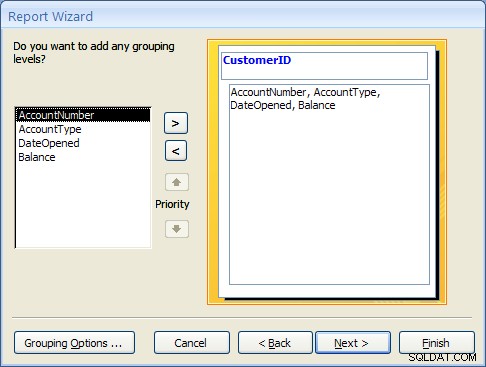
- Group the report by CustomerID by clicking on the CustomerID field and then clicking on the right arrow button. This is shown in the following figure:
Click on the Next button to continue. - Choose to sort the report on the AccountNumber Feld. Note that a new button will appear called Summary Options.
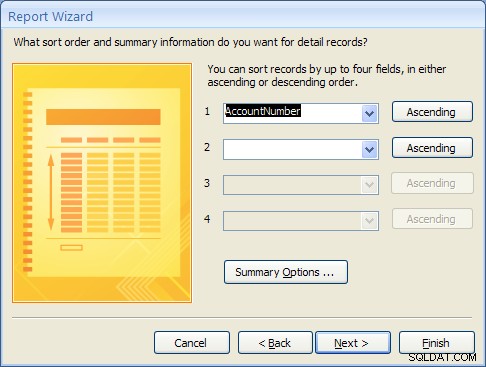
Click on the Summary Options button. Choose the Balance field and select the Sum option. Choose the option to show both Detail and Summary data. Then click on the OK button.

Click on the Next button. - Choose a Block layout and click on the Next button.
- Choose the Corporate style and the click on the Next button.
- Finally, name the report:AccountsReport and click on the Finish button to create, save and run the report.
The output from the AccountsReport is shown below:
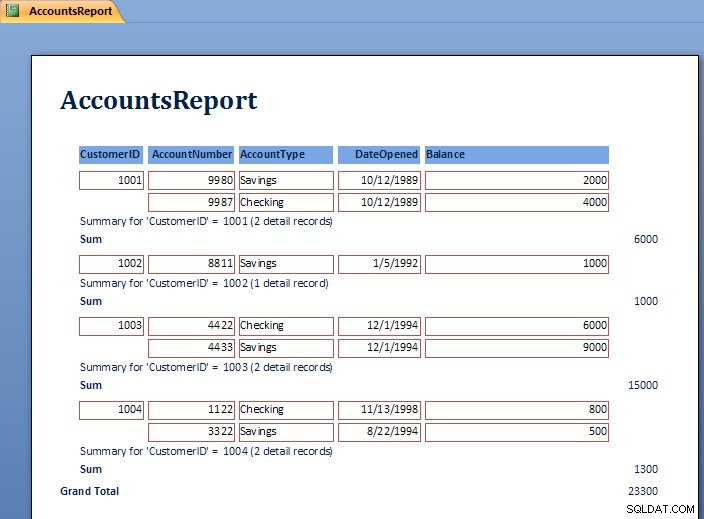
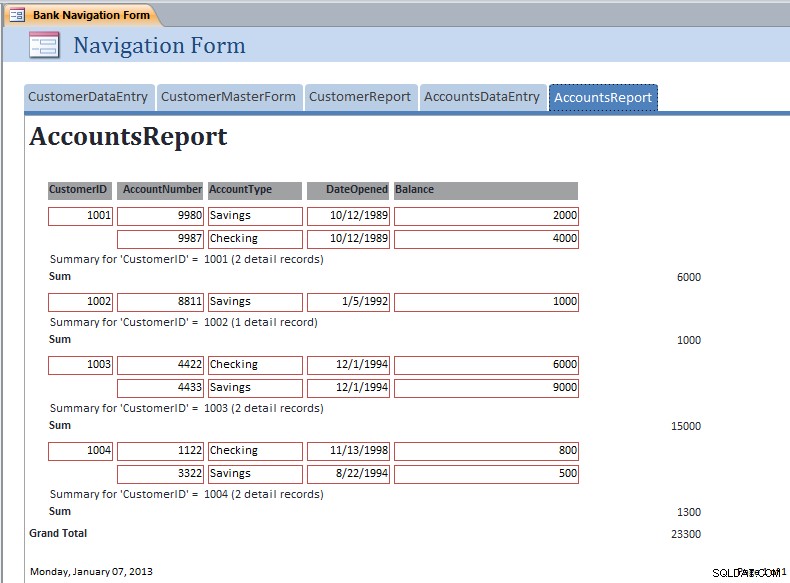
Note the Grouping at the level of the CustomerID and the Sum for each customer’s balances.
To close the report and return to the Access main screen, pull down the File menu and choose Close.
8.3 Review of Creating and Running a Report
As can be seen in the report exercise, there are many ways to create reports to show summation, sorting and layout of the data. Further study of Reports will show how to modify the layout using the Design View. Students are encouraged to work with the Report wizards to create different styles and types of reports.
9 Creating and Running a Master/Detail Form
Master/Detail forms are used to display data from two tables at the same time. MS Access calls the “details” a “subform”. The forms are linked according to the relationship between the tables. Recall that in the example database, the CustomerID is used to link the Customer table (Master) to the Accounts table (Detail). In this section a master / detail form for the Customer and Accounts tables will be created.
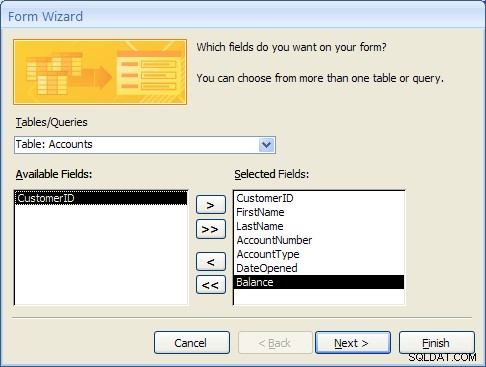
- From the Access main screen, click on the Create tab and Click on the “More Forms…” section and finally the “Forms Wizard”.Select the Customer table first and move the CustomerID, FirstName and LastName fields to the Selected Fields list.Next, select the Accounts table and move the AccountNumber, AccountType, DateOpened and Balance fields to the Selected Fields list as shown below.
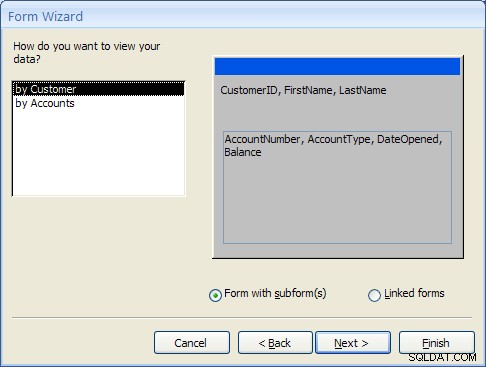
Click the Next… button to move to the next step. - At this point MS Access detects that this form will involve data from two different tables. The first prompt asks how the form should be organized at the top or “Master” level. The “by Customer” selection should be highlighted.The second prompt asks how the forms should be created. For this example, select “Form with Subform(s)” as shown below and click the Next… button to move to the next step.
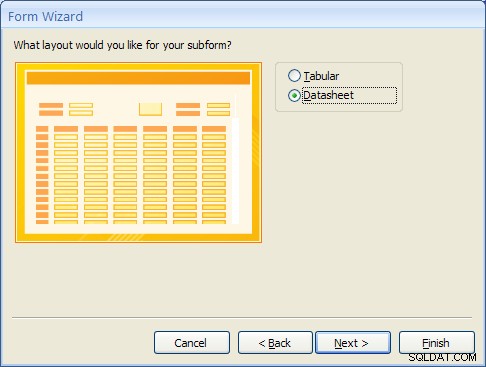
- The Subform is the form that will display the detailed data from the Accounts table. Selecting the “Datasheet” layout will make it easy for the user to view the multiple accounts a Customer may have. Select “Datasheet” and click the Next… button to move to the next step.
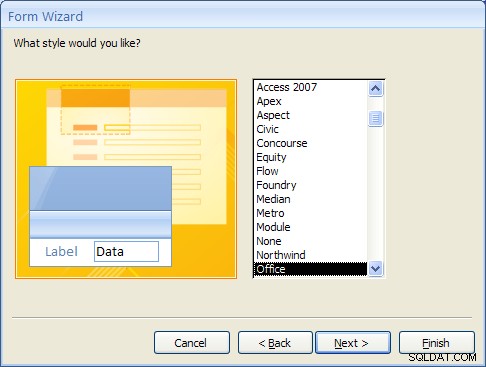
- For Access 2007, select the Office style and click the Next… button to move to the next step. (This step will not appear in MS Access 2010 or 2013).
- Finally, give the main form the name “CustomerMasterForm” and the Subform the name “Accounts Subform”.
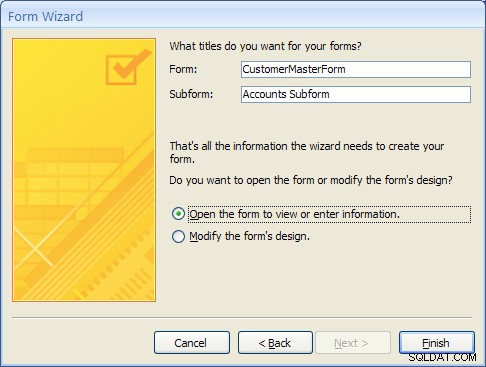
- After clicking on the Finish button the new Master/Detail form will appear as shown below.
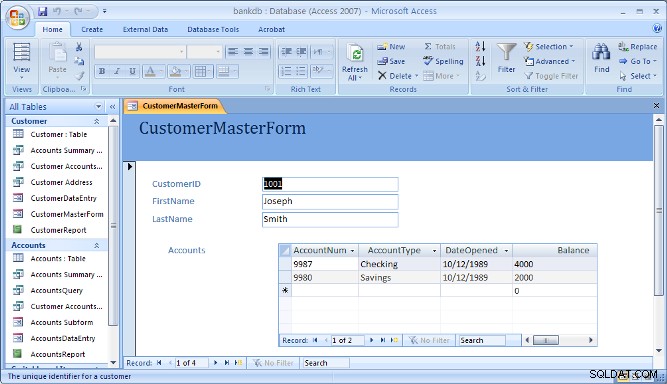
Note that the navigation bar at the bottom of the form is used to navigate through the records in the Master (or top) part of the form.
10 Creating and Running a Switchboard
A Switchboard is a type of form that displays a menu of items that a user can click on to launch data entry forms, reports, queries and other actions in the database. A switchboard is typically created after all of the forms and reports for a database application have been completed. It can be used to guide the user to an appropriate set of forms and reports.
Note that starting with Access 2010, Switchboards are not available by default (you will need to add this to the ribbon bar manually using the Options). Access 2010 and 2013 make use of the Navigation Forms.
In this section, a default switchboard will be created.
- From the Access main screen, click on the Database Tools tab and Click on the Switchboard Manager as shown in the figure below.

If this is the first switchboard made for this database, you will be prompted to create a new one as shown below. Click the Yes button.

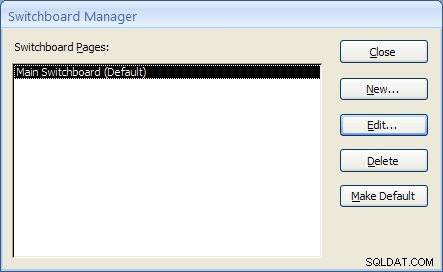
- The Switchboard manager will appear as shown below:
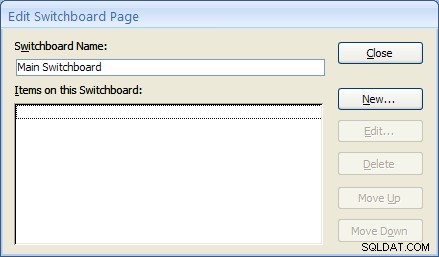
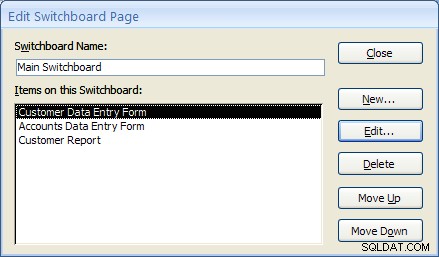
- Click on the Edit menu to edit the “Main Switchboard”. The Edit Switchboard Page will appear as shown below:
- Add a new switchboard item by clicking on the New… button. The Edit Switchboard Item form will appear as shown below. Fill in the fields as follows:
Text: Customer Data Entry Form Command: Select Open Form in Edit Mode from the drop down list. Form: Select the “CustomerDataEntry” form from the drop down list. 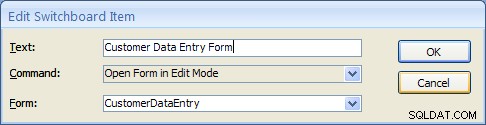
Click on the OK button to save this new Switchboard item.
- Repeat the above step two more times to add Switchboard items for the Accounts DataEntry form and the Customer Report.
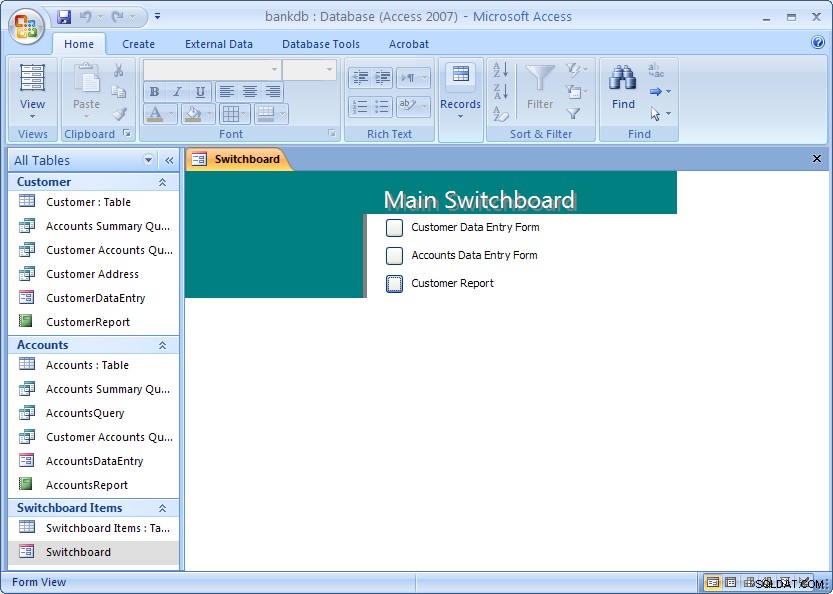
Once completed, click the Close button. Then click the Close button once more to close the Switchboard manager. - From the main MS Access screen look for a new section labeled Switchboard items. To view the switchboard, double-click on name “Switchboard”.
The next section covers creating a Navigation Form which is the recommended navigation screen for MS Access 2007, 2010 and newer versions.
11 Creating and Running a Navigation Form
MS Access 2010 introduced a new form called a Navigation Form. Navigation forms take the place of Switchboards but provide much the same functionality. Namely, they are designed to give the user the ability to run forms and reports without having to hunt through all of the different menus and lists objects. Typically a database application will have one main Navigation form that will appear when the database is opened.
In this section, the basic steps for creating and running a Navigation Form in MS Access 2010 will be demonstrated.
A Navigation Form is another type of form in MS Access 2010 and 2013
- To get started, click on the Create tab on the Access 2010 or 2013 ribbon bar. Under the section for Forms look for the item labeled Navigation Form. Note that this may be located on the button labeled Other Forms.
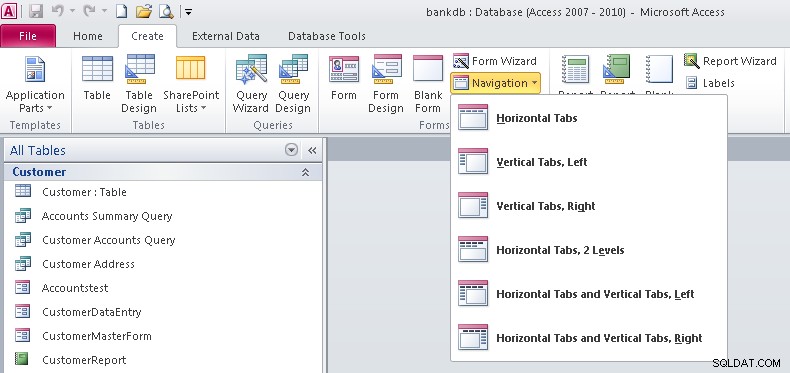
- Note that there are 6 different default styles of Navigation Forms. Each one places the buttons in a different configuration on the screem. Buttons can be aligned across the top, either side or some combination.For this tutorial select the Horizontal Tabs configuration which appears as the first item on the list.
- At this point a new Navigation Form will be created with a row of tabs across the top. The first tab will be labeled [Add New]
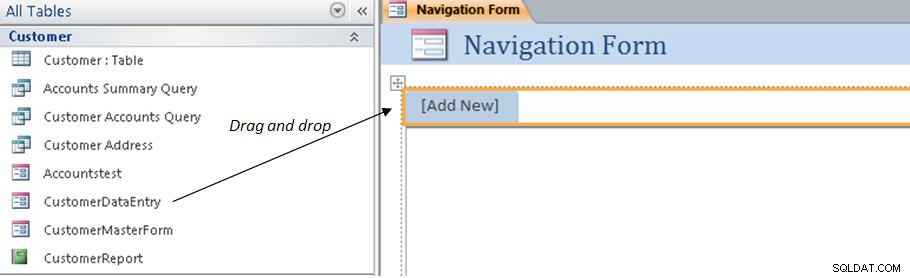
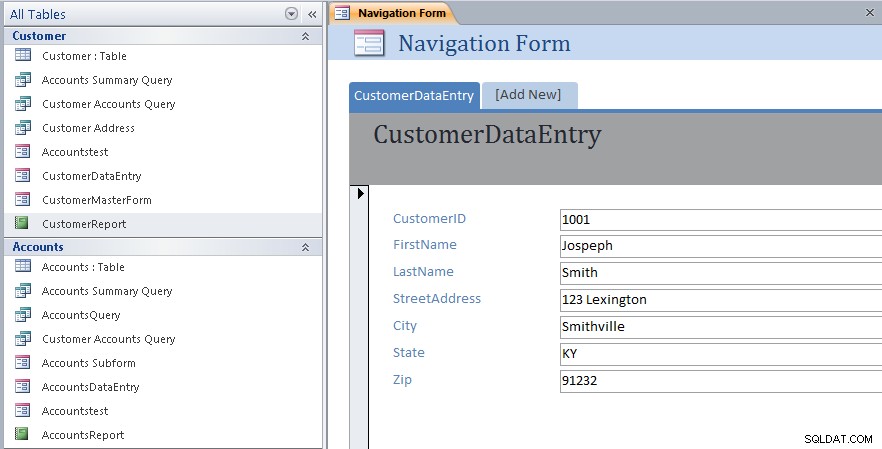
- To add items to the Navigation form, drag the items from the list on the left over to the spot on the Navigation Form labeled [Add New]. This is shown by the arrow in the above figure. For example, drag over the CustomerDataEntry form to the Navigation Form. The result is shown below.
- Next drag and drop the CustomerMasterForm as shown below.

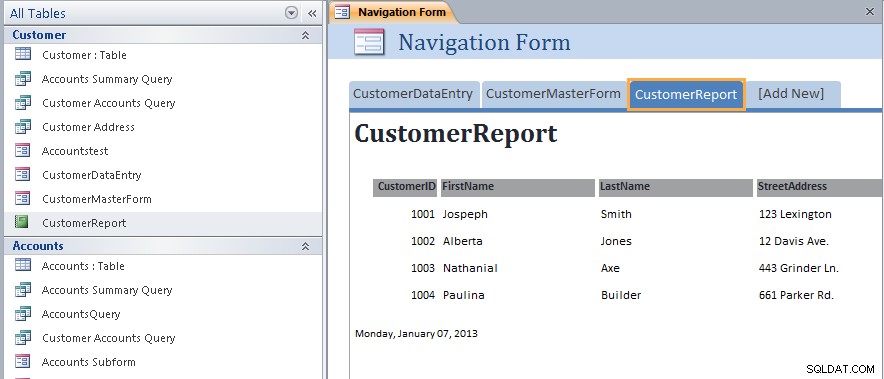
- Next drag and drop the CustomerReport as shown below.
- At this point we have created a new navigation Form and added three items along the top of the page. Save the Navigation Form by right-clicking on the name of the form and choosing Save as shown below:
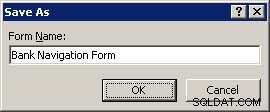
- Name the Navigation Form:Bank Navigation Form and click the OK button.
- Close up the Navigation Form by right-clicking again on the name of the form and choosing Close menu item.At this point the new Navigation Form has been created and saved. The next step will be to view the Navigation Form and navigate the different forms and reports linked to it.
- To view the Navigation Form, look for the Unrelated Objects group on the left side of the screen. Double click on the Bank Navigation Form item as shown below:
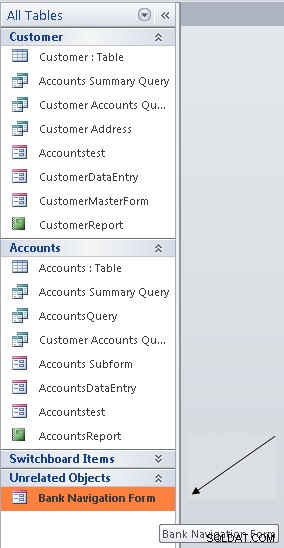
The Navigation Form will appear: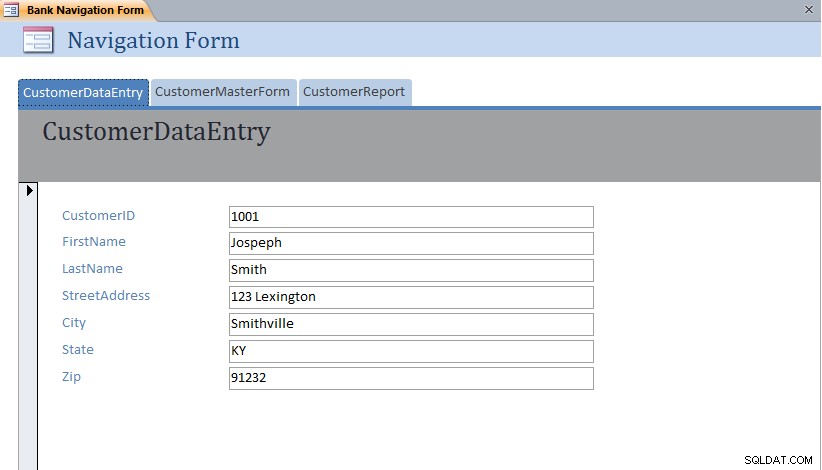 Note that each form or report can be displayed simply by clicking on the different tabs across the top of the Navigation Form.
11.1 Exercise:Modifying a Navigation Form
For this exercise, edit the Bank Navigation Form in Layout View and add the following new items to the Navigation Form:
- AccountsDataEntry
- AccountsReport
The resulting Navigation Form should appear as below with the AccountsReport opened:
11.2 Setting the Navigation Form as the Default
MS Access 2007 and 2010 (as well as earlier versions) have the ability to set a default form that will open up automatically once the MS Access data file is opened. This is especially useful for end users so that they always see the same form when they open up the database.
To set the Default Form, pull down the File menu and select the Options menu item.

The Database Options form will appear. Click on the Current Database item on the left hand side.
Under the Application Options heading, look for the Display Form:prompt and set this to the Bank Navigation Form as shown below:
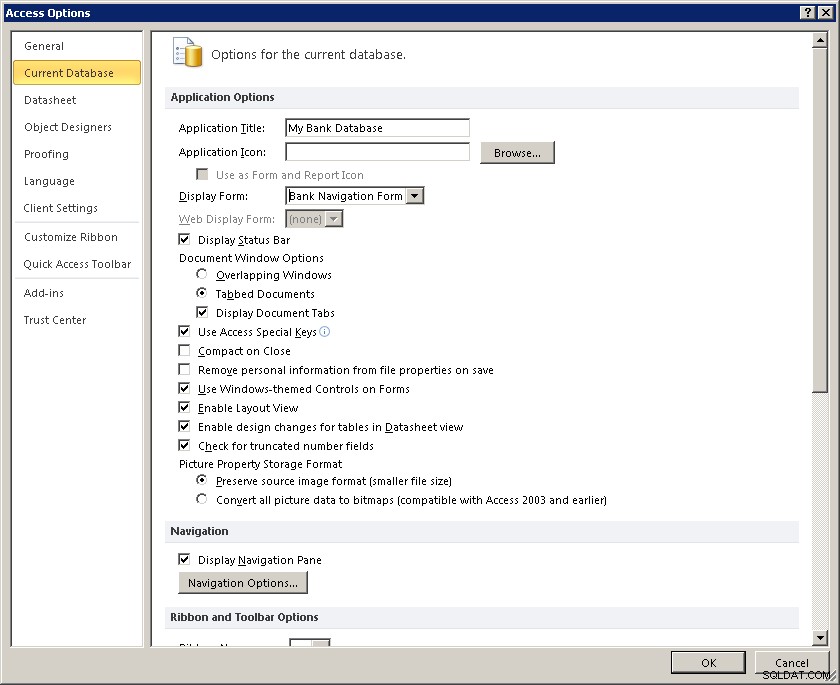
Click on the OK button to close up the Database Options screen.
The next time this database (bankdb.accdb) is opened, the Bank Navigation Form will open up.
12 Tutorial Summary
In this tutorial, we have covered the basics for creating an Access database including tables with data, queries to retrieve data, forms to enter data and reports to display and summarize data.
Students are encouraged to further their Access knowledge and skills by working through more advanced tutorials such as Advanced Access Database Table Design and Advanced Access Forms Design, and by reading the on-line help and Access documentation.
You may also be interested in this tutorial that covers up-sizing the Access database to Microsoft SQL Server using the Microsoft SQL Server Migration Assistant.